
37 rounds · filed under dense · 23 of them
Garments · added 10 Oct 2026
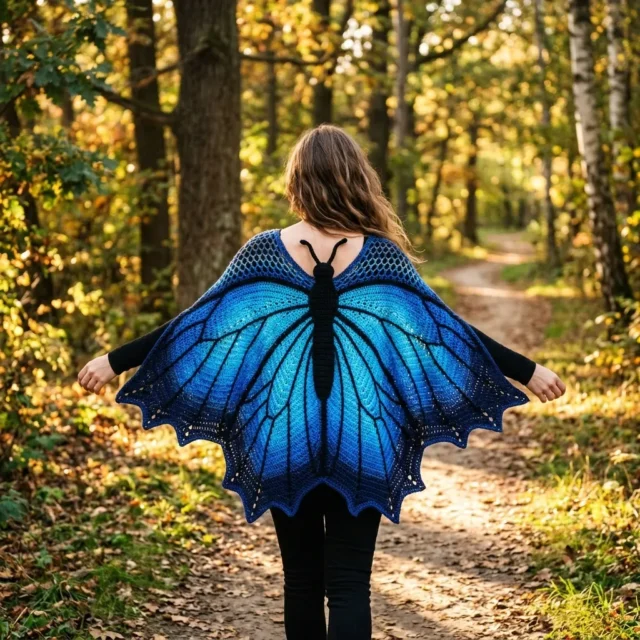
Blue morpho cape with a honeycomb mesh yoke
Honeycomb mesh opens into solid single crochet, shaping a draped blue morpho cape with a stuffed butterfly body at the spine.
- Skill
- Advanced Intermediate
- Time
- 80-110 hours
- Hook
- 3.5 mm
- Yarn
- DK
- Rounds
- 32
About this pattern
Under your hands, the first twelve rows feel airy and open: honeycomb mesh stitch builds ch-2 spaces between single crochets, so the fabric drapes loose and lattice-like across the neck yoke. Once the transition row converts every ch-2 space into two solid stitches, the hook starts packing single crochet tight and dense, and the fabric firms up fast. That shift from lace to solid is where you feel the wings take shape, thicker, with less stretch, ready to hold the short-row shaping ahead.
The whole piece grows outward from the center back neck as one flat panel, so you are always working toward the wing tips rather than joining sections later. It settles over the shoulders as a poncho with a V-neck opening at center front, falling to hip length at the longest lower wing tips, with a full 54-inch tip-to-tip wingspan when your arms are out. Wear it open over a sweater, or let the weight of the solid sc body keep it anchored on its own.
Skill level: Advanced Intermediate. You should be comfortable with flat piece construction, managing multiple color sections, short row shaping, surface slip stitching, and three-dimensional applique construction. If you have completed at least two shaped garments like a shawl with increase shaping and a color change project, you will find this manageable.
Finished measurements: width tip to tip across both wings 54 inches / 137 cm; length at upper wing (shoulder to wing tip) 18 inches / 45.5 cm; length at lower wing (shoulder to longest lower wing tip) 28 inches / 71 cm; center back neck opening width 10 inches / 25.5 cm; front V neckline depth 6 inches / 15 cm. This cape fits most adult sizes XS through XL due to its open drape construction.
The swatch in numbers
- Rounds
- 32
- Parts
- 10
- Level
- Advanced Intermediate
- Time
- 80-110 hours
- Hook
- 3.5 mm
- Yarn
- DK
The yarn and the hook
- Color A (Deep Navy): 600 yards / 550 meters
- Color B (Royal Blue): 500 yards / 457 meters
- Color C (Electric Blue): 450 yards / 411 meters
- Color D (Bright Cyan): 300 yards / 274 meters
- Black yarn for butterfly body, head, and antennae: 150 yards / 137 meters
- DK weight yarn (CYCA 3 Light) required for all colors A through D
Total yardage
- approximately 2000 yards / 1829 meters across all colors plus 150 yards black
- Paintbox Yarns Simply DK (100% acrylic, 276 yards per 100g skein) is budget-friendly and widely available in all required shades. Its smooth construction shows stitch definition clearly, which matters for the visible venation lines. You need approximately 3 skeins Color A, 2 skeins Color B, 2 skeins Color C, 1 to 2 skeins Color D, and 1 skein black.
- Malabrigo Rios (100% superwash merino wool, 210 yards per 100g skein) produces beautiful soft drape with a slight halo that adds depth to the gradient colors. Choose Azul Profundo for Color A, Marine for Color B, Matisse Blue for Color C, and Cerulean for Color D.
- Cascade 220 Superwash (100% superwash wool, 220 yards per 100g skein) offers excellent stitch clarity and easy care. The superwash treatment allows machine washing on cold, which is practical for a wearable this size.
Substitution note
- Any smooth DK weight yarn matching gauge works. Avoid brushed or fluffy yarns since the surface venation lines will not read clearly against a textured background.
- US size E-4 (3.5 mm) crochet hook for main cape body
- US size D-3 (3.25 mm) crochet hook for butterfly body and antennae
- US size E-4 (3.5 mm) for surface slip stitch venation
- Yarn needle for weaving ends and assembly
- Rust-proof pins and blocking mats
- Fiberfill polyfill stuffing, approximately 1 ounce, for butterfly body
- Stitch markers, at least 12
- Measuring tape
- Scissors
Stitches, spelled out
beg beginning; BLO back loop only (insert hook under just the back loop of the stitch, leaving the front loop unworked)Ridge; ch chain (yarn over, pull through loop on hook); ch-sp chain space (the gap created by a chain in the previous row)Lace; cont continue; dec decrease (reducing stitch count); dc double crochet (yarn over, insert hook, pull up loop, yarn over and pull through 2 loops twice)Drape; hdc half double crochet (yarn over, insert hook, pull up loop, yarn over and pull through all 3 loops)Dense; inc increase (2 sc in same stitch, adding one stitch to your count); lp loop; pm place marker; rem remaining; rep repeat; RS right side (the side facing outward when worn); sc single crochet (insert hook, pull up loop, yarn over and pull through both loops)Dense; sc2tog single crochet 2 together (insert hook in first stitch and pull up loop, insert hook in next stitch and pull up loop, yarn over and pull through all 3 loops, creating a decrease)Dense; sk skip; sl st slip stitch (insert hook, pull up loop and through loop on hook in one motion); sm slip marker; sp space; st(s) stitch(es); tch turning chain; WS wrong side; yo yarn over.
Tension and hand-feel
Gauge: With an E-4 (3.5 mm) hook and DK weight yarn, 20 single crochet stitches = 4 inches / 10 cm, and 24 rows of single crochet = 4 inches / 10 cm.
Gauge swatch: Chain 26. Work single crochet (sc) in the 2nd chain from hook and each chain across. (25 sc) Turn each row with chain 1 (does not count as stitch). Work 28 rows. Block swatch before measuring. Measure the center 20 stitches and center 24 rows only.
Mesh section gauge: 10 chain-2 spaces = 4 inches / 10 cm across; 12 rows of mesh = 4 inches / 10 cm in height.
Gauge is critical to achieve the stated finished dimensions and ensure the cape drapes correctly over the shoulders. Please take time to check this before starting.
After completing Row 1 of Section 1 (18 sc across), lay the piece flat and compare it to gauge: 20 sc should measure 4 inches, so this row should feel noticeably narrower than that mark rather than matching it stitch-for-stitch.
If the honeycomb mesh feels tight and the ch-2 spaces resist opening under light stretch, size the hook up; if the lattice feels loose and sags, size it down before moving past Section 1 into the solid rows that follow.
Honeycomb Mesh Stitch (worked flat)
Section 1: Foundation and Center Back Neck Yoke
The cape begins at the center back neck with a foundation chain. The yoke is worked in honeycomb mesh for the first 12 rows.
Using Color D and E-4 hook, chain 52.
Section 2: Transition Row to Solid Fabric
Section 3: Upper Wing Shaping (Rows 14 Through 55)
In this section the cape grows outward to form the upper wing lobes. Four increases are worked every RS row at the inner markers.
Color sequence: Rows 14 to 22: Color D Rows 23 to 34: Change to Color C Rows 35 to 46: Change to Color B Rows 47 to 55: Change to Color A
Section 4: Upper Wing Tip Shaping (Rows 56 Through 70)
The outer edges are now tapered while center increases continue.
Picot-3
Single crochet in indicated stitch, chain 3, slip stitch in the first chain of the chain-3 just made, single crochet in the same stitch as the first single crochet. This creates a small decorative knot used along wing border edges.
Picot-5
Single crochet in indicated stitch, chain 5, slip stitch in the first chain of the chain-5 just made, single crochet in the same stitch as the first single crochet. This creates a larger decorative knot used at the pointed wing tip projections.
Surface Slip Stitch Vein
With the right side facing you, insert hook through the fabric from front to back at the starting point of the vein line. Draw up a loop of black yarn from behind the fabric. Without turning the work, insert hook through the fabric at the next point along the vein line approximately 1 to 2 stitches away. Draw up a new loop and pull it through the loop already on the hook. Continue along the entire vein path. Fasten off and weave ends to the wrong side. The resulting line sits raised on the right side surface.
Wing Tip Spike
At the designated wing tip point, work: sc in tip st, ch 7, sc in 2nd ch from hook, sc in each of next 5 ch, sl st in same tip st. This creates a small free-standing spike forming the jagged lower wing tip characteristic of the Morpho wing shape.
Section 5: Lower Wing Lobe Shaping (Rows 71 Through 110)
The lower wing lobes extend below the upper wings using short rows. Divide the work at the center 2 stitches (held on a stitch marker as the spine).
Color sequence: Rows 71-80: Color A Rows 81-95: Color B
Rows 96-110: Color C Work the left wing half (stitches 1 through 87) first, increasing at the lower outer edge on every RS row as specified in the detailed pattern. Then work the right wing half to match.
The lower wing sections build the characteristic scalloped shape with pointed projections. Follow the row-by-row instructions for each half, changing colors at the specified rows.
How the texture is built
- The transition row (Row 13) converts every ch-2 space built up through Rows 1-12 into two solid stitches, jumping the count to 82 sc in a single pass; that row marks the exact point where open mesh becomes the solid fabric the wing shaping depends on.
- Markers placed in Row 13 (LOW after stitch 2, LIW after stitch 40, RIW before stitch 43, ROW before stitch 81) isolate stitches 41 and 42 as the center spine where the butterfly body attaches, splitting the row's 82 stitches into the two wing halves that Sections 3 and 5 shape independently.
- Because the cape is built as a single flat panel from the center back neck outward rather than in the round, every row turns RS/WS and gains its shape from increases at the row ends; the wingspan comes entirely from how many stitches get added row by row, with no seam or join doing the work.
- The cape is worked flat as a single large piece starting from the center back neck edge, expanding outward in all directions using increases placed at four key shaping points per row. Mark the right side at the beginning with a locking stitch marker, since the right side faces outward when worn.
- Color changes follow a gradient from Color D (Bright Cyan) at the center through Color C, Color B, and finally Color A (Deep Navy) at the outer edges. Carry unused colors loosely along the edge or cut and rejoin.
Putting the pieces together
If you swap the yarn
| Worsted weight superwash wool | Move up to an F-5 (3.75mm) or G-6 (4mm) hook for the main body; the honeycomb mesh opens wider and the solid sc rows run thicker and warmer, so plan on more yardage per color section and a firmer hand when stuffing the butterfly body at D-3. |
|---|---|
| Fingering weight wool or wool-blend | Drop to a C-2 (2.75mm) or D-3 (3.25mm) hook throughout, including the main cape body; both the mesh and solid sections thin out and drape closer to the shoulders, and extra rows are needed to reach the stated 54-inch wingspan since smaller stitches pack tighter per inch. |
| DK weight cotton or cotton-blend | Keep the E-4 (3.5mm) hook for the main body and D-3 for the butterfly, but expect less stretch and a heavier hang in the finished cape; cotton's smoother surface makes the surface slip stitch venation sit crisper, and the stuffed butterfly body holds a firmer, less squishable shape. |
Colorways
- Spine-to-tip gradient Color D (Bright Cyan) at the center back neck yoke in Section 1, shifting to Color C (Electric Blue) through Section 3's upper wing shaping, Color B (Royal Blue) across Section 4's wing tip rows, and Color A (Deep Navy) for Section 5's lower wing lobe, so the fabric reads brightest at the spine and deepens toward both sets of wing tips.
- Deep center, light edge Color A (Deep Navy) at the center back neck yoke and Section 2's transition row, moving into Color B for Section 3, Color C for Section 4, and Color D (Bright Cyan) at the farthest rows of Section 5's lower wing lobe, so the cape darkens at the spine where the butterfly body sits and lightens toward the outer edges that carry the surface slip stitch venation.
Washing and blocking
Hand wash in lukewarm water with a wool wash, the way the blocking step describes, rather than machine washing; superwash treatment makes this safe, but the cape's size and the stuffed butterfly body are easier to control by hand.
After washing, squeeze out water without wringing and lay flat on blocking mats, pinning the wing tips out to the finished 54-inch wingspan so the fabric dries holding its shape instead of relaxing back.
Store the finished cape folded flat rather than hung, since the weight of the solid single crochet wing sections and the stuffed butterfly body will stretch the drape out of shape over time on a hanger.
When it does not look right
- The wing tips curl under instead of lying flat.
- Short-row shaping in Section 4 (Rows 56-70) tightens the fabric at the tip; block the piece wet and pin the tips out flat per the blocking step before adding any surface venation.
- The transition row comes out short of 82 sc.
- A ch-2 space was skipped or double-counted somewhere in Rows 1-12; recount the ch-2 spaces across Row 12 before working Row 13, since each space needs 2 sc worked into it to land on 82.
- The butterfly body looks lumpy or the
- Overstuffing past the roughly 1 ounce of fiberfill the pattern calls for distorts the body's shape and pulls on the center spine stitches (41 and 42); stuff firmly but evenly and check the shape before closing it.
Questions people ask
Can the cape be made smaller or larger than the 54-inch wingspan?
The flat, open-drape construction already fits adult sizes XS through XL at the stated 54-inch wingspan and 18-inch upper wing length, so most sizing comes from how the finished piece drapes rather than altering stitch counts. If a different size is wanted, change the hook and yarn weight together rather than the row counts, since the short-row wing shaping is written for this gauge.
Why does the pattern use two different hook sizes?
The E-4 (3.5mm) hook handles the main cape body and the surface slip stitch venation, while the smaller D-3 (3.25mm) hook works the butterfly body and antennae. The smaller hook keeps those stitches tighter, which holds the fiberfill stuffing in without gaps.
How much yarn does the full cape actually use?
Across the four blue shades you need roughly 2000 yards total, plus 150 yards of black for the butterfly body, head, and antennae. That breaks down to about 600 yards of Color A, 500 of Color B, 450 of Color C, and 300 of Color D.
How long should this project realistically take?
Plan for 80 to 110 hours total for an experienced crocheter: roughly 65 to 80 hours for the cape body itself, 4 to 6 hours for the butterfly body and antennae, 8 to 12 hours for the surface venation, and 4 to 6 hours for finishing and assembly. Working in sections between major shaping changes, as the pattern suggests, makes the hour count feel less daunting.
New patterns, as they are filed
One short email when a batch lands, with the feel of each.