
6 rounds · filed under dense · 4 of them
Tops · added 16 Sep 2026
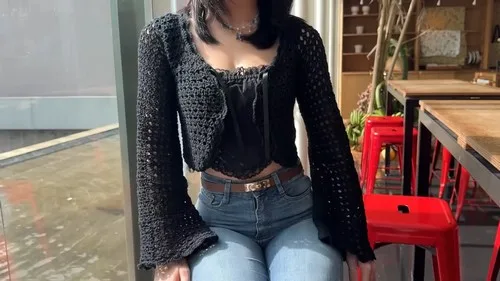
Open Mesh Dakota Vest With Shell Edging and Ribbon Ties
Chain-3 mesh and dc clusters build an airy, stretchy fabric for this shell-edged crochet vest with mirrored front panels.
- Skill
- Intermediate
- Time
- 4-6 hours
- Hook
- 3.5 mm
- Yarn
- Sport
- Rounds
- 3
About this pattern
Under your hand this fabric feels loose and springy, with real give in every direction. The single crochet mesh sets the tone: chain-3 spaces between single crochets leave gaps you can see through, and the double crochet clusters worked into those spaces on Row 2 add height without closing the holes. The result is light on the skin, easy to stretch across the bust for fitting, and quick to see progress in as rows stack.
The two front panels grow from a narrow foundation chain to full bust width through steady increases, then run straight until the armhole calls for decreases on both sides. Past the armhole, no-increase rows continue into straps that stay unfastened, ready to pick up stitches for the sleeve mesh and the joined armhole rounds. Wear it open over a plain top to let the mesh show, or thread ribbons through the edging to pull it in at the neckline.
Measurement A: Bust circumference divided by four, minus 3 inches. Measurement B: Bust circumference divided by four. Measurement C: Length from waist to desired armhole or neckline shaping point. Measurement D: Length from waist to shoulder.
The swatch in numbers
- Rounds
- 3
- Parts
- 5
- Level
- Intermediate
- Time
- 4-6 hours
- Hook
- 3.5 mm
- Yarn
- Sport
The yarn and the hook
- Sport weight yarn (size 2)
- 3.5 mm hook
- 4.5 mm hook
- Scissors
- Tapestry needle
- Stitch markers
- Measuring tape
- Ribbons
Stitches, spelled out
shell shell stitchLace.
Tension and hand-feel
After the foundation chain and the first two cluster rows, lay the piece flat and check its width against Measurement A - it should match before increases begin.
Front Panel A
Foundation Chain: Create a loose foundation chain equal to Measurement A.
Front Panel B
Mirror Front Panel A: Repeat the process for Front Panel A, reversing the increases and decreases to create a mirror image.
Back Panel
Foundation Chain: Create a foundation chain with a number of stitches roughly the length of both front panels combined.
No Increase/Decrease Section: Work Rows 2 and 3 without increases or decreases until you have the same number of cluster rows as the front panels before the armhole shaping.
Decreases: Work two rows of decreases on both sides.
Straps: Continue with no increase/decrease rows until the total cluster rows are equal to the front panels. Do not fasten off.
Edging
Neckline Single Crochet: Using a 3.5 mm hook, single crochet around the entire neckline.
Neckline Double Crochet Mesh: Chain 4, turn, and work double crochet, chain 1, skip 1 pattern into the front loop only.
Body Single Crochet Edging: Single crochet into every stitch and chain around the neckline, down the panels, and along the bottom edge.
Body Shell Edging: Single crochet into the first stitch, then skip 2 stitches, work 5 double crochets into the next stitch, skip 2 stitches, single crochet into the next stitch.
Repeat around the neckline and body.
Neckline Shell Edging: Attach yarn to the unworked front loops from the double crochet mesh step and work a shell edging.
Ribbon: Thread a ribbon through the double crochet mesh.
Sleeves
Top Version Work a foundation row of single crochet mesh around the armhole. Then, work rows with increases, similar to the body of the top, to build the sleeve.
Cardigan Version Work rounds of single crochet mesh and double crochet mesh around the armhole, joining each round. Finish with a single crochet round and a shell edging round.
How the texture is built
- Increases sit at the very end of every Row 2, worked as chain 1, single crochet, chain 1, double crochet all into the same last stitch, so the panel widens along one edge only, row by row, until it reaches Measurement B.
- Front Panel A repeats the same row structure as its mirror but reverses which side takes the increases and decreases, so the two panels curve toward each other rather than away when seamed at the shoulder.
Putting the pieces together
If you swap the yarn
| Fingering weight cotton blend | Produces a denser, crisper mesh with less stretch through the chain-3 spaces; drop to roughly a 3 mm hook to keep the shell edging from splaying open. |
|---|---|
| DK weight acrylic-cotton blend | Closes the mesh spaces down and adds weight and structure, trading the airy drape for a sturdier fabric; move up to roughly a 5 mm hook so the double crochet clusters still sit open. |
| Silk-blend sport weight | Keeps the same hook sizes but adds sheen and a heavier drape that pulls the mesh into a more fluid hang; expect the panels to lengthen slightly under their own weight, so check Measurement B again after a few rows. |
Colorways
- Tonal Sand Work both front panels, the straps, and all armhole rounds in one warm neutral; save a second, slightly darker shade of the same fiber for the shell edging round so the scallops read as a subtle border rather than a contrast.
Washing and blocking
Hand wash the sport weight yarn in cool water, since the open mesh spaces can distort under the agitation of a machine cycle.
Dry flat on a towel rather than hanging, so the cluster rows and straps do not stretch out of shape under wet weight.
Store folded rather than on a hanger, and re-block the shell edging by pinning the scallops out flat if it packs down during storage.
When it does not look right
- The mesh puckers instead of lying flat
- The last stitch of the Row 2 increase - chain 1, single crochet, chain 1, double crochet all in one stitch - is likely pulled too tight; work that group with a looser tension or go up to the 4.5 mm hook.
- The straps sit unevenly or twist when the vest is worn.
- The no-increase/decrease cluster rows on the straps have drifted out of count with the front panels; recount rows against the panel total before leaving stitches unfastened for the armhole.
- The shell edging looks flat and even instead of scalloped.
- The skip-2-stitches spacing before each 5-double-crochet shell has slipped out of rhythm; place a stitch marker every third stitch around the edge before starting the shell round to keep the repeat consistent.
Close-ups
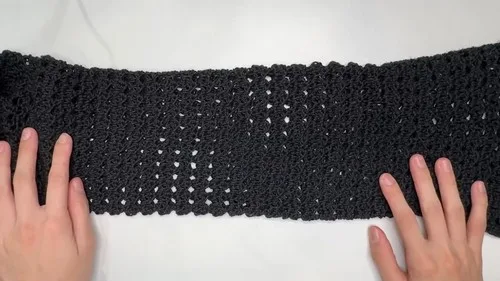
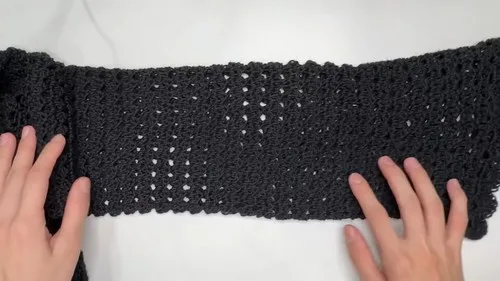
Questions people ask
Can this pattern be made as a cardigan instead of a vest?
Yes - at the armhole stage, work the stitch count as a multiple of 3 for the cardigan version instead of the plain count used for the vest/top. Everything else in the panel and strap construction stays the same.
Are the ribbons structural or just decorative?
They are decorative. Thread them through the mesh or edging spaces near the neckline for a more feminine finish, or leave them off entirely for a plainer, minimalist edge.
Why does the materials list call for two different hook sizes?
The larger 4.5 mm hook keeps the body mesh and clusters open and drapey, while the smaller 3.5 mm hook is used for the edging so the neckline single crochet and shell rounds sit firmer and closer than the open body fabric.
How do you know when to stop increasing on the front panel?
Keep repeating the Row 2 and Row 3 increase pattern until the panel's width reaches Measurement B, which is the bust circumference divided by four. After that point, work the no-increase/decrease rows until the panel has the same number of cluster rows as it will need before the armhole shaping begins.
New patterns, as they are filed
One short email when a batch lands, with the feel of each.