

27 rounds · filed under dense · 27 of them
Bags and accessories · added 14 Oct 2026
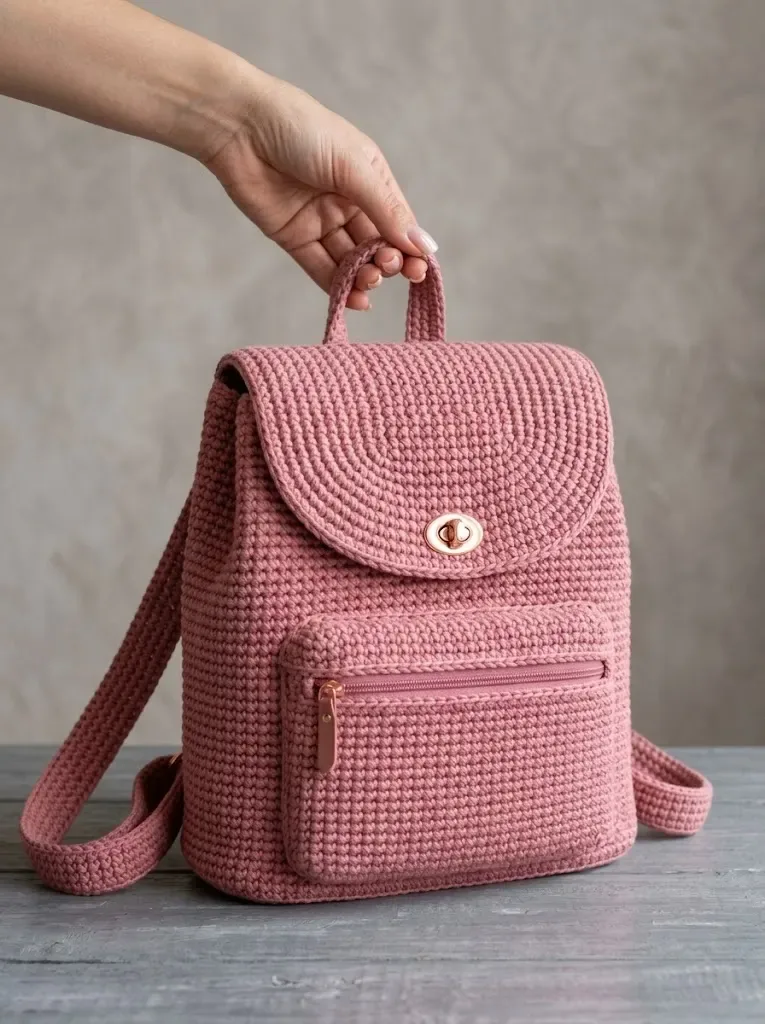
Sturdy dusty rose crochet backpack with a folded flap
Single crochet worked tight builds a dense, sturdy fabric for this dusty rose crochet backpack with a folded flap.
- Skill
- Intermediate
- Time
- 8-10 hours
- Hook
- 4.0 mm
- Yarn
- Worsted
- Rounds
- 27
About this pattern
Under your hand this fabric sits firm and almost board-like, the kind of density that comes from single crochet worked tight with no gaps between stitches on a 4.0mm hook. Tightly spun cotton pulls the stitch definition close together so the surface reads flat and grid-like rather than fuzzy, and the fabric holds a crease where you fold it rather than springing back. It does not stretch when you load it, which is the entire point of a bag.
The body builds as a rectangle worked in a continuous spiral, four corners increased early then left alone for forty-five straight rounds, so the shape rises as a tall box rather than a floppy sack. A flat-worked flap with a curved lower edge folds down over the opening, and D rings at the sides give you somewhere to clip an adjustable strap running 24 to 32 inches.
The swatch in numbers
- Rounds
- 27
- Parts
- 7
- Level
- Intermediate
- Time
- 8-10 hours
- Hook
- 4.0 mm
- Yarn
- Worsted
The yarn and the hook
- Approximately 400 to 450 grams of worsted weight cotton yarn (Weight 4). Cotton or a cotton blend works best for bags because it holds its shape, does not stretch over time, and creates a sturdy fabric. I recommend a tightly spun yarn rather than something soft and drapey. Look for yarn labeled as "dishcloth cotton" or "kitchen cotton" for the best results.
- 4.0mm (US G/6) crochet hook. You may need to adjust based on your tension. The fabric should be dense with no gaps between stitches.
- Two D rings (15mm to 20mm)
- Tapestry needle for weaving ends
- Sewing needle and matching thread
- Fabric for optional lining (approximately half a yard of cotton fabric)
- Scissors
Stitches, spelled out
ch chain; st stitch; sts stitches; sl st slip stitch; sc single crochetDense; inc increase; sc2tog single crochet 2 stitches together (decrease)Dense; puff puff stitchSquish.
Tension and hand-feel
After round 5, lay the base flat and check that the four sides and corners sit square rather than cupped, matching the 18 stitches and 20 rows per 4 inches given in the gauge note.
If your rounds run looser than that count, drop to a smaller hook until the fabric closes up with no visible gaps; if the piece measures tighter and stiffer than expected, go up a hook size before continuing into the straight rounds.
Notions
Tapestry needle for weaving ends Stitch markers Sewing needle and matching thread Fabric for optional lining (approximately half a yard of cotton fabric)
Scissors Pins Gauge and Finished Dimensions
Gauge: 18 stitches and 20 rows equals 4 inches in single crochet worked in rows. Please check your gauge before starting. A bag that is too loose will stretch and sag when you use it.
Finished Dimensions: Approximately 10 inches tall, 9 inches wide, and 4 inches deep. Strap length is adjustable, approximately 24 to 32 inches.
Stitch Abbreviations and Definitions
Ch (Chain): Yarn over, pull through the loop on your hook. This creates the foundation for your work.
Sl st (Slip Stitch): Insert hook into stitch, yarn over, pull through both the stitch and the loop on your hook in one motion. Used for joining and creating a flat seam.
Sc (Single Crochet): Insert hook into stitch, yarn over and pull up a loop (2 loops on hook), yarn over and pull through both loops. This creates the dense, sturdy fabric perfect for bags.
Inc (Increase): Work 2 single crochet stitches into the same stitch. This adds one stitch to your total count.
Sc2tog (Single Crochet 2 Together): Insert hook into first stitch, yarn over and pull up a loop, insert hook into next stitch, yarn over and pull up a loop (3 loops on hook), yarn over and pull through all 3 loops. This decreases one stitch.
Body of the Backpack
Now we work in continuous rounds around the base to build up the sides of the bag. Place a stitch marker at the beginning of each round and move it up as you go.
Part 3
Your body should measure approximately 10 inches tall from the base.
Flap
The flap is worked flat and then shaped into a curved bottom edge. This is what folds over the top of your backpack.
Front Pocket This pocket sits on the front of the bag and holds the zipper.
Part 5
Top Handle
Part 6
Shoulder Straps (Make 2)
Part 7
Optional: Fold each strap in half lengthwise and whip stitch closed for added durability and a rounder appearance.
Strap Connectors (Make 2)
These small tabs attach to the bottom of the bag and hold the D rings.
Part 8
Assembly Instructions
Take your time with assembly. This is where your backpack really comes together, and careful sewing makes all the difference in the finished look.
Attach the Base
If you worked the body in rounds starting from the base, your base is already attached. If you worked them separately, pin the base to the bottom of the body and whip stitch around all edges using a tapestry needle and matching yarn.
Install the Front Pocket with Zipper
Step 1: Position the zipper between the two pocket panels. The zipper teeth should be visible between the panels.
Step 2: Using a sewing needle and matching thread, hand stitch the zipper tape to the wrong side of each panel along the top edges. Take your time and keep your stitches small and even.
Step 3: Once the zipper is installed, sew the pocket panels together along the sides and bottom, wrong sides facing.
Step 4: Position the completed pocket on the front of the backpack body, approximately 1 inch up from the bottom. Pin in place and whip stitch around the sides and bottom, leaving the top open for access.
Attach the Flap
Position the straight edge of the flap along the back top edge of the backpack body. The flap should fold forward over the front. Pin in place and whip stitch securely.
Install the Twist Lock Step 1: Mark the center of the curved flap edge, approximately 1 inch up from the bottom curve.
Step 2: Following the hardware manufacturer’s instructions, install the decorative portion of the twist lock on the flap.
Step 3: Close the flap over the front of the bag and mark where the catch portion should go on the bag body.
Step 4: Install the catch portion, making sure the lock aligns properly.
Attach the Top Handle
Position the handle ends on either side of the flap attachment point on the back of the bag. The handle should form a loop at the top. Sew each end securely to the bag body, reinforcing with several passes of yarn.
Attach the Strap Connectors
Sew the strap connector tabs with D rings to the bottom corners of the back of the bag. These should be positioned at the side seams, about 1 inch up from the base.
Attach the Shoulder Straps
Step 1: Sew the top of each strap to the back top corners of the bag, just below where the flap attaches.
Step 2: Thread the bottom of each strap through the D rings at the bottom of the bag.
Step 3: If using adjustable sliders, thread the strap through the slider hardware before attaching to the D ring. This allows you to adjust the length.
Optional Lining For a more professional finish and to protect the inside of your bag, you can add a fabric lining.
Cut your lining fabric to match the dimensions of the bag body, adding half an inch seam allowance on all sides. Sew the lining into a bag shape. Fold the top edge under and hand stitch the lining inside the crocheted body, just below the top edge.
Helpful Tips for Success
Tension matters. For bags, you want tight, firm stitches. If your fabric feels floppy or you can see through it, go down a hook size.
Block your pieces before assembly. Wet blocking your crocheted panels helps even out stitches and makes sewing much easier.
Use stitch markers generously. Mark your corners, your stitch counts, and any shaping points. You will thank yourself later.
Do not skip the test swatch. I know, I know. Nobody loves making gauge swatches. But spending 15 minutes on a swatch can save you from a bag that is too small or too floppy.
Reinforce stress points. The strap attachments and handle attachment points take a lot of weight and pulling. Sew these areas multiple times with strong stitches.
Customization Ideas This beginner friendly crochet pattern is easily adapted to your personal style.
Consider adding an internal pocket by sewing a small fabric pouch inside the lining. You can change the flap shape to a pointed or squared design. Try adding decorative stitches, such as a row of puff stitches or a simple texture stripe, around the body for visual interest. Swap the twist lock for a magnetic snap closure for a more casual look.
The straps can also be crocheted wider for more comfort, or you can use leather straps from a craft store for a mixed media look.
I truly hope you love making this dusty rose crochet backpack as much as I loved designing it. It is one of those projects that feels so satisfying to finish, and you will reach for it constantly once it is done.
If you make this crochet backpack pattern, I would absolutely love to see it! Share your finished project with me on Instagram or in our Facebook group. Seeing your creations genuinely makes my day.
Do not forget to save this pattern to your Pinterest boards so you can find it easily when you are ready to start. And if you make this backpack, please leave a comment below! I love hearing which colors you chose, how the construction went for you, and any tips you discovered along the way. Happy crocheting, friend!
How the texture is built
- Corner increases are frontloaded into rounds 1 and 2 only, with 3 sc worked in each corner on round 1 and a single extra sc in each corner on round 2 to reach 88 stitches, after which rounds 3 through 50 run straight with no further shaping.
- The body is worked as a continuous spiral rather than joined rounds, which keeps the corner lines running unbroken up all four sides; only at round 50 does the pattern call for a slip stitch join, marking the point where the straight sides stop and the opening is finished.
- The flap is worked flat in rows instead of in the round because its curved bottom edge depends on paired sc2tog decreases at both ends of the row, starting at row 21, which a continuous spiral cannot produce the same way.
If you swap the yarn
| Acrylic, worsted weight 4 | Gives a softer, more drapey fabric that will not hold the box shape as firmly as cotton; expect the sides to lean rather than stand square unless you go down a hook size to tighten the stitches. |
|---|---|
| Cotton-acrylic blend, DK weight 3 | Produces a thinner, lighter fabric, so you will need more rounds than the 50 given here to reach the same 10-inch height; drop to roughly a 3.5mm hook to keep the stitches from gapping. |
| Linen blend, worsted weight 4 | Holds its shape even more rigidly than cotton with almost no give, making a stiffer, rougher-handed fabric; the optional fabric lining becomes more worthwhile here since it softens what touches your back. |
Colorways
- Clay and Cream Work the body (Part 3, rounds 1-50) in dusty rose, keep the flap worked in unbleached cream, and return to dusty rose for the straps and D-ring tabs (Parts 5-8) so the flap reads as a contrast panel against the box.
- Rose and Charcoal Keep the body in dusty rose throughout, work the flap in charcoal from row 1 to the curved edge, and carry charcoal into the strap and D-ring tab rounds so the hardware end of the bag matches the flap rather than the body.
Washing and blocking
Hand wash the finished bag in cool water, since tightly spun cotton can take a gentle machine cycle but holds up better long-term with less agitation.
Lay the piece flat to dry and press the base into its square shape while still damp, because dense single crochet in cotton resists stretching but will dry into whatever shape it is left in.
Store the bag stuffed with tissue or a folded towel rather than flattened, so the straight-sided body (rounds 6-50) does not crease along the corners where the increases sit.
When it does not look right
- The base cups upward instead of lying flat.
- The corner increases from rounds 1 and 2 were likely missed or overworked, throwing off the 88-stitch count; recount the corners against the pattern and rip back to round 2 if the total does not match.
- The flap edge puckers instead of curving smoothly.
- The paired sc2tog decreases from row 21 onward were worked unevenly at one end; check the stitch count after each decrease row against the pattern's totals before moving on.
Close-ups

Questions people ask
When does the base stop increasing and start going straight?
Corner increases only happen in rounds 1 and 2, bringing the stitch count to 88. From round 3 through round 5 the pattern confirms that count, then rounds 6 through 50 are worked straight with no further shaping.
Can the strap be made shorter or longer than given?
Yes, the finished dimensions list the strap as adjustable between roughly 24 and 32 inches, so you can work fewer or more rounds in the strap sections to fit how you want the bag to sit.
Is the fabric lining necessary?
No, the single crochet body is dense enough on its own to hold its shape and contents. The optional half yard of cotton fabric is there mainly to hide the inside seams and give a cleaner interior finish, not to add structure.
What if a 4.0mm hook does not give a dense enough fabric?
Hook size is meant to be adjusted to your tension rather than followed rigidly here. If you can see light through the stitches, go down a size until the fabric closes up with no gaps between stitches.
New patterns, as they are filed
One short email when a batch lands, with the feel of each.