
16 rounds · filed under dense · 15 of them
Slippers · added 24 Oct 2026
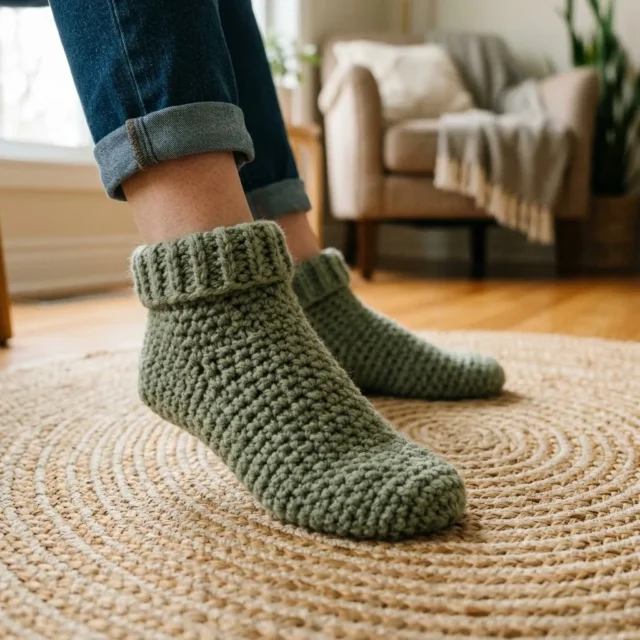
Sage green crochet slipper socks with a ribbed cuff
Alternating sc and hdc rounds build a dense, ridged fabric for slipper socks topped with a stretchy ribbed cuff.
- Skill
- Intermediate
- Time
- 4-6 hours
- Yarn
- Worsted
- Rounds
- 16
About this pattern
Under your hand this slipper feels thick and corded, not soft and floppy. That comes from alternating rounds of single crochet and half double crochet worked around all 92 stitches — the sc rounds pack tight and the hdc rounds sit taller, and stacked together they build a ridged, dense wall of fabric with almost no stretch sideways. It is the kind of fabric that holds its shape underfoot rather than collapsing, which is exactly what you want between your sole and a cold floor.
The body of the slipper starts flat as a sole, then turns a corner at the heel and heel edge to close into a tube, cupping around your foot as the rounds climb. On top of that sits a separate ribbed strip, worked flat and long, then folded and seamed into its own smaller tube and whip-stitched to the body. Once both pieces are joined, you have a slipper that slides on at the ribbed opening and stays put, snug at the ankle, firm at the sole.
The swatch in numbers
- Rounds
- 16
- Parts
- 3
- Level
- Intermediate
- Time
- 4-6 hours
- Yarn
- Worsted
The yarn and the hook
- for Your Crochet Slipper Socks
Stitches, spelled out
ch chain; st stitch; sts stitches; sl st slip stitch; sc single crochetDense; hdc half double crochetDense; sc2tog single crochet 2 stitches together (decrease)Dense; blo back loops onlyRidge; flo front loops onlyRidge.
Tension and hand-feel
Work a swatch in the textured sc/hdc pattern with your J/10 hook and measure a 4-inch square, counting for 12 stitches and 14 rows.
If your swatch comes up short of that count the fabric is running tight, so go up a hook size, and if it overshoots, drop down a hook size before starting the sole.
Gauge
Working in the textured stitch pattern with the J/10 hook: 12 stitches and 14 rows = 4 inches square
Checking your gauge matters for this project because you want your slippers to actually fit your feet. Take a few minutes to make a small swatch. If your swatch is too big, go down a hook size. If it’s too small, go up a hook size.
Sizing Information
This crochet pattern is written for Women’s Medium, which fits approximately shoe sizes 7 to 8. The finished slipper measures roughly 9 inches from heel to toe.
To adjust for other sizes: For Small (sizes 5 to 6), reduce the sole length by 4 rows For Large (sizes 9 to 10), add 4 rows to the sole length
For Extra Large (sizes 11 to 12), add 8 rows to the sole length
The stretchy nature of crochet fabric means these slippers have some give, so don’t worry about getting it perfectly exact.
Stitches and Abbreviations Used
Let me define every stitch before we dive into the pattern. Understanding these terms will make the instructions crystal clear.
ch = chain. Wrap the yarn over your hook and pull through the loop already on your hook. This creates one chain stitch. If the pattern says "ch 10," you’ll make 10 of these in a row.
sl st = slip stitch. Insert your hook into the stitch, yarn over, and pull through both the stitch and the loop on your hook in one motion. This creates a very flat, tight stitch used mainly for joining or moving across stitches.
sc = single crochet. Insert your hook into the stitch, yarn over and pull up a loop (two loops on hook), yarn over and pull through both loops. This is your basic building block stitch.
hdc = half double crochet. Yarn over first, then insert your hook into the stitch, yarn over and pull up a loop (three loops on hook), yarn over and pull through all three loops at once. Slightly taller than single crochet.
BLO = back loop only. Instead of inserting your hook under both loops of the stitch, you only go under the back loop. This creates those beautiful horizontal ridges you see in the ribbing.
FLO = front loop only. The opposite of BLO. You insert your hook under only the front loop.
Special Techniques in This Pattern
Working in the Round: After constructing the sole, you’ll work in continuous rounds around the foot portion. Use a stitch marker to track where each round begins.
Textured Stitch Pattern: The body of these slipper socks uses alternating rows of single crochet and half double crochet to create that lovely bumpy texture visible in the pattern. This technique builds density and cushion.
Ribbing: The cuff uses half double crochet worked in the back loop only to create stretchy ribbing that mimics knit fabric.
Crochet Pattern Instructions
Ready to make your own cozy slipper socks? Let’s get started. Remember, you’ll make two of these, so consider making them at the same time to ensure they match.
Part One: The Sole Using your J/10 (6.0mm) hook and bulky weight yarn, begin with the foundation.
If you need a different size, this is where you add or subtract rows. Each row adds roughly a third of an inch to the length.
Part 4
Try on your slipper at this point. The toe should feel snug but not tight. If you have longer toes, you might do one fewer decrease round.
Part Four: The Ankle Now we build up the ankle portion before adding the ribbed cuff.
Part Five: The Ribbed Cuff
Switch to your I/9 (5.5mm) hook for this section. The smaller hook creates tighter ribbing with better stretch and recovery.
Setup Row: Ch 8.
Part 5
Part Six: Finishing
Weave in all your ends securely. I like to weave through at least 2 inches of stitches, then reverse direction for another inch. This prevents ends from popping out after washing.
Make a second slipper following the same instructions.
Tips for Success
Preventing slipping: If you plan to wear these on hard floors, consider adding grip to the soles. You can use fabric paint, hot glue dots, or purchase adhesive grip pads made for slippers.
Washing: Hand wash in cool water and lay flat to dry. Machine washing may cause the fibers to felt slightly, which actually adds durability but may shrink the slippers.
Yarn substitutions: While bulky weight yarn works best, you could use two strands of worsted weight held together for similar results.
Making them last: Reinforce the heel and toe areas by working a few extra rounds of single crochet on the inside of the sole before attaching the foot portion.
Who Will Love These Slipper Socks?
This crochet pattern makes wonderful gifts for pretty much everyone. I’ve made pairs for my mom, my sister, my college-aged niece, and several coworkers. They all adore them.
How the texture is built
- Round 1 of the body does not add stitches so much as collect them: 26 sc along each long edge of the sole plus 20 sc across the heel chain gives exactly 92 stitches, and a marked slip stitch join turns that flat, 26-row sole into a continuous round without any separate increase row.
- Rounds 2 and 3 repeat as a pair — plain sc, then plain hdc — straight through Rounds 4 to 7, holding the stitch count at 92 the whole time. The cup shape around your foot comes purely from the height difference between sc and hdc stacking up, not from shaping.
If you swap the yarn
| Wool-blend, worsted weight | Produces a squishier, warmer fabric with softer stitch definition on the sc/hdc rounds; keep the J/10 hook and expect the ribbed cuff to relax and stretch more generously over the ankle. |
|---|---|
| Cotton, worsted weight | Firms up the fabric considerably with almost no give in the ribbed cuff, so sizing becomes less forgiving; a slightly larger hook than J/10 can loosen the gauge back toward the pattern's 12 stitches per 4 inches. |
| Acrylic, bulky weight | Thickens every round noticeably and speeds up the body, but the stitch and row counts given will come out larger than the stated 9-inch length, so a bigger hook and fewer rounds are needed to land back at Women's Medium. |
Colorways
- Alternating Round Stripe Keep the sole and Round 1 in one shade, then swap colors every time you move from an sc round to an hdc round through Rounds 2-7 so each ridge reads as its own stripe, and finish the cuff in a third, lighter shade.
Washing and blocking
Check the yarn label before washing — if the fiber is wool, hand wash in cool water and avoid agitation so the dense sc/hdc fabric does not felt and tighten.
Lay the slippers flat to dry rather than hanging them, since the ribbed cuff holds water and will stretch out of shape under its own weight if left wet and vertical.
Reshape the cup of the sole and smooth the ribbing while still damp, then store the pair flat or stuffed loosely with tissue so the ridged texture doesn't flatten in storage.
When it does not look right
- The heel end feels tight or pinches when you try the slipper on after Round 1
- The 20 sc worked across the heel chain weren't spaced evenly against the 26 sc on each long edge; pick back to Round 1 and redistribute the stitches more evenly along that short edge.
- The body still feels flat instead of cupping around your foot after Rounds 4 through 7
- Tension on the hdc rounds is likely too loose for the hook size; check your swatch gauge again and consider dropping to a smaller hook so the sc and hdc rounds stack with enough height difference to curve.
- The ribbed cuff won't stretch open wide enough to pull over your foot
- The back-loop-only hdc rows were worked too tightly, or the strip came out short of 52 rows; add a few more rows to the strip or loosen your hdc tension before folding and seaming the tube.
Close-ups


Questions people ask
Can you make these slippers in a different shoe size?
Yes — the pattern is written for Women's Medium at roughly 9 inches heel to toe. For Small, remove 4 rows from the sole length, and for Large, add 4 rows, adjusting before you reach Part 4's Round 1.
Why does the fabric feel so dense compared to a plain single crochet slipper?
Rounds 2 and 3 alternate sc and hdc around all 92 stitches, and that pairing repeats through Round 7. The hdc rounds add height while the sc rounds pack tight, so the combination builds a thicker, ridged fabric than sc alone.
How does the ribbed cuff actually attach to the slipper body?
The cuff is worked flat, folded lengthwise, and seamed along its short edge into a tube. That tube is then whip-stitched with a tapestry needle to Round 17 of the slipper body, spacing the stitches evenly around the opening.
Can the cuff be made taller or shorter than the pattern states?
Yes — the cuff should match the circumference of your slipper opening, so if your 52-row strip feels short, add a few more rows, and if it feels long, remove a few before folding it into a tube.
New patterns, as they are filed
One short email when a batch lands, with the feel of each.