
47 rounds · filed under dense · 43 of them
Children's Clothing · added 15 Oct 2026
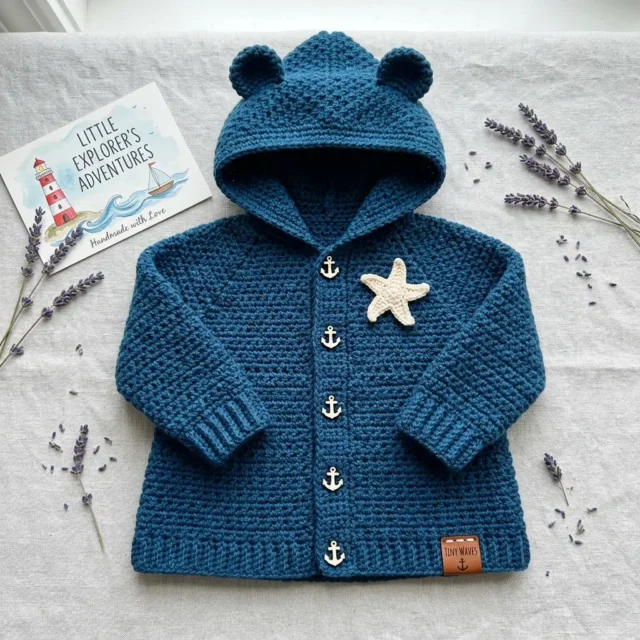
Ocean blue hooded toddler sweater with bear ears
Dense single crochet builds a warm, sturdy fabric for a top-down hooded toddler cardigan with bear ears and a starfish applique.
- Skill
- Intermediate
- Time
- 12-18 hours
- Yarn
- Worsted
- Rounds
- 45
About this pattern
Under your hand this sweater reads dense and a little stiff at first, the kind of fabric that holds its shape rather than draping over a shoulder. Single crochet worked row after row packs the yarn tight, closing the gaps between stitches so wind doesn't cut through and little fingers can't poke holes in it. The ribbed sections at the hem and cuffs loosen things up where you need give, working through the back loop only to build in horizontal stretch for pulling over a diaper or a chubby wrist.
The shape comes together top-down from a raglan yoke, so the fabric grows outward in four diagonal lines before splitting into body and sleeves at the underarm. Once separated, the body is just rows of even single crochet stacking up straight and square, easy to try on and stop at whatever length suits the toddler in question. Add the hood, the bear ears, the anchor buttons, and the starfish, and you have a piece built for repeated wear and repeated washing.
The swatch in numbers
- Rounds
- 45
- Parts
- 9
- Level
- Intermediate
- Time
- 12-18 hours
- Yarn
- Worsted
The yarn and the hook
- Lion Brand Vanna’s Choice in Dusty Blue or Colonial Blue works beautifully. It’s 100% acrylic, machine washable, soft on baby skin, and holds stitch definition well.
- Paintbox Yarns Simply DK held double in Sailor Blue gives you a slightly heathered look with excellent loft.
- We Are Knitters The Wool in Petrol creates a luxurious heirloom finish if you want to splurge on 100% Peruvian wool.
- Stick with smooth, non-splitty yarn. Fuzzy fibers will hide your stitches and make seaming harder.
Yarn
- Worsted weight, Category 4. You’ll need approximately 600 yards or 550 meters (700 yards or 640 meters for the larger size) in your main color. I’m using a gorgeous ocean teal-blue. You’ll also need about 30 yards or 27 meters of cream or off-white for the starfish applique.
Notions
- At least 6 stitch markers
- Yarn needle for finishing
- Sewing thread and needle for buttons
- Small piece of faux leather for the optional label (about 1.5 inches by 0.75 inches)
- Scissors
- Rust-proof pins for blocking
Stitches, spelled out
sc single crochet. Insert hook, yarn over, pull up a loop, yarn over, pull through both loops.Dense; ch chain. Yarn over, pull through loop on hook.; sl st slip stitch. Insert hook, yarn over, pull through stitch and loop on hook in one motion.; inc increase. Work 2 sc in the same stitch.; sc2tog single crochet two together, a decrease. Insert hook in next stitch, pull up a loop (2 loops on hook). Insert hook in following stitch, pull up a loop (3 loops on hook). Yarn over and pull through all 3 loops. This turns 2 stitches into 1.Dense; blo back loop only. Instead of inserting your hook under both loops of a stitch, go under only the back loop (the one farthest from you). This creates ribbed texture.Ridge; RS right side. The public-facing side of your work.; WS wrong side. The inside of your garment.; pm place marker; sm slip marker (move it from left needle to right without working it); MC main color (your ocean blue); CC contrast color (cream for the starfish).
Tension and hand-feel
After the first few rows of the yoke, lay the piece flat and measure across the 32 or 36 stitch foundation row; it should match the stated stitch count without the fabric curling or stretching to get there.
The Yoke
Foundation chain: With MC and J hook, ch 33 (37).
Size 12 to 18 months stops here.
Size 18 to 24 months continues:
The Body
Now you’ll separate the sleeves from the body.
Separation Row (RS): Ch 1, turn. Sc across 12 (14) left front sts. Ch 4 to bridge the underarm gap. Skip 20 (22) left sleeve sts (put these on a stitch holder or scrap yarn). Sc across 32 (36) back sts. Ch 4. Skip 20 (22) right sleeve sts. Sc across 12 (14) right front sts. Ch 1, turn.
Body stitch count: 12 + 4 + 32 + 4 + 12 = 64 sc (72 sc for larger size)
Hem Ribbing
Switch to your smaller hook (I or 5.5 mm).
Sleeves (Make 2)
Return your held sleeve stitches to the hook. Attach MC at center of the underarm chain bridge.
Setup Round: With J hook and RS facing, join MC with sl st at center of underarm chain. Sc 2 sts across remaining half of underarm chain. Sc across all 20 (22) held sleeve sts. Sc 2 sts across remaining half of underarm chain. Join with sl st to first sc. Place marker. (24 sc) (26 sc)
Sleeves are now worked in the round. Do not turn.
Sleeve Cuff Ribbing
Switch to smaller hook (I or 5.5 mm).
The Hood
Neckline Pickup: With RS facing and J hook, join MC at upper right front corner. Work sc evenly across the entire neckline edge. (32 sc) (36 sc)
Foundation Row (RS): Sc across all sts. Ch 1, turn. (32 sc) (36 sc)
Bear Ears (Make 2)
With MC and J hook, make a magic ring.
Starfish Applique
With CC and J hook, make a magic ring.
Button Bands
Right Front Buttonhole Band: With RS facing and J hook, join MC at lower right front corner. Work sc evenly up the right front edge, placing approximately 2 sc per every 3 rows. (approximately 36 sc) (38 sc)
Band Row 1 (RS): Sc in each st across. Ch 1, turn. (36 sc) (38 sc)
Band Row 2 (WS, Buttonhole Row): Sc in first 2 (3) sts. Ch 2, sk 2 sts, sc in next 6 sts repeat 4 times. Ch 2, sk 2 sts, sc in last 2 (3) sts. Ch 1, turn.
Band Row 3 (RS): Sc across, working 2 sc into each ch-2 sp. Ch 1, turn. (36 sc) (38 sc)
Band Row 4 (WS): Sc in each st across. Fasten off. (36 sc) (38 sc)
Left Front Button Band: With RS facing, join MC at upper left front corner. Work 4 rows of sc evenly down the left front edge. No buttonholes. Fasten off.
How the texture is built
- The four raglan increase points sit exactly at the marker placements set in Row 1 — between left front and left sleeve, left sleeve and back, back and right sleeve, and right sleeve and right front — so every increase row widens the yoke along the same four seams rather than randomly across the fabric.
- The yoke and body are worked flat, turning at the end of every row, which is what lets the sweater open down the front for a cardigan closure instead of forming a closed pullover tube.
- The underarm chain-4 bridges created in the Separation Row stand in for the skipped sleeve stitches, holding the gap open at a fixed width so the sleeve can be picked up later without distorting the body stitch count.
Putting the pieces together
If you swap the yarn
| 100% cotton, worsted weight | Produces a heavier, less stretchy fabric with crisper stitch definition; size up to a 6.5 mm hook to keep the single crochet from stiffening too much, and expect less give in the ribbing. |
|---|---|
| Acrylic-wool blend, DK weight held double | Matches gauge closer to the worsted-weight yardage while adding loft and a softer hand; drape stays similar to the Paintbox DK-held-double option already listed, so the body falls with a touch more airiness. |
| 100% superwash merino, worsted weight | Keeps the washable ease of acrylic but adds a lighter, warmer fabric with more bounce; stick with the J hook for the main fabric and drop to I for ribbing exactly as written, since merino gauge tracks close to the option. |
Colorways
- Deep water Main color in a dark petrol or navy-leaning blue covers the Yoke, Body, Sleeves, and Hood; cream is reserved entirely for the Starfish Applique so it reads as a single bright accent against the dark field.
Washing and blocking
Hand wash in cool water and skip the wringing; acrylic and wool blends both hold their shape better when water is pressed out rather than twisted.
Dry flat on a towel, reshaping the hood and bear ears by hand while damp so they dry sitting upright instead of flattened.
Store folded rather than hung, since the dense single crochet body has enough weight to stretch out of shape on a hanger over time.
When it does not look right
- The yoke puckers or pulls at one of the four raglan lines
- An increase was likely worked on the wrong side of a marker instead of on both sides of it; recount stitches between markers against the Row 2 stitch totals and redo the increase pair if the numbers don't match.
- The underarm gap gapes open or feels floppy after separation
- The chain-4 bridge was chained too loosely; redo that bridge with a firmer tension so it sits flush with the surrounding single crochet instead of sagging below the body line.
- The ribbed hem or cuffs look identical to the main fabric instead of textured
- The back-loop-only step was skipped and both loops were worked instead; rip back to the ribbing start and confirm each stitch picks up only the back loop to create the horizontal ridge.
Questions people ask
Can you try the sweater on the toddler before finishing it?
Yes, the top-down raglan construction is built for that. Stop at any point after the body rows begin and hold it up against the child to judge length before adding the ribbing.
What happens to the sleeve stitches during the Separation Row?
The 20 or 22 sleeve stitches on each side are set aside on a stitch holder or scrap yarn rather than worked, and a chain-4 bridges the gap they leave. Those held stitches get picked up later to begin each sleeve.
Why does the pattern call for two hook sizes?
The J or 6.0 mm hook builds the main yoke, body, sleeve, and hood fabric at the intended density. The smaller I or 5.5 mm hook tightens the ribbing rows at the hem and cuffs so those edges pull in snugly instead of flaring.
Is the starfish applique attached as part of the main rounds or added afterward?
It is worked as its own separate piece across 6 rounds, independent of the Yoke, Body, and Hood. It gets sewn on during assembly rather than crocheted directly into the sweater fabric.
New patterns, as they are filed
One short email when a batch lands, with the feel of each.