
53 rounds · filed under dense · 31 of them
Amigurumi · added 11 Oct 2026
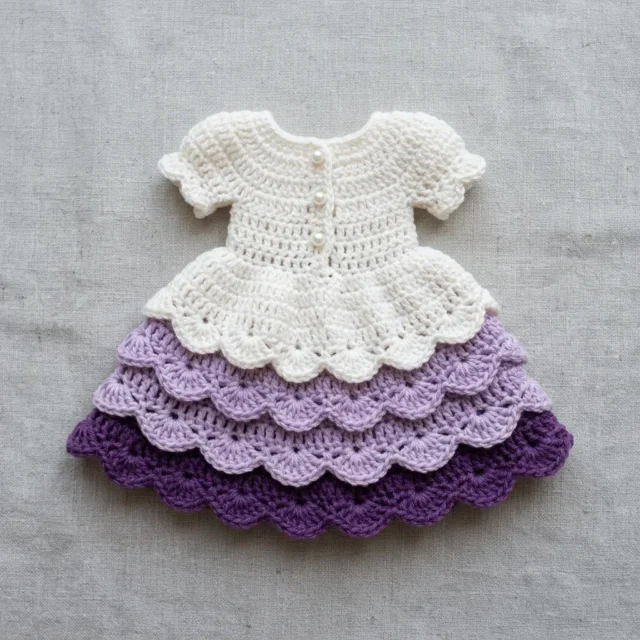
Ombre ruffle doll dress crochet pattern with shell tiers
Shell stitch fans into ruffled tiers for a doll dress with body at the hem and give at the yoke.
- Skill
- Intermediate
- Time
- 4-6 hours
- Hook
- 3.25 mm
- Yarn
- DK
- Rounds
- 50
About this pattern
The bodice sits close and smooth, built in plain single crochet so the yoke holds its raglan shape without any give fighting the fit. Drop down into the skirt and the hand changes completely: shell stitch opens the fabric into fans of five double crochets each, and the scallop edge variation rounds those fans off into a softer wave along the tier edges. Where the body is dense and controlled, the ruffles are open, airy, and full of movement.
The dress is a tube from the neck down, raglan increases shaping the yoke before the waist narrows and three graduated tiers flare out below it. Once the last tier is blocked, the shape wants to stand away from the doll's legs rather than cling to them, so let the shells splay open flat when you pin them rather than stacking them close. Button the back opening last, after blocking, so the bands lie against a shape that is already set.
The swatch in numbers
- Rounds
- 50
- Parts
- 9
- Level
- Intermediate
- Time
- 4-6 hours
- Hook
- 3.25 mm
- Yarn
- DK
The yarn and the hook
Yarn
- Color A (Cream White): approximately 80 yards / 73 meters
- Color B (Soft Lavender): approximately 40 yards / 36.5 meters
- Color C (Medium Lavender): approximately 50 yards / 45.7 meters
- Color D (Deep Purple): approximately 60 yards / 54.9 meters
Recommended Yarn Options
- Paintbox Yarns Simply DK works beautifully for this project. It is 100% acrylic with a smooth, consistent twist that shows stitch definition clearly. The purple color range is excellent.
- Lion Brand Pound of Love is another solid choice. One skein provides far more yardage than needed, making it economical if you plan to make multiple dresses.
- For a more structured finish, try Drops Safran in 100% cotton. Cotton gives the dress a slightly stiffer body, which helps the tiers hold their shape beautifully.
Hook
- US size D/3 (3.25 mm)
Notions
- 3 pearl shank buttons, approximately 6 mm diameter
- Yarn needle for weaving ends
- Scissors
- At least 6 stitch markers
- Small safety pins for holding stitches
Stitches, spelled out
ch chain: Yarn over, pull through loop on hook. The foundation of most crochet projects.; sl st slip stitch: Insert hook, yarn over, pull through both the stitch and the loop on your hook in one motion. Used for joining and moving across stitches without adding height.; sc single crochet: Insert hook into stitch, yarn over and pull up a loop (2 loops on hook), yarn over and pull through both loops. Your most basic stitch.Dense; hdc half double crochet: Yarn over, insert hook into stitch, yarn over and pull up a loop (3 loops on hook), yarn over and pull through all 3 loops.Dense; dc double crochet: Yarn over, insert hook into stitch, yarn over and pull up a loop (3 loops on hook), yarn over and pull through 2 loops (2 loops remain), yarn over and pull through remaining 2 loops.Drape; inc increase: Work 2 single crochets in one stitch. This adds one stitch to your count.; dec single crochet decrease: Insert hook into first stitch, pull up a loop, insert hook into second stitch, pull up a loop (3 loops on hook), yarn over and pull through all 3 loops. This removes one stitch from your count.; sk skip: Pass over the indicated stitch without working into it.; sp space: The gap created by chain stitches in previous rows.; ch-sp chain space: Specifically refers to a space created by chains.Lace; st(s) stitch(es); blo back loop only: Work into only the back loop of the stitch (the loop farthest from you).Ridge; flo front loop only: Work into only the front loop of the stitch (the loop closest to you).Ridge; pm place marker; RS right side: The side of the fabric that will face outward when worn.; WS wrong side: The inside of the fabric.; rem remaining; rep repeat; rnd round; yo yarn over: Wrap yarn over hook from back to front..
Bodice Yoke
Using Color A and US D/3 hook, begin with the neckline.
Foundation: Ch 37. (This chain forms the neckline. 37 chains provide 36 working stitches.)
Your sections are: 5 / 4 / 14 / 4 / 5 = 36 confirmed.
Sections: 8 / 10 / 20 / 10 / 8 = 56 confirmed.
Body
All body rounds are worked in continuous rounds. Place a stitch marker at the beginning of each round and move it up.
Armhole Separation and Body Join
The body tube is now joined. Total body circumference is 56 sc.
Ruffle Tier 1 (Color A, Cream)
This tier is worked into the front loops only of Round 8, creating a ridge and the first scalloped ruffle at the waist.
Ruffle Tier 2 (Color B, Soft Lavender)
This tier picks up from the back loops of Body Round 8, creating the second layer sitting just behind and below Tier 1.
Ruffle Tier 3 (Color C and Color D)
This is the largest tier and uses two colors. Because both loops of Body Round 8 are already used, Tier 3 attaches to the ridge between Body Round 7 and Round 8.
Sleeves
Each sleeve uses the 14 held stitches plus 4 underarm bridge chains for 18 working stitches total.
Back Opening and Button Bands
Right Back Button Band (Buttonhole Edge): With RS facing, join Color A with sc at bottom right corner of back opening. Work sc evenly up the right back edge, placing approximately 1 sc per row edge (approximately 18 to 20 sc total). Work 3 buttonholes evenly spaced: when you reach each buttonhole position, ch 2 and skip 2 sc. Space buttonholes at rows 3, 7, and 11 approximately. Fasten off.
Left Back Button Band: With RS facing, join Color A with sc at top left corner of back opening. Work sc evenly down the left back edge. Fasten off.
Sew 3 pearl buttons to the left back band aligned with the buttonholes.
Front Decorative Buttons
Sew 3 pearl buttons vertically down the center front of the bodice, evenly spaced between the neckline and waist. These are purely decorative.
How the texture is built
- The raglan increases in the Bodice Yoke rounds fall at the four marked seam points set up in Row 2, which is why the yoke widens evenly into front, back, and two sleeve sections rather than ballooning in one spot.
- Rows 1 through 13 are worked flat and turned, because the center-back opening needs two separate edges for the button bands; the Joining Round then slip stitches those edges together and absorbs the underarm chain-4 bridges into the round so the body becomes one continuous tube.
- The Waist Decrease Round pulls the stitch count from 56 down to 48 by working a decrease every sixth stitch, which is what gives the dress a waist before the first ruffle tier flares back out.
Putting the pieces together
If you swap the yarn
| 100% cotton, DK weight | Stitches sit stiffer and the shell fans hold their open shape without pinning as hard during blocking, though the fabric feels less soft against the hand than acrylic. |
|---|---|
| Acrylic, DK weight | Keeps the same hook size and stitch count as the pattern calls for, with a smooth twist that shows the shell fans clearly and machine-washes without special care. |
| Wool-acrylic blend, DK weight | Adds a slight halo that softens the edges of the scallop-shell rounds, but hand-wash only to avoid felting, and block with light steam rather than full submersion. |
Colorways
- Classic ombre Color A (Cream White) on the Bodice Yoke and Body through Ruffle Tier 1, Color B (Soft Lavender) on Ruffle Tier 2, and Colors C and D (Medium Lavender to Deep Purple) blended across Ruffle Tier 3 so the hem reads darkest.
- Reversed depth Color D (Deep Purple) on the Bodice Yoke and Body for a dark top half, Color C (Medium Lavender) on Ruffle Tier 1, Color B (Soft Lavender) on Ruffle Tier 2, and Color A (Cream White) on Ruffle Tier 3 so the dress lightens toward the hem instead.
Washing and blocking
Hand wash in cool water and press out excess moisture without wringing, since twisting strains the open shell stitches in the ruffle tiers.
Lay flat to dry and reshape each shell fan by hand while damp, pinning the scallop edges so the tiers dry splayed rather than curled inward.
Store flat or loosely folded rather than hung, so the weight of the lower tiers does not stretch the single crochet body out of shape over time.
When it does not look right
- The ruffle tiers curl inward instead of flaring
- The shells were likely worked too tightly or not blocked; wet or steam block and pin each 5-dc fan open flat while damp so the chain-2 spaces hold their spread.
- The back opening gaps or overlaps at the buttons
- This points to an uneven stitch count between the two back panels set up in Row 2; recount the 5-stitch panels before working the button bands so both sides match.
- The bodice yoke feels tight across the front or sleeves
- A missed increase in one of the four raglan sections throws off the proportion; check that each marked section grew evenly across all 12 rounds before joining the body.
Questions people ask
Can the dress be made without the button bands?
The back opening is what lets the fitted yoke fit over the doll's head, so it needs some closure. A simpler slip stitch seam could replace the buttons, but the bands as written keep the opening flat rather than puckered.
What happens if the shell stitch rounds don't lie flat?
An uneven number of shells around the tier, or shells worked into the wrong chain-2 space rather than the space itself, will pull the ruffle off-grain. Recheck that each shell sits in a ch-2 sp rather than split across individual chains.
Is DK weight yarn required, or can a different weight work?
The stated gauge of 18 single crochet stitches and 20 rows per 4 inches is specific to DK weight with the US D/3 hook, and the dress is sized to an 18-inch doll on that gauge. A different weight would need a resized stitch count to keep the fit.
New patterns, as they are filed
One short email when a batch lands, with the feel of each.