
14 rounds · filed under ridge · 9 of them
Bags & Purses · added 16 Sep 2026
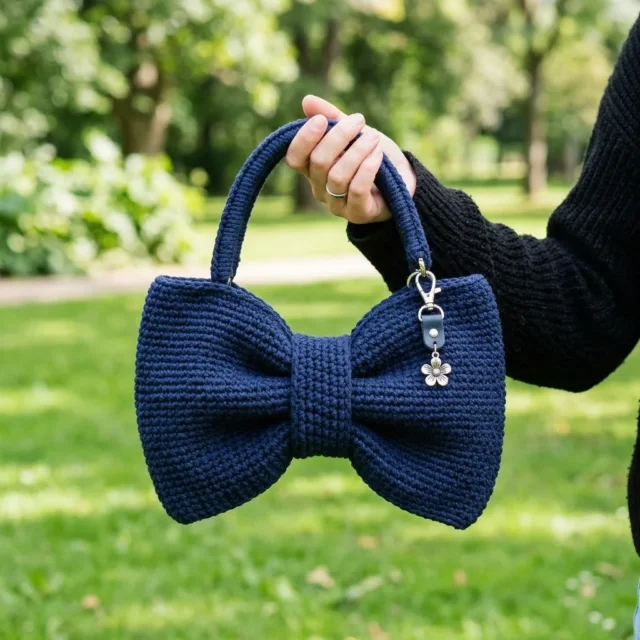
Ribbed Bow Shoulder Purse Crochet Pattern With Firm Fabric
Back loop single crochet builds a dense, ribbed fabric for this structured bow-shaped shoulder purse.
- Skill
- Intermediate
- Time
- 4-6 hours
- Hook
- 4.0 mm
- Yarn
- Worsted
- Rounds
- 14
About this pattern
Every row here goes into the back loop only, so under your hand the fabric builds a raised horizontal ridge on every single crochet. Worked flat in cotton or a cotton blend, it comes off the hook firm and stable rather than soft — the kind of surface that holds its shape when you set the purse down instead of slumping sideways. The ribbing runs the length of both long strips, giving the whole piece a corduroy-like grain you can feel with a fingertip.
The shape reads as a bow: two panels meeting at a center wrap, with wings that take a light fill of polyester fiberfill for dimension rather than rigidity. Once the pieces are seamed together with the tapestry needle, you get a shoulder purse with real structure — one that keeps its silhouette on a table or against your hip, not a floppy sack that needs something inside it to hold a shape.
Finished dimensions: width across bow approximately 12 inches; height of bow center approximately 6 inches; depth at widest point approximately 4 inches; handle drop approximately 5 inches.
The swatch in numbers
- Rounds
- 14
- Parts
- 4
- Level
- Intermediate
- Time
- 4-6 hours
- Hook
- 4.0 mm
- Yarn
- Worsted
The yarn and the hook
- Approximately 300-350 yards of worsted weight cotton or cotton-blend yarn
- I used a navy blue shade, but any solid color will showcase the ribbed texture beautifully
- Look for yarn with good stitch definition and minimal stretch
- 4.0mm (US G/6) crochet hook
- You may need to adjust your hook size to achieve proper gauge
- Tapestry needle for seaming
- Stitch markers
- Polyester fiberfill for light stuffing in the bow wings
- Optional: magnetic snap closure, decorative charm, small piece of fabric for lining
- Gauge: 18 stitches and 20 rows = 4 inches in single crochet worked in back loops only
- Take time to check your gauge. This pattern relies on a firm, structured fabric. If your gauge is too loose, your purse will be floppy. Go down a hook size if needed.
Stitches, spelled out
ch chain; st stitch; sts stitches; sl st slip stitch; sc single crochetDense; inc increase; dec decrease; blo back loops onlyRidge.
Tension and hand-feel
The target gauge for this pattern is 18 stitches and 20 rows = 4 inches in single crochet worked in back loops only.
After the first few rounds of the bow center, check that the fabric feels dense and resists stretching when you tug it gently between your fingers — this pattern depends on a firm, structured hand rather than a soft, drapey one.
If the fabric feels loose or the stitches shift under light pressure, drop to a smaller hook size and re-check before continuing, since a floppy gauge here means a floppy finished purse.
Bow Wing Panels (Make 2)
These panels create the signature bow shape. The ribbed texture comes from working in the back loop only throughout.
You should now have a panel that is wider at one end and tapers at the other. The ribbed lines run horizontally across the piece. Make a second identical panel.
Center Gusset And Base Panel
This piece wraps around the bottom of the purse and connects the two bow wing panels. It also creates the depth of the bag.
Center Band (The Bow Knot)
This smaller piece wraps around the center of the purse to create the pinched bow effect and hides the seaming.
Handle (Make 1)
The handle is a tube worked in continuous rounds. This creates a sturdy, rounded handle that is comfortable to hold.
Important tip: The handle may want to curl as you work. This is normal. It will straighten out when you attach it and the weight of the purse pulls it down.
Assembly Instructions
Take your time with assembly. This is where the bow shape comes together, and careful seaming makes a huge difference in the finished look.
Step 1: Prepare the Bow Wing Panels
Lay both bow wing panels flat with the right side facing up. The ribbed lines should run horizontally. Identify the tapered end of each panel. This tapered end will be the center of the bow where everything cinches together.
Step 2: Add Light Stuffing (Optional but Recommended)
Before closing the panels, add a small amount of polyester fiberfill to the wider curved sections of each bow wing. This helps the bow hold its rounded shape. Do not overstuff. You want gentle fullness, not a firm pillow.
Step 3: Attach the Gusset
Using your tapestry needle and matching yarn, whipstitch or mattress stitch the center gusset strip around the outer curved edge of one bow wing panel. Start at one tapered end, work around the curved bottom edge, and end at the opposite tapered end.
Repeat for the second bow wing panel, attaching it to the other long edge of the gusset strip.
Your purse should now have dimension and hold its shape.
Step 4: Create the Bow Center
This is the fun part. Bring the two tapered ends of the bow wings together at the center top of the purse. Pinch the fabric inward to create that classic bow silhouette.
Wrap the center band piece around this pinched section. Pull it snug enough to create nice gathers, but not so tight that you cannot fit items inside the purse. Whipstitch the short ends of the center band together on the inside of the purse. Tack the band to the bow panels in a few spots to keep it from sliding around.
Step 5: Attach the Handle
Position the handle ends at the top of the center band, one on each side of the bow knot. Stitch each end securely to the inside of the purse, reinforcing with several passes of yarn. The handle should form a smooth arc above the bow center.
Step 6: Add Closure and Finishing Touches
For a magnetic snap closure, install the snap pieces inside the purse opening before you complete the center band attachment. Position them so the purse closes securely when carried.
Add a decorative charm to the center band if desired. A small lobster clasp attached to a leather tab looks elegant against the navy yarn.
Weave in all remaining ends. Block gently by misting with water and shaping with your hands if the bow wings need adjusting.
How the texture is built
- Part 5 holds a steady 16 stitches across all 90 rows with no shaping — the strip stays a uniform width so it can wrap continuously around the curved bottom edge of one bow panel, across the base, and around the opposite panel's edge as a binding strip rather than a fitted piece.
- Part 6 is narrower and shorter than Part 5, holding 12 stitches over 24 rows — its smaller footprint matches its job as the center band that cinches around the bow's middle rather than spanning the full base.
- The Height Of Bow Center is built in rounds instead of rows, which lets that section close into a tube-like form with real depth for the fiberfill, while the two long strips stay flat and open since they only need to wrap and seam rather than hold stuffing.
- Maintain consistent tension throughout — the ribbed texture looks best when your stitches are uniform, and tired hands tend to make uneven stitches, so take a break if your tension starts to loosen as you work.
- Count your stitches at the end of every row, especially through the shaping rows, since the shaping requires accuracy and losing or gaining even a single stitch will throw off the symmetry of your bow wings.
If you swap the yarn
| DK weight cotton | Produces a smaller, lighter purse with tighter ribbing; drop to a 3.5mm hook and expect to add extra rows to Part 5 and Part 6 to reach the same wrapped length. |
|---|---|
| Worsted weight acrylic | Keeps the same hook size and stitch counts but softens the hand overall, so the panels hold their shape less firmly and may need slightly more fiberfill in the wings to keep dimension. |
| Cotton-linen blend, worsted weight | Adds a drier, slightly stiffer texture to the ribbing and a subtle sheen; stitch definition sharpens further, making the back-loop ridges more pronounced under the hand. |
Colorways
- Tonal navy Work the Height Of Bow Center and both bow panels in a deep navy, then carry the same navy through Part 5 and Part 6 so the wrap band and base strip disappear into the panels rather than standing apart.
- Contrast band Keep the bow panels and Height Of Bow Center in navy, then work Part 6 — the center knot band — in a lighter contrasting shade so the ribbed wrap reads as a distinct cinch across the bow's middle.
Washing and blocking
Hand wash the finished purse in cool water, since cotton holds shape best without the agitation of a machine cycle.
Lay the piece flat to dry on a towel rather than hanging it, so the weight of a damp cotton bow doesn't pull the ribbing out of line.
Reshape the bow wings and panels by hand while still slightly damp, then store the purse stuffed lightly with tissue paper to keep its structured shape between uses.
When it does not look right
- The purse feels floppy and won't hold
- Gauge is running loose; drop to a smaller hook size and rework a swatch until the back-loop fabric resists stretching under light pressure.
- The bow wings look flat instead of rounded.
- Too little fiberfill has gone in, or it's packed unevenly; add polyester fiberfill in small increments, working it into the corners of the wings before closing the seam.
- The long strip from Part 5 comes up
- Row gauge is tighter than expected; work additional rows past row 90 in the same BLO pattern until the strip reaches fully around the curved edge before fastening off.
Questions people ask
Why does the pattern use back loop only for almost every row?
Working in the back loop only leaves the front loop exposed as a visible ridge, which is what gives the fabric its corduroy-like texture and extra firmness. It also makes the fabric behave more like a woven strap than a typical single crochet panel, which matters for a purse that needs to hold its shape.
Can the length of Part 5 be adjusted?
Yes — the pattern notes that the 90-row length may need adjustment depending on gauge, since the strip needs to wrap around the bottom curved edge of one bow panel, across the base, and around the opposite panel's edge. Work extra rows or fewer rows in BLO single crochet until it reaches that distance.
How much stuffing goes into the bow wings?
The materials list calls for polyester fiberfill used for light stuffing only, not a firm packed fill. Add it gradually and check the wings by feel, aiming for gentle dimension rather than a hard, overstuffed shape.
What yarn amount should be on hand before starting?
Plan on roughly 300 to 350 yards of worsted weight cotton or a cotton blend. Choosing a yarn with good stitch definition and minimal stretch matters here, since the back-loop ribbing and firm gauge depend on the fiber holding its shape rather than relaxing.
New patterns, as they are filed
One short email when a batch lands, with the feel of each.