
45 rounds · filed under dense · 5 of them
Amigurumi · added 15 Sep 2026
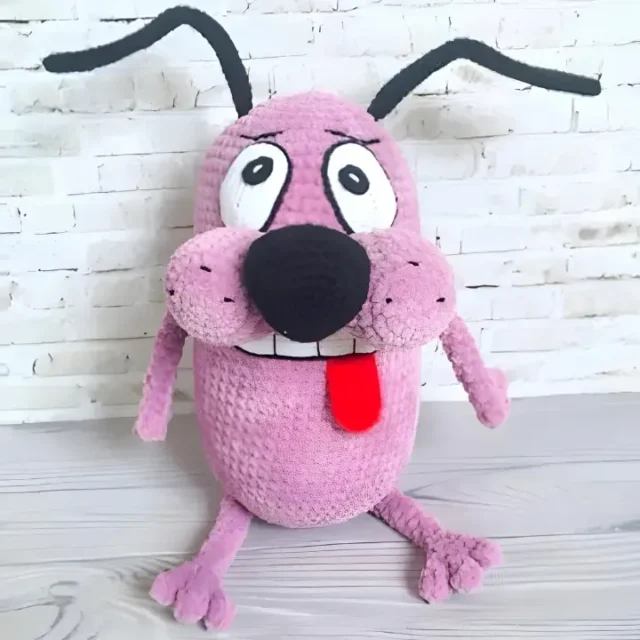
Amigurumi scared dog worked in dense plush single crochet
Single crochet builds a dense plush pile for this amigurumi scared dog, with jointed paws and a curled tail.
- Skill
- Intermediate
- Time
- 4-6 hours
- Hook
- 3.5 mm
- Yarn
- Bulky
- Rounds
- 45
About this pattern
Single crochet worked tight in plush yarn turns this dog's body into a dense, no-gap fabric. Pinch it and there is almost no give between stitches, just a firm spongy surface that reads like short fur once it is stuffed. The plush yarn does most of the texture work, but the tight sc is what keeps the filler from showing through, even at the fast increases circling the magic ring.
Forty-nine rounds build the body into a rounded torso, four limbs finish as small three-toed paws, and a short tapered tail curls off the back. Once each piece is stuffed, the limbs sit around the body's midsection and the muzzle sets low on the face. The dense sc fabric holds its shape well enough that a light stuffing pass is enough to keep the whole dog standing upright without sagging.
The swatch in numbers
- Rounds
- 45
- Parts
- 4
- Level
- Intermediate
- Time
- 4-6 hours
- Hook
- 3.5 mm
- Yarn
- Bulky
The yarn and the hook
- Plush yarn Himalaya Dolphin Baby 1-1.5 skeins of the main color. Or any other yarn
- Hook No. 3.5mm
- Hook No. 1.5mm for ears, eyes, tongue and nose
- New baby yarn: black, white and red
- Scissors
- Long needle
- Filler (holofiber, synthetic balls, etc.)
Stitches, spelled out
MR Magic ringDense; Sc Single crochetDense; Dc Double crochetDrape; Hdc Half double crochetDense; Slst Slip stitch; Inc Increase; Dec Decrease.
Tension and hand-feel
After round 5 of the body (30sc), lay the piece flat and check that the rounds sit smoothly without ruffling at the edge or cupping toward the center.
If the fabric buckles or the increases stack unevenly, drop to a smaller hook so the plush yarn packs tighter and the disc lies flat before the rounds turn upward.
Body
Made in main thread color with hook No. 3.5mm.
Tail
Made in main thread color with hook No. 3.5mm.
Arms and legs
Make 44 details total.
Crochet 3 fingers first.
On the third finger, do not cut the thread; continue to crochet the arm.
Muzzle
2 cheek details made in main thread color with hook No. 3.5mm.
How the texture is built
- The body gains six stitches per round through round 5 (6, 12, 18, 24, 30), the standard spacing that lets a magic-ring circle grow flat before the rounds curve upward into a sphere.
- The tail increases on only one side each round (inc, 3sc / inc, 4sc / inc, 5sc / inc, 6sc), which pulls the tube into a curve rather than the straight taper an even increase would produce.
- Each arm and leg starts as three separate finger tubes worked flat in rounds of 4sc, then all three are crocheted together into one 12-stitch round before decreasing to 6, so the paw joins in a single pass instead of through seaming.
If you swap the yarn
| Worsted-weight cotton | Stitches show more clearly and the fabric turns firmer with less spring, so stuffing needs to be packed a bit harder and a hook a size down from 3.5mm keeps the sc tight enough to hide it. |
|---|---|
| DK-weight acrylic | The fabric turns thinner and drapes more at the limbs, so a smaller finished dog results unless a larger hook or a few extra rounds compensate for the lighter yarn. |
| Chenille-style plush polyester | Keeps the same velvet surface as the main yarn, works well with the same 3.5mm hook, and thicker skeins may cover the body in less yardage than the stated 1-1.5 skeins. |
Colorways
- Sandy Terrier Main color covers the body, tail, and all four arms and legs; the muzzle works in main color with white new baby yarn at the lower rounds; black marks the nose and eyes, red fills the tongue.
Washing and blocking
Hand wash in cool water only, since both the plush main yarn and the new baby yarn used for details are synthetic fibers that can flatten under heat or agitation.
Reshape the body, tail, and paws while still damp, then lay flat to dry rather than hanging, so the stuffed shape does not stretch under its own weight.
Store away from direct sun and radiators, since heat presses down the plush pile on the body and tail and dulls the raised texture over time.
When it does not look right
- The paw looks lumpy or the fingers sit
- The connect round is not spaced evenly (2sc, 4sc, 2sc, 4sc for 12sc total); recount the join round so each finger gets its share before decreasing.
- The tail sticks out straight instead of curving.
- The one-sided increase pattern (inc, 3sc / inc, 4sc, and so on) is what pulls the curve; check that increases were only worked on one side of the round, not spaced evenly around it.
- Stuffing peeks through the body fabric.
- The sc is too loose for the plush yarn's loft; drop to a smaller hook so each stitch closes tighter around the filler.
Questions people ask
Why are the fingers made separately before joining into the paw?
Working each finger as its own small tube of 4sc rounds keeps the toes distinct and rounded before they merge. Joining them in one 12sc round afterward is what gives the paw its separated-toe look rather than a smooth stump.
Where does the 1.5mm hook get used if the body uses 3.5mm?
The smaller hook is for the fine detail pieces: ears, eyes, tongue, and nose. Those parts are worked in the thinner new baby yarn, so a smaller hook keeps that fabric just as tight as the plush main sections.
How firm should the stuffing feel through the finished body?
Aim for a fabric that gives slightly under a press but springs back rather than staying dented. The dense sc from the plush yarn already resists sagging, so overstuffing is easy to avoid.
What does tapping the tail after stuffing actually do?
A light tap settles the filler and helps the curve set from the one-sided increase pattern instead of the tail sitting stiff and straight. It is a shaping step, not a fix for a mistake.
New patterns, as they are filed
One short email when a batch lands, with the feel of each.