
39 rounds · filed under dense · 24 of them
Amigurumi · added 17 Oct 2026
Chenille puppy amigurumi stuffed animal pattern
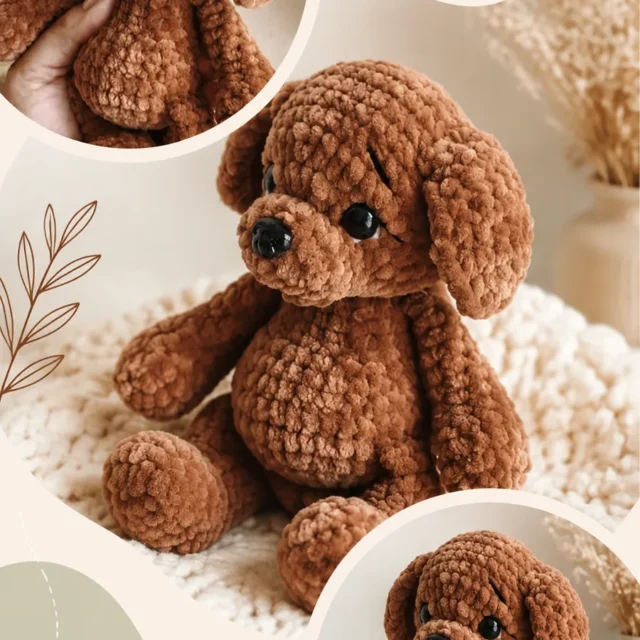
Single crochet worked in chenille builds a dense, fuzzy fabric for this stuffed puppy with rounded head, muzzle, body, arms, legs, and floppy
- Skill
- Intermediate
- Time
- 4-6 hours
- Hook
- 5 mm
- Yarn
- Bulky
- Rounds
- 31
About this pattern
Worked entirely in single crochet, the fabric here comes out dense and tight, with almost no gaps between stitches. That tightness is what keeps the fiberfill from poking through later, and it is also what lets the chenille yarn's fuzzy surface blur the stitch lines into something soft and pelt-like rather than ridged. Run a finger over a finished round and you feel bumps, not holes.
The shape builds from a flat ring at the crown of the head down through ten rounds of increases and decreases into a sphere, with the body, muzzle, ears, arms, and legs each made as their own small piece. Once a part comes off the hook, stuff it before closing the opening, then set it aside to be sewn on once the head and body are both shaped and firm.
This is a confident-beginner pattern worked in US crochet terms with a 5 mm US H-8 hook, using approximately 220 yards (200 meters) of bulky chenille yarn. Gauge is approximately 14 single crochet stitches by 16 rounds for 4 inches (10 cm), and the finished puppy stands approximately 8 inches (20 cm) tall.
All main pieces are worked in continuous rounds. Do not join rounds unless instructed. Place a stitch marker in the first stitch of each round and move it upward as you crochet.
The swatch in numbers
- Rounds
- 31
- Parts
- 7
- Level
- Intermediate
- Time
- 4-6 hours
- Hook
- 5 mm
- Yarn
- Bulky
The yarn and the hook
- Bulky chenille yarn in brown or your preferred plush color, approximately 220 yards (200 meters)
- Small amount of black yarn for embroidery
- 5 mm US H-8 crochet hook
- Polyester fiberfill stuffing
- Yarn needle
- Stitch marker
- Scissors
- Optional 10 mm safety eyes
Stitches, spelled out
MR Magic ringDense; sc Single crochetDense; inc Increase, 2 single crochet stitches in one stitch; dec Invisible decrease; sl st Slip stitch; st Stitch; FO Fasten off; UK equivalent sc is commonly called double crochet (dc) in UK terminology..
Tension and hand-feel
After Round 1 of the head, the six single crochet stitches should sit snugly around the magic ring with no visible gap at the center.
If the ring gapes open or the stitches feel loose and slide around the ring, tighten the tail and try a half size smaller hook so the fabric stays dense enough to hold stuffing.
The pattern gauge is approximately 14 single crochet stitches by 16 rounds for 4 inches (10 cm), producing a finished puppy about 8 inches (20 cm) tall.
Head
Head: Worked from the top downward in continuous rounds with gradual increases and decreases.
Muzzle
Body
Arms (Make 2)
Legs (Make 2)
Ears (Make 2)
Special Techniques
Invisible decrease: Insert the hook through the front loop only of the next two stitches, yarn over, pull through both loops, yarn over, and complete a single crochet. This creates a smooth amigurumi shape.
How the texture is built
- The head's increases are spread evenly across the early rounds, six stitches added at a time, which pushes the dome outward gradually instead of in one abrupt jump, keeping the curve smooth rather than stepped.
- The muzzle is shaped with a late-round decrease, three sets of (2 sc, dec), which narrows the piece just before it closes so it sits as a rounded bump rather than a flat disc when sewn to the face.
- The ears are worked flat in rows of chained turns rather than in the round, because a flat rectangle folded and seamed along one edge drapes and flops the way a round, stuffed piece never would.
Putting the pieces together
If you swap the yarn
| Bulky acrylic | Stitches stay sharp and visible instead of blurred, so increases and decreases on the head and muzzle will show as a ridged texture rather than being hidden by fuzz; hook size and stitch counts stay the same. |
|---|---|
| Worsted-weight cotton | Produces a thinner, firmer fabric that needs a smaller hook and more rounds to reach the same finished size, with a stiffer drape on the ears instead of a soft flop. |
| Super bulky plush polyester | Builds the same spherical shapes faster with fewer rounds needed to reach size, but the heavier yarn adds weight to the floppy ears and legs, so lighter stuffing keeps them hanging rather than sagging. |
Colorways
- Classic brown pup Brown chenille for the head, body, muzzle, ears, arms, and legs, with black embroidery yarn reserved for the nose and mouth details only.
- Two-tone patch Brown chenille for the head and body, a lighter contrast chenille for both ears and the muzzle, black embroidery yarn for the face.
Washing and blocking
Hand wash the finished chenille pieces gently in cool water, since machine agitation can flatten or mat the fuzzy pile.
Air dry fully before handling, laying the toy flat so the stuffed head and body keep their rounded shape instead of developing a flat side.
Store away from direct sunlight and reshape the ears and limbs by hand after storage, since chenille can flatten under pressure if left folded for long periods.
When it does not look right
- Loose stitches
- Use a smaller hook if stuffing shows through the fabric.
- Uneven shaping
- Count every round and keep the stitch marker in place.
- Lumpy stuffing
- Add small amounts of fiberfill gradually.
- Uneven facial placement
- Pin features temporarily before sewing.
Questions people ask
Can safety eyes be used instead of embroidered ones?
Yes, the materials list includes optional 10 mm safety eyes as an alternative to the black embroidery yarn. Place and secure them on the head before stuffing it fully, since the backing needs access from inside. Plastic safety eyes may not be appropriate for babies or children under three; for a baby-safe version, embroider the eyes and facial features securely instead.
Why does chenille yarn work better than smooth acrylic for this toy?
The fuzzy pile of chenille covers minor tension differences between stitches, so the single crochet fabric looks even without perfect stitch consistency. Smooth acrylic shows every stitch clearly, which demands more even tension from the maker.
How much should each piece be stuffed before closing it?
Stuff lightly through the middle rounds of the head and firmly before the final closing round, as the pattern notes at each stage. Firmer stuffing near the opening keeps the decrease rounds pulling tight around solid fill rather than collapsing inward.
Does this puppy design work for other animals?
Yes, the same rounded head, oval body, and separate ear pieces adapt to other animals by changing the yarn color and the shape or placement of the ears and facial embroidery. The underlying construction of continuous rounds and separate attached pieces stays the same.
New patterns, as they are filed
One short email when a batch lands, with the feel of each.