
35 rounds · filed under dense · 20 of them
Bags · added 20 Oct 2026
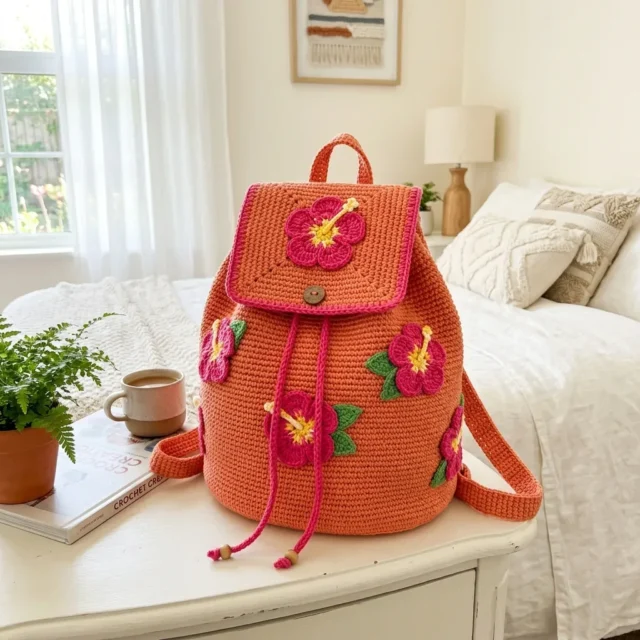
Coral hibiscus backpack worked in firm single crochet
Single crochet builds a dense, structured fabric for a flap backpack with crocheted hibiscus appliques and leaves.
- Skill
- Intermediate
- Time
- 10-14 hours
- Hook
- 3.5 mm
- Yarn
- Worsted
- Rounds
- 23
About this pattern
Single crochet, worked tight and continuous, is what gives this bag its backbone. Every round packs stitches close enough that the oval base and cylindrical body hold their shape without a liner, and under your hand the fabric reads dense and slightly stiff rather than soft or drapey. The flap and handle, worked flat in the same stitch, add a bit more flex but still feel firm between your fingers.
The shape is a bottom-up cylinder on an oval footprint, 8.75 inches wide and 5.5 inches deep, rising to 11 inches tall with a flap that folds down over the front third. Once the body is off the hook, this is the point to attach the handle, shoulder straps, and button, then set the hibiscus appliques and leaves where you want them before sewing them down.
The swatch in numbers
- Rounds
- 23
- Parts
- 8
- Level
- Intermediate
- Time
- 10-14 hours
- Hook
- 3.5 mm
- Yarn
- Worsted
The yarn and the hook
Yarn
- Main yarn A (terracotta): Worsted/Aran weight cotton or cotton-acrylic blend, approximately 430 yards (393 m)
- Flower yarn B (fuchsia): Approximately 75 yards (69 m)
- Accent yarn C (yellow): Approximately 20 yards (18 m)
- Leaf yarn D (green): Approximately 45 yards (41 m)
- Cord/edge yarn E (bright pink): Approximately 95 yards (87 m)
Suggested Yarns
- Paintbox Yarns Cotton Aran offers crisp stitch definition and saturated color
- Lion Brand 24/7 Cotton creates firm fabric and smooth structure
- Knit Picks Dishie Worsted provides durable cotton with good body for bags
Hook
- 3.5 mm (US E) or size needed for gauge
Extras
- 15 mm button
- 4 wooden beads
- 2 strap adjusters or D-rings
- Yarn needle
- Stitch markers
Substitution Note
- Choose a smooth worsted or Aran yarn that creates a firm fabric at gauge. If using softer acrylic, add a lining or work one hook size smaller for structure. Match stitch gauge first, then check row gauge.
Stitches, spelled out
Invisible Join Cut yarn, pull tail through final stitch, thread needle under both loops of first stitch, then back down through final stitch. Tighten to mimic a stitch. This creates a seamless finish.; Standing sc Place a slip knot on hook, insert hook in indicated stitch, yarn over, pull up a loop, yarn over and pull through both loops. Perfect for joining new yarn without a chain.Dense; Picot Tip Chain 3, slip stitch in first chain to make a small point for flower centers if desired.Lace; ch chain; dc double crochet (yarn over, insert hook, pull up loop, yarn over and pull through 2 loops twice)Drape; hdc half double crochet (yarn over, insert hook, pull up loop, yarn over and pull through all 3 loops)Dense; inc increase, meaning 2 sc in the same stitch; rem remaining; rnd(s) round(s); RS/WS right side/wrong side; sc single crochet (insert hook, pull up loop, yarn over and pull through both loops)Dense; sc2tog single crochet 2 stitches together (insert hook in next stitch, pull up a loop, insert hook in following stitch, pull up a loop, yarn over and pull through all 3 loops)Dense; sk skip; sl st slip stitch; sp space; st(s) stitch(es); yo yarn over.
Tension and hand-feel
After the base reaches its full width, lay it flat and check that it measures close to the stated oval footprint before you start the body rounds.
Base Rounds
Main Pattern
Top Handle
Shoulder Straps (Make 2)
Large Hibiscus (Make 6)
Body Rounds
This round creates the eyelet holes for your drawstring. Count carefully to make sure you have 8 evenly spaced eyelets.
Small Hibiscus (Make 2)
Leaves (Make 8)
Step 1: With yarn D, chain 8. Sc in 2nd chain, hdc, dc 3, hdc, 3 sc in last chain. (9 stitches on first side)
Step 2: Working along opposite side: hdc, dc 3, hdc, sc, slip stitch to first sc. Fasten off. (17 edge stitches)
How the texture is built
- The base increases are placed in four clusters at each end of the oval rather than spread evenly around the round, which is what pushes the shape long and oval instead of round.
- The Main Pattern flap is worked flat in rows rather than in the round because it needs to hang free from one point on the body and fold down independently, not join into a tube.
Putting the pieces together
If you swap the yarn
| cotton-acrylic blend, worsted weight | Lighter structure than pure cotton; add a fabric or fusible liner to the body so it keeps standing on its own, and keep the same 3.5 mm hook. |
|---|---|
| mercerized cotton, DK weight | Finer stitches and a smaller finished bag unless you add rounds; drop to a 3.0 mm hook to keep the fabric dense enough to hold its shape. |
| acrylic, aran weight | Softer hand and more drape in the body and flap, so size down one hook to compensate, or stiffen the base with a cardboard or plastic insert. |
Colorways
- Classic tropical Terracotta yarn A for the base and body, fuchsia yarn B for all 6 large and 2 small hibiscus flowers, yellow yarn C for the flower centers, green yarn D for the 8 leaves, and bright pink yarn E for the flap edge, handle cord, and drawstrings.
- Monochrome body, bright accents Work the base, body, handle, and straps all in yarn A so the structural piece reads as one solid color, then let yarn B, C, and D carry all the color through the hibiscus flowers and leaves alone, with yarn E reserved only for the flap trim and cord.
Washing and blocking
Hand wash the cotton body in cool water, since machine agitation can loosen the firm single crochet fabric over time.
Lay flat to dry over a towel or small box, as suggested at blocking, so the base and sides keep their built-in shape instead of drying flat.
Store stuffed with tissue paper or a folded towel so the oval base and cylinder walls don't collapse or crease between uses.
When it does not look right
- The base cups or ruffles instead of lying flat.
- The increase placement in Rounds 2 through 5 is off, usually from working increases into the wrong stitches at the oval ends. Check the 22-stitch straight sections on each side stay flat while the clusters at each end carry all the increases.
- The flap doesn't sit centered over the button.
- Row 1 of the Main Pattern was started in the wrong stitch, since the flap join point is set 19 stitches to the right of back center. Unpick and rejoin at the correct stitch count so the chain-8 button loop in Row 19 lands centered.
Questions people ask
Can the handle be worked as an i-cord instead of a flat strap?
Yes, the pattern notes an i-cord option for the drawstring cord as an alternative to the slip-stitched chain, giving a rounder finish. The Top Handle itself is worked flat in single crochet rows, but you can swap in an i-cord there too if you prefer a cord feel over a flat band.
How many hibiscus flowers and leaves does this pattern need in total?
You'll make 6 large hibiscus flowers, 2 small hibiscus flowers, and 8 leaves. Arranging them before sewing is worth the extra time, since placement is what gives the finished bag its character.
What stitch gauge should the body hold to before starting the flap?
The swatch target is 18 sc by 18 rows over 4 inches, and after Round 20 the body should measure about 4.25 inches tall from the base edge. Match stitch gauge first, then check row gauge, since a loose gauge will leave the walls unable to support the bag's own weight.
New patterns, as they are filed
One short email when a batch lands, with the feel of each.