
53 rounds · filed under dense · 23 of them
Bags · added 20 Oct 2026
Bobble Stitch Bucket Bag With Floral Appliques
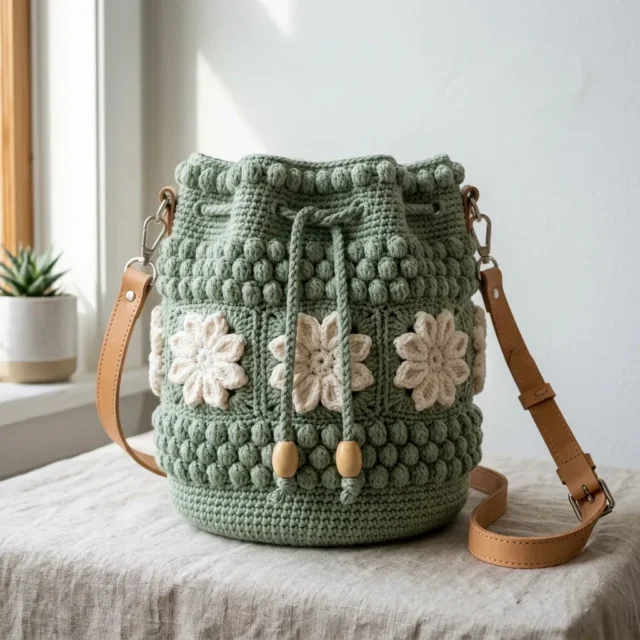
Bobble stitch raises firm bumps across a bulky single crochet bucket bag with cream flower appliques.
- Skill
- Intermediate
- Time
- 12-18 hours
- Hook
- 6.5 mm
- Yarn
- Bulky
- Rounds
- 49
About this pattern
Under your hand this bag reads as a field of firm, rounded bumps set into otherwise plain single crochet. The bobble stitch does the work here, each one built from five incomplete double crochets pulled together through six loops and locked with a closing chain 1. That closure has to stay tight, because a loose chain 1 lets the bump sag sideways instead of standing up round and proud. Worked in bulky yarn, the bobbles sit dense and close enough that the fabric feels almost upholstered rather than knit-soft.
The shape builds from a flat single crochet circle at the base, through two back-loop-only transition rounds that crease the fabric upright, into the bobble body, a drawstring eyelet band, and a smooth upper rim. What you get is a self-standing bucket with a firm floor and walls stiff enough to hold their shape when the bag is set down empty. Cinch the drawstring to close the top, or leave it open and let the cream flower appliques around the middle do the visual work.
The swatch in numbers
- Rounds
- 49
- Parts
- 9
- Level
- Intermediate
- Time
- 12-18 hours
- Hook
- 6.5 mm
- Yarn
- Bulky
The yarn and the hook
- Main Color (MC): Sage green, approximately 400 yards (366 m) of bulky weight yarn (US weight 5). This makes up the entire bag body.
- Contrast Color (CC): Cream or off-white, approximately 80 yards (73 m) of the same weight for the flowers.
- Lion Brand Pound of Love in bulky weight works beautifully here. The 100% acrylic gives excellent stitch definition for bobbles and is machine washable.
- Paintbox Yarns Simply Chunky is another solid choice. The consistent twist and smooth surface create clean bobble shapes, and their color range includes lovely sage and cream options.
- Wool and the Gang Shiny Happy Cotton in bulky weight is perfect if you want a firmer bag. The cotton content provides natural structure and a slight sheen.
- A quick note on yarn substitution: choose a smooth, tightly plied yarn. Loosely spun or fuzzy yarns will obscure your bobble texture, and you definitely want those bobbles to pop. Avoid anything with high halo.
- US Size K / 6.5 mm crochet hook , or whatever size you need to meet gauge.
- Stitch markers, at least 4
- Yarn needle for weaving ends and sewing flowers
- Scissors
- 3 wooden beads with a hole wide enough to thread a 4 mm cord, approximately 12 mm diameter
Stitches, spelled out
ch chain. Wrap yarn over hook, pull through the loop on your hook.; sl st slip stitch. Insert hook, yarn over, pull through both the stitch and the loop on hook in one motion.; sc single crochet. Insert hook, yarn over, pull up a loop (2 loops on hook), yarn over, pull through both loops.Dense; dc double crochet. Yarn over, insert hook, yarn over, pull up a loop (3 loops), yarn over, pull through 2 loops, yarn over, pull through remaining 2 loops.Drape; hdc half double crochet. Yarn over, insert hook, yarn over, pull up a loop (3 loops), yarn over, pull through all 3 loops at once.Dense; inc increase. Work 2 single crochet stitches into the same stitch.; sk skip. Pass over the indicated stitch without working into it.; sp space. The gap created by chain stitches.; st(s) stitch or stitches.; BLO back loop only. Work into only the back loop of the stitch, leaving the front loop unworked.Ridge; FLO front loop only. Work into only the front loop of the stitch.Ridge; RS right side. The outside of your work that will be visible when finished.; WS wrong side. The inside of your work.; rnd round.; rep repeat.; rem remaining.; pm place marker.; sm slip marker..
Tension and hand-feel
After Round 2 of the base, lay the circle flat and check that it measures roughly a round disc with no ruffling at the edge and no cupping inward; both signal your tension is off rather than your stitch count.
Section 1: Base
The base is a flat circle worked in continuous rounds of single crochet.
Foundation: Magic ring (adjustable loop).
Section 9: Flower Appliques (Make 3)
Each flower is worked in CC (cream). Make 3 identical flowers.
Foundation: Magic ring.
The finished flower has two layers of petals: a front layer of 5 smaller pointed petals and a back layer of 5 larger rounded petals offset between the front ones. This creates the full multi-petal look visible in the finished bag.
Flower Placement: Position the three flowers evenly spaced around the circumference of the bag, each approximately 120 degrees apart. Center each flower vertically between Rounds 26 and 34, which places them in the middle of the bobble body. Pin or use locking stitch markers to hold them in position before sewing.
Using the yarn tail and a yarn needle, sew each flower to the bag through the base of the flower center, catching the bobble stitches of the bag body with small secure stitches. Work around the perimeter of the flower center to anchor it flat. Weave in all ends on the inside.
Section 2: Base Transition Rounds
These two rounds shift from the flat base to the vertical walls using back loop only single crochet. Working through the back loop only creates a crisp fold at the base edge.
Section 3: Lower Single Crochet Band
This smooth band sits at the very bottom of the bag sides and provides a clean visual base below the bobbles.
Section 4: Bobble Body
The bobble body is the main visual section of the bag. It alternates bobble rounds with back-loop-only single crochet rounds. Bobbles are worked in a staggered offset on alternating bobble rounds so the bobbles brick across the surface.
Section 6: Drawstring Eyelet Round
This is a joined round. At the end of Round 39, slip stitch into the first stitch to join. Chain 1 to begin the eyelet round. The bag is still worked with RS facing.
Section 7: Upper Bobble Rim
The top rim mirrors the bobble texture and creates the raised rolled edge visible in the finished bag.
Section 8: Drawstring Cord
Using MC, make a chain approximately 48 inches (122 cm) long, or to your preferred length. Slip stitch into the second chain from the hook and into each chain across to form a tight, rounded cord. Fasten off leaving a 6-inch (15 cm) tail.
Thread the cord through the eyelet round beginning at the center front of the bag. Pass the cord in and out through each ch-2 space all the way around so both ends emerge at the center front.
Thread one wooden bead onto each end of the cord. Tie a firm overhand knot below each bead to secure. Trim excess cord if desired, leaving at least 1 inch (2.5 cm) below the knot.
Thread a third wooden bead onto both strands together just below where they emerge from the bag to create the central gathered drawstring look. Knot below this bead to hold it in place.
Section 10: Hardware and Strap Attachment
At the 3 o’clock position (directly to the right side of the bag when facing the front) and the 9 o’clock position (directly to the left), create two attachment loops for the strap hardware.
Cut two lengths of MC approximately 18 inches (46 cm) long. Thread each length through a D-ring on a lobster clasp fitting. Fold the yarn in half so the D-ring sits at the fold. Insert both ends to the inside of the bag between Rounds 39 and 40 (just below the eyelet channel) using a yarn needle, passing through the bag wall from outside to inside. Pull through about 3 inches (7.5 cm) on the inside. Tie the ends together firmly with several square knots on the inside. Thread the tails back through the adjacent stitches for at least 1 inch (2.5 cm) in each direction to distribute the load and prevent tearing. Weave in all ends.
Attach the pre-made leather strap clips to the D-rings. Adjust the strap to the desired length using the buckle.
How the texture is built
- The base builds by doubling stitch count each round (6, then 12 sc) in the early rounds, a standard flat-circle increase rate that keeps the disc from doming or rippling as it grows.
- Each flower applique is built separately in continuous rounds and joined with a slip stitch at Round 1, then worked in front loop only for the petal round, leaving the back loop free so the petals stand forward off the flower's flat disc instead of lying pressed against it.
Putting the pieces together
If you swap the yarn
| 100% acrylic, bulky weight | Closest match to the pattern's suggested yarn; bobbles hold their shape crisply and the fabric stays lightweight, with no change to the US K / 6.5mm hook. |
|---|---|
| 100% cotton, bulky weight | Adds natural structure and a slight sheen as noted for the cotton option, but cotton has less give, so bobbles will feel firmer and less springy; keep the same hook or go up a half size if stitches feel tight. |
| Wool-acrylic blend, bulky weight | Softer drape overall, so the bucket shape will hold less rigidly on its own; a half size smaller hook tightens the fabric back up if the walls feel floppy. |
Colorways
- Classic sage and cream Sage green MC covers the base, transition rounds, bobble body, eyelet round, and upper rim; cream CC is reserved entirely for the three flower appliques sewn around the bobble band.
Washing and blocking
acrylic yarn, skip wet blocking entirely; steam the outside of the body with a steam iron held at least 1 inch (2.5 cm) above the surface to relax and even the bobbles without flattening them.
cotton yarn, wet blocking is the better route since cotton holds a damp shape well and the fiber's natural structure keeps the bucket form after drying flat.
Reshape the bucket by hand while damp or freshly steamed, pressing the base flat and the walls round, and store the bag stuffed loosely with tissue or a shaper so the bobble texture doesn't get pressed flat in storage.
When it does not look right
- The base circle cups upward instead of lying flat
- Tension is too tight for the increase rate set in Rounds 1 and 2; move up a half hook size so each doubled stitch count has room to lie flat.
- Bobbles look flat or lean to one side instead of standing round
- The closing chain 1 in Step 6 is being worked too loosely; pull it snug before moving to the next stitch so it locks the six loops in place.
- The fold between the base and the walls looks soft or rounded instead of a crisp edge
- Stitches in Round 15 were worked through both loops instead of back loop only; redo that round in BLO to create the ridge that forces the crease.
Questions people ask
Can the bobble body be worked without stuffing or interfacing to keep its shape?
Yes, the bulky yarn and dense bobble stitch create enough body on their own that the walls hold a bucket shape unstuffed. Steam blocking the acrylic version afterward firms this up further without flattening the texture.
Why does the pattern work the base transition in back loop only?
Back loop only single crochet leaves the front loop standing proud as a ridge, and that ridge is what creates the crisp fold between the flat base and the upright walls. Skipping it leaves a soft, rounded transition instead of a defined edge.
Is it possible to make this bag in a smaller size by working fewer rounds?
The flat base increases are calculated to reach a specific stitch count before the transition rounds, so cutting rounds there will leave the base too small for the wall stitch count to sit flat. It's more reliable to keep the full 14 base rounds and shorten only the 18-round bobble body instead.
Do all three flower appliques need to be identical?
The pattern calls for three identical flowers worked the same way in cream CC yarn, which keeps the band around the bobble body visually even. Varying petal count or ring size on one flower will make it noticeably smaller or larger than its neighbors once sewn on.
New patterns, as they are filed
One short email when a batch lands, with the feel of each.