
11 rounds · filed under dense · 8 of them
Amigurumi · added 2 Oct 2026
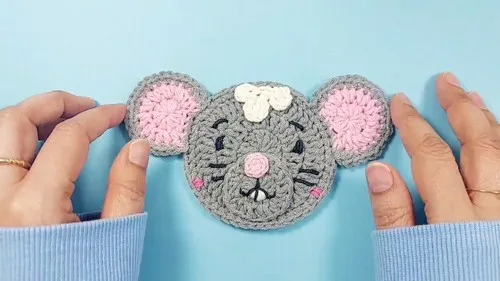
Crochet mouse face, ears, and hair motif for a granny square
Double crochet and half double crochet rounds build a flat mouse head, muzzle, ears, nose tip, and chained hair motif to stitch onto a granny
- Skill
- Intermediate
- Time
- 4-6 hours
- Yarn
- Worsted
- Rounds
- 11
About this pattern
Double crochet gives the mouse's head a dense, ridged surface — each round sits slightly proud of the last, so you can feel distinct rows under your fingers rather than a smooth curve. Worked in joined rounds instead of a continuous spiral, the fabric lies flat rather than cupping, with a firm hand that holds its circular shape before it ever meets a hook or needle for assembly. The muzzle, worked in half double crochet, feels shorter and softer between the rows, a visible step down in height from the head's taller stitch.
Both pieces come off the hook as flat circular medallions, not stuffed balls — the head reaching four rounds across, the muzzle stopping at three and sitting noticeably smaller in diameter. Stack the muzzle centered on the head once both motifs are finished, then set the pair onto the front of a granny square as a face panel. Because neither piece curls at the edge, they sit flush against the square's surface, ready to be tacked down with a few stitches rather than fought into place. The same pattern also builds a pair of ears, a small nose tip, and a chained hair motif to complete the face.
The swatch in numbers
- Rounds
- 11
- Parts
- 5
- Level
- Intermediate
- Time
- 4-6 hours
- Yarn
- Worsted
The yarn and the hook
- Worsted weight yarn in your main color (for the head, muzzle, nose tip, and hair)
- Crochet hook (size to suit your yarn)
- Gray yarn (joined for the Round 3 ear edging)
Stitches, spelled out
ch chain; st stitch; sl st slip stitch; sc single crochetDense; hdc half double crochetDense; dc double crochetDrape; inc increase; dec decrease; mr magic ringDense; fo finish off.
Tension and hand-feel
After round 1 of the head, check that the 12 double crochet stitches sit in a flat ring you can lay on the table without the edges lifting toward you.
If the circle domes upward instead of lying flat, your tension is tight — try a half size larger hook before round 2 so the increases in that round can spread the fabric back out flat.
The Mouse's Head (Main Body)
The Nose/Muzzle
The Ears (Make two)
The Tip of the Nose/Muzzle
The Hair
How the texture is built
- Both the head and the muzzle close each round with a slip stitch into the top of the first stitch, a joined-round method rather than a spiral; this keeps the increase points stacked in a visible line from round to round instead of scattering, which is what lets the motif lie flat for appliqué instead of curving into a cup.
- The head's stitch count exactly doubles from round 1 to round 2 — 12 double crochet stitches to 24 — meaning every single stitch of the first round takes an increase, the standard rate that keeps a flat disc flat rather than starting to dome.
- The muzzle repeats that same full-round increase (10 half double crochet stitches growing to 20) but in a shorter stitch, so across the same number of increase rounds it ends up both smaller in diameter and lower in profile than the head, which is what lets it sit centered on the head as a distinct lower layer rather than matching it edge to edge.
If you swap the yarn
| Cotton, worsted weight | Stitches sharpen and the ridge lines of the double crochet rounds on the head stand out more crisply; the fabric stiffens and holds a flatter shape against the granny square, so size the hook down slightly from what you'd use with the same weight in acrylic. |
|---|---|
| Acrylic, worsted weight | Keeps the dense, slightly springy hand the pattern is written around, with rounds staying flat without extra blocking; stick with the hook size the rounds were tested on. |
| Wool-blend, DK weight | Produces a smaller head and muzzle with a softer, more pliable fabric that drapes rather than holding a stiff disc shape; drop to a smaller hook so the round 1 ring doesn't gape before the increases start. |
Colorways
- Soft Fieldmouse Work the head in dove gray and the muzzle rounds in dusty pink, with the granny square background in oatmeal so both motifs read as a pale face against a warm neutral.
- Warm Barn Mouse Work the head in warm brown and the muzzle in cream, setting the granny square itself in a deeper rust so the face motifs lift forward instead of blending into the background.
Washing and blocking
Hand wash the finished motifs in cool water if the yarn is acrylic or a wool blend, since the dense double crochet rounds hold water and take time to dry through.
Lay the head and muzzle flat to dry rather than hanging them, so the flat circular shape doesn't stretch out of round under its own weight.
Store the finished square flat or loosely folded rather than stacked under other squares, which keeps the slightly raised muzzle motif from flattening into the fabric beneath it.
When it does not look right
- The head domes or cups instead of lying flat.
- The round-to-round increase isn't keeping pace with the stitch count (12 to 24); recheck that every stitch from round 1 gets a second double crochet in round 2, and loosen tension or size up the hook slightly if the ring still pulls inward.
- The muzzle looks too small or sits
- Half double crochet is shorter than double crochet, so the muzzle naturally reads smaller even at matching stitch counts; if the gap feels too large, work the muzzle in the next hook size up from the head to bring the two closer in scale.
- A visible step or ridge shows where each round joins.
- The slip-stitch join at the top of the first stitch leaves a small seam at that point every round; keep that join lined up on one side of the motif so it ends up hidden against the granny square once the piece is sewn down.
Close-ups


Questions people ask
Do the head and muzzle get stuffed like a typical amigurumi piece?
No — both are worked in joined rounds that stay flat rather than closing into a ball, so they read as flat motifs meant to layer onto the front of a granny square rather than stand alone as a stuffed shape.
Why use half double crochet for the muzzle instead of matching the head's double crochet?
The shorter stitch keeps the muzzle lower in profile and smaller in diameter even though it increases at the same rate, which is what makes it read as a separate, centered layer once it's placed on the head.
How is the mouse face attached to the granny square?
Finish the granny square and both motifs first, then center the muzzle on the head and set the stacked pair onto the square's front, tacking the flat edges down since neither piece curls or rolls.
How many rounds does each piece take to finish?
The head is worked over four rounds and the muzzle over two, with the muzzle's shorter stitch keeping its final round noticeably narrower than the head's. The ears each take three rounds, the nose tip a single round, and the hair is worked as a single chained row.
New patterns, as they are filed
One short email when a batch lands, with the feel of each.