
27 rounds · filed under dense · 27 of them
Amigurumi · added 16 Sep 2026
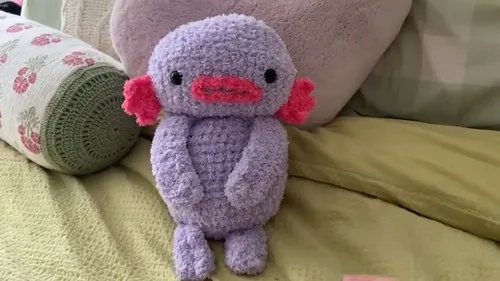
Crochet swamp monster plush with folded flat-panel limbs
Single crochet builds a dense, firm-bodied swamp monster amigurumi with flat folded arms and ridged fin panels.
- Skill
- Intermediate
- Time
- 4-6 hours
- Yarn
- Worsted
- Rounds
- 27
About this pattern
The head and body build up in single crochet, the stitch that packs tightest and shows the least gap between loops — that tight lock is what keeps stuffing from peeking through once the piece is filled. The side fins break from that density: rows alternate single crochet with half-double crochet and finish with a free single crochet pass, so the fabric there sits looser and steps outward instead of curving smoothly, giving the fin real ridges you can feel under a fingertip rather than a flat scalloped edge.
Underneath the dense head and body sit two flat panels — the 14-stitch arm and the 7-stitch leg — each folded lengthwise and seamed into a paddle rather than a round tube. That flatness is deliberate: a folded panel lies against the curved body instead of fighting it, so once seamed on, the limbs settle rather than pull. Attach the fins along the head or body sides where their ridged edge can stand proud, and save the mouth for last, working or stitching it directly onto the stuffed face.
The swatch in numbers
- Rounds
- 27
- Parts
- 6
- Level
- Intermediate
- Time
- 4-6 hours
- Yarn
- Worsted
The yarn and the hook
- Worsted weight yarn
- Crochet hook (size to suit your yarn)
Stitches, spelled out
ch chain; st stitch; sl st slip stitch; sc single crochetDense; hdc half double crochetDense; dc double crochetDrape; inc increase; dec decrease; mr magic ringDense; fo finish off.
Tension and hand-feel
There are no inch or stitch-per-inch figures given for this pattern, so judge the head and body rounds by feel: the stitches should sit close enough after the first few rounds that stuffing won't show through the gaps.
the arm and leg panels, lay the first row flat before folding — 14 stitches across for the arm and 7 for the leg — and if either row curls at the edges instead of sitting flat, tension is running tight and a slightly larger hook will let the fabric relax.
Side Fins or Gills
Leave a tail and create a starting chain of five stitches.
Arms
Make a starting chain of 15 stitches.
Legs
Make a starting chain of eight stitches.
Head
Start with a magic ring and make six single crochet stitches into the center.
Body
Start with a magic ring and place six stitches into the center.
Round 2: Two stitches in each stitch around, totaling 12 stitches.
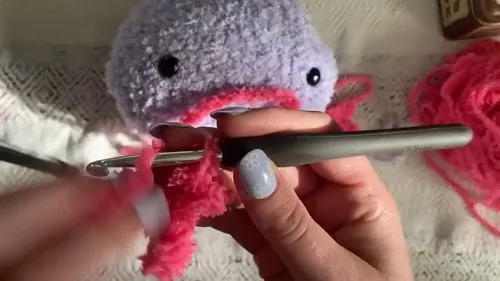
Mouth
Make a starting chain of 22 stitches.
Cut the yarn, leaving a long tail to sew the mouth onto the head.
How the texture is built
- The fins and gills, arms, and legs are all worked as flat rows with explicit turning ('Flip the work'), while the head and body are counted in rounds — that terminology split marks a real construction difference, flat panels for the limbs and fin, continuous shaping for the two amigurumi pieces.
- The fin alternates single crochet with half-double crochet on the right-side rows and adds a free single crochet pass on the return rows, so each pair of rows builds a slightly different stitch height — that mismatch is what pushes the ridge outward instead of letting the edge sit flat.
- The arm panel starts from a 15-stitch chain worked down to 14 single crochet stitches across 11 rows, and the leg panel starts from an 8-stitch chain worked down to 7 stitches across 13 rows — the leg's narrower, longer panel folds into a slimmer limb than the wider, shorter arm panel.
If you swap the yarn
| Cotton, worsted weight | Stitches hold their shape more crisply on the head and body rounds, which sharpens the fin's stepped ridge, but the fabric has less give, so stuffing the rounds firmly takes a bit more push; keep the same hook size. |
|---|---|
| Chenille or velvet-style yarn, worsted weight | Softens the stitch definition across every part, so the fin's alternating single and half-double crochet rows blur into a plush ripple instead of a sharp ridge; size up the hook slightly since the yarn is thicker per stitch, and stuff a touch less firmly since the fabric itself adds bulk. |
| Acrylic, DK weight | Shrinks the whole plush down since every round and row produces a smaller stitch, so drop to a smaller hook to keep the fabric dense enough to hide stuffing, and expect the folded arm and leg panels to come out noticeably slimmer. |
Colorways
- Classic Swamp Moss green on the Head and Body for the main mass, a darker forest green on the Arms and Legs so the folded panels read as a separate limb color, and a pale yellow or cream on the Side Fins or Gills to make the ridged edge stand out; work the Mouth in a near-black contrast.
- Bog Creature Deep teal on the Body and Head, violet on the Side Fins or Gills so the stepped stitch texture reads as a color block, and mismatched shades on each Arm and Leg for an asymmetrical look; finish the Mouth in a bright coral for contrast against the teal.
Washing and blocking
Hand wash the finished plush in cool water rather than a machine cycle, since the looser hdc rows in the fin can stretch or distort under agitation.
Reshape the fins and the folded arm and leg panels while still damp, pressing them flat, then lay the whole piece on a towel to air dry so the seams keep their line.
Store the toy loosely rather than pressed under other items, since the dense single crochet fabric of the head and body can hold a crease if compressed for long stretches.
When it does not look right
- The fin curls upward instead of lying flat against the head or body.
- Uneven tension between the single crochet and half-double crochet rows is pulling the shorter stitches tighter than the taller ones. Dampen the fin and press it flat under a light weight until it dries in that shape before seaming it on.
- The folded arm or leg looks lumpy or twisted after seaming rather than sitting as a flat paddle.
- The fold likely didn't land exactly down the center of the panel, so the two seamed edges don't match row for row. Unpick the seam, refold along the exact center stitch column, and whip-stitch through matching loops on each side.
- The head or body pulls tight and puckers instead of rounding out smoothly over 9 or 11 rounds.
- A stitch count has drifted off partway through the rounds, usually from a missed or doubled stitch at the round marker. Count stitches at the end of every round and correct any mismatch before continuing, rather than waiting until stuffing time.
Close-ups
Questions people ask
Do the arm and leg panels need to reach a specific length before folding?
Work the arm panel through all 11 rows of 14 single crochet stitches and the leg panel through all 13 rows of 7 single crochet stitches before folding either lengthwise. Stopping short leaves too little fabric to fold and seam into a stable limb.
The Mouth part shows 0 rounds — how is it actually made?
That zero means the mouth isn't built as a crocheted round at all; it's added afterward, either embroidered directly onto the stuffed head or cut and stitched on as a small appliqué. Position it after the head is fully stuffed so you can see the finished curve of the face.
Why are the fins and limbs worked flat in rows instead of joined in the round like the head and body?
Flat rows let the fin keep its stepped, ridged edge and let the arm and leg lie as folded paddles rather than round tubes. That flatness is what allows them to sit against the curved head and body instead of pulling away from it.
How much yarn and stuffing does this plush actually take?
Exact yardage and fill amounts aren't specified, but given the round and row counts, expect to use a small quantity of worsted weight yarn per color and enough polyester fiberfill to firmly pack the head and body rounds without stretching the single crochet fabric thin.
New patterns, as they are filed
One short email when a batch lands, with the feel of each.