
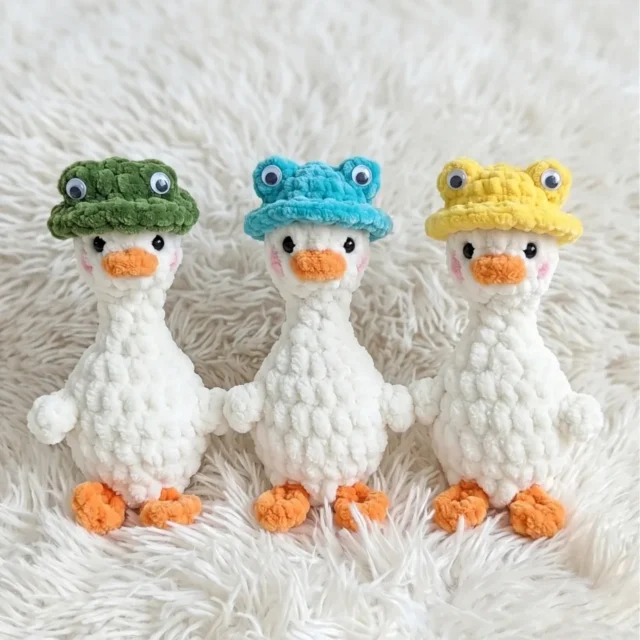
20 rounds · filed under dense · 10 of them
Amigurumi · added 15 Sep 2026
Mini goose amigurumi with a crochet frog hat pattern
Single crochet builds a dense, plush shell over firm stuffing for a small goose wearing an attached frog hat with a raised-eye popcorn stitch
- Skill
- Intermediate
- Time
- 4-6 hours
- Hook
- 3.5 mm
- Yarn
- Worsted
- Rounds
- 16
About this pattern
Worked entirely in single crochet, the surface comes out dense and slightly nubby, with almost no gaps between stitches once the plush or velvet yarn plumps up around them. That tightness is what holds the fiberfill in place and keeps the finished shape from going soft or lumpy at the seams — every stitch is doing structural work, not just covering ground.
The swatch in numbers
- Rounds
- 16
- Parts
- 3
- Level
- Intermediate
- Time
- 4-6 hours
- Hook
- 3.5 mm
- Yarn
- Worsted
The yarn and the hook
Yarn
- Plush/velvet yarn, 100g / 120m, in 3 colors — Green (frog hat), White (goose body), and a contrast color (beak and feet — orange or yellow recommended)
Hook
- US E-4 / 3.5 mm
Safety eyes
- 6 mm × 2
Stuffing
- Polyester fiberfill
- Stitch markers
- Yarn needle / tapestry needle
- Scissors
Stitches, spelled out
BLO Back Loop OnlyRidge; ch Chain; dec Invisible Decrease (insert hook in front loop of next 2 sts, draw up a loop, yarn over, pull through all 3 loops); FLO Front Loop OnlyRidge; hdc Half Double CrochetDense; inc Increase (2 sc in same stitch); MR Magic RingDense; sc Single CrochetDense; sl st Slip Stitch.
Tension and hand-feel
Gauge is not critical for this project; consistent, firm tension is more important so stuffing doesn't show through.
Head & Body (Begin with Green — Frog Hat)
Hat Brim
Attach Green yarn to the front loops left open in Rnd 4. Hold the goose upside-down so you are working away from you.
Beak
Attach contrast color yarn to the goose’s face at the appropriate position — 3 stitches wide, centered on the lower face below the eye shaping.
How the texture is built
- This pattern is written in US crochet terminology, and the goose is worked in a continuous spiral (no joining, no turning chains) unless otherwise noted. Stitch counts are given at the end of each round in parentheses: (##).
- The frog hat and goose head are worked as one continuous piece — do not cut yarn between the hat and body sections unless instructed. Leave the front loops of Round 4 (the color-change round) unworked; you will return to these later to crochet the hat brim.
- Safety eyes are glued on after finishing; placement is guided by the cheek-shaping step described in the finishing section. Wings and tail are worked inline during their respective rounds; feet are shaped with color changes during the lower body round.
Putting the pieces together
When it does not look right
- Plush yarn and tension
- Velvet/plush yarn is forgiving but loves to hide your stitches. Work under good lighting and count every round as you go — stitch markers at the round start are your best friend with this fiber.
- Frog eyes
- The raised popcorn-style frog eyes in Rnd 2 can feel awkward at first. Work slowly, keep your tension consistent, and make sure all 4 sc share the same “top” so the bump stands up cleanly. You can coax the shape with your fingers once the yarn is in place.
- Invisible decrease with plush yarn
- Because velvet yarn has a pile, standard decreases can look lumpy. For the cleanest result, insert your hook under only the very front threads of each stitch — the invisible decrease technique makes a real difference in how neat the body and cheek shaping look.
- Stuffing the body
- Fill the body firmly but not rock-hard — you want the goose to sit upright without flopping. Add stuffing in small pinches before Rnd 17 so you can gauge the density. The head section (Rnds 5–9) needs less stuffing than the rounded belly.
Questions people ask
Can I use regular acrylic yarn instead of plush yarn for this goose?
Yes, you can substitute a standard worsted weight acrylic — the finished goose will be slightly smaller and the surface will be smooth rather than velvety. Keep in mind that acrylic shows stitch definition more clearly, which actually makes it easier to count rounds. Adjust your hook size to a US G-6 / 4 mm if your tension tends to run loose.
The frog hat brim isn’t lying flat — what went wrong?
This usually happens if the front loops from Rnd 4 were accidentally worked into during the body rounds, leaving fewer loops to pick up for the brim. Make sure you work Rnd 4 strictly in back loops only, and place a stitch marker in one of the free front loops right away so you can find them easily later. If the brim still ruffles slightly, blocking with a light steam press will help it settle.
Where exactly should the safety eyes be placed?
The safety eyes sit just below the hat brim, roughly on either side of the face in line with the cheek-shaping round (Rnd 6). Do the cheek cinching with your needle first — the dimples will mark the exact spot for each eye. Always test placement with the eyes held in position before pressing the washers on, since they cannot be removed once secured.
My goose won’t sit upright — how do I fix this?
Stability depends on two things: firm stuffing in the lower belly and the angle at which the feet are positioned. Make sure the belly rounds (Rnds 10–14) are stuffed densely before you close up. If the goose still tips, you can sew a small circle of cardboard or plastic canvas to the base of the body before closing the opening — it gives a flat, weighted foundation that keeps the goose sitting perfectly.
New patterns, as they are filed
One short email when a batch lands, with the feel of each.