
Skip to the patterns
Hook Satisfied
Menu
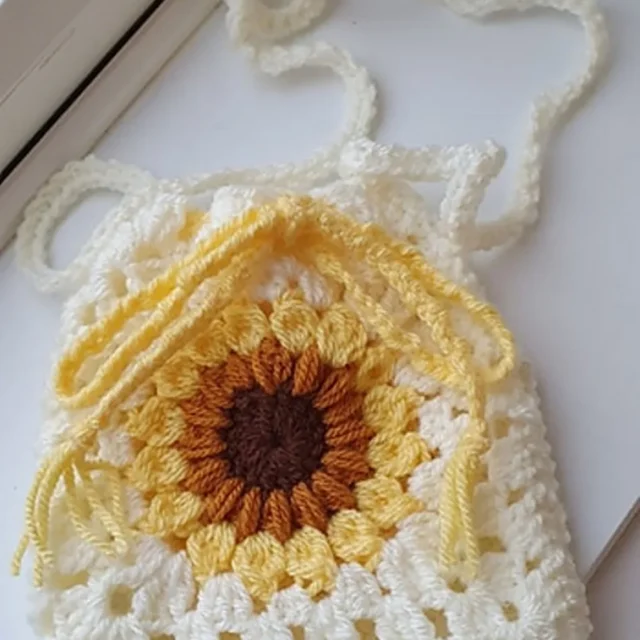
Sunflower granny square drawstring bag crochet pattern
Drape Bags

8 rounds · filed under drape · 3 of them

SquishDenseDrapeNo feel

Bags · added 6 Oct 2026

Sunflower granny square drawstring bag crochet pattern

Puff and cluster stitches raise a textured sunflower square, folded and seamed into a soft drawstring bag.

Skill
Intermediate
Time
4-6 hours
Hook
5 mm
Yarn
Aran
Rounds
5

About this pattern

Under your hand this fabric moves from flat to raised and back again. Round 1 lays down a smooth DC circle, then the puff stitches of round 2 push up into firm little domes that catch the light and give your fingers something to grip. The cluster round that follows softens those domes into rounder bumps before the DC and TR corners of round 4 flatten everything back into a crisp square edge, so one piece carries three distinct textures without changing hook or yarn weight.

Two of these squares, joined on three sides and turned right-side out, become a boxy little bag with an open top. Thread the plaited drawstring through the granny-cluster gaps around that opening and you have a pouch that holds its shape on a table but softens in the hand, sized to sit at the hip when the strap is cut long. Use it for small, light things — it is built from Aran cotton, not meant to carry weight on the puff stitches alone.

The swatch in numbers

Rounds
5
Level
Intermediate
Time
4-6 hours
Hook
5 mm
Yarn
Aran

The yarn and the hook

  1. Hook (5mm)
  2. Yarn (I recommend Paintbox DK Aran, but any Cotton Aran will do)
  3. Tapestry needle
  4. Scissors

Stitches, spelled out

hdc half double crochetDense; dc double crochetDrape; tr treble crochetDrape; puff puff stitchSquish; mc magic circle; ch chain; sl st slip stitch; sc single crochetDense.

Main Pattern

Round 1Start with your first color. Make a magic circle or chain 5 and join to form a loop. Chain 3 (this counts as your first DC). Make 15 DC into the loop. Join to the top of the first stitch and fasten off. You should have 16 stitches in total.
Round 2Puff Stitches Attach your second color and chain 2. Then, Yarn over, insert hook into the same stitch as the chain 2 and pull up a loop to the height of a DC (you should have three loops on your hook). Repeat this step twice more for a total of 7 loops on your hook. Pull through all 7 loops and chain 1 to secure the stitch. Repeat these steps all the way around until you have 16 puff stitches. Join to the top of the chain 2 with a slip stitch and fasten off. You should have 16 stitches.
Round 3Cluster Stitches Attach your third color in the spaces between the puff stitches and chain 3. Then, Yarn over, insert your hook between two puff stitches and pull up a loop. Yarn over and pull through two loops. You should have 2 loops on your hook. Make 3 more incomplete DC to have five loops on your hook. Pull through all five loops and chain 2 to secure the stitch. Repeat in every space around until you have 16 cluster stitches. Join to the top of chain 3 with a slip stitch and fasten off. You should have 16 stitches.
Round 4Creating the Square Attach your fourth color in any space from the previous round and chain 3 (this counts as your first DC). Make 2 additional DC in the same space. In the next space, work 3 TR, chain 2, and 3 more TR for the corner. In the next space, work 3 DC, 3 HDC in the next space, and 3 DC in the final space. Repeat from * to * three more times. Join with a slip stitch into the top chain 3 of your first DC. Do not fasten off.
Rounds 5–6Extending the Square Chain 3, make two more DC in the same space, then chain 1. Make 3 DC in the next space, chain 1, then at the corner make 3 DC, chain 2, 3 DC, and chain 1. Repeat from * to * around, join with a slip stitch to the top of the third chain of your first chain 3. Finish round 6, make a slip stitch and fasten off. Weave in your ends.

Putting the pieces together

Step 1Repeat the same process for a second granny square. Once you have two squares, join three sides together, leaving the top open. Place the right sides together, attach the fourth color at a corner and chain 1. SC in each stitch along the sides, placing one SC in each corner. Continue around the second and third side, and join with a slip stitch into the last stitch. Do not fasten off. Finally, flip your work right-side out and your bag is now ready!
Step 2 – StrapFrom where you finished your sl st, chain as many stitches as you want for the length of the strap — there is no fixed count, just chain until you are happy with the length (one example chained around 150, reaching just past the hips on a 5'1" frame). Once you've done the length of chain you are happy with, sl st into the other side to secure, then go back over in sc along the chain to give the strap more strength. Sl st again once you reach back to the opposite side. Fasten off.
Step 3 – DrawstringCut 6 pieces of yarn about 30-40 inches long, depending on the size you have made your bag. Knot all 6 pieces together, then start plaiting them together until you get to the end or your desired length. Split the plait into 3 sections of 2 strands together to make it thicker with a more desired effect. Once you have come to the end, knot the ends together so that they are secure. Weave the drawstring through the holes of your granny clusters. Make sure both ends are equal and tie them in a bow. Then voila! You have your very own drawstring bag!

Questions people ask

How long should the starting chain for the strap be?

There is no fixed count; chain until the length suits your own height, checking it against your hip as you go. One length used around 150 chains and reached just past the hip on a 5 foot 1 inch frame, so treat that as a reference point rather than a rule.

Why does the pattern say not to fasten off after round 4?

Rounds 5 and 6 build directly outward from the live stitches of round 4, so keeping the yarn attached lets the square grow without a second seam. Fastening off early would leave an extra join point visible on the flat side of the square.

Can the drawstring be made without plaiting six strands?

The six-strand plait, split into three pairs partway through, is what gives the cord enough thickness to sit comfortably in the hand and to weave cleanly through the cluster gaps. A thinner twisted cord will thread through the same gaps but will feel noticeably flimsier to pull.

New patterns, as they are filed

One short email when a batch lands, with the feel of each.