
14 rounds · filed under dense · 6 of them
Amigurumi · added 16 Sep 2026
Make a plush kitty paw keychain in single crochet
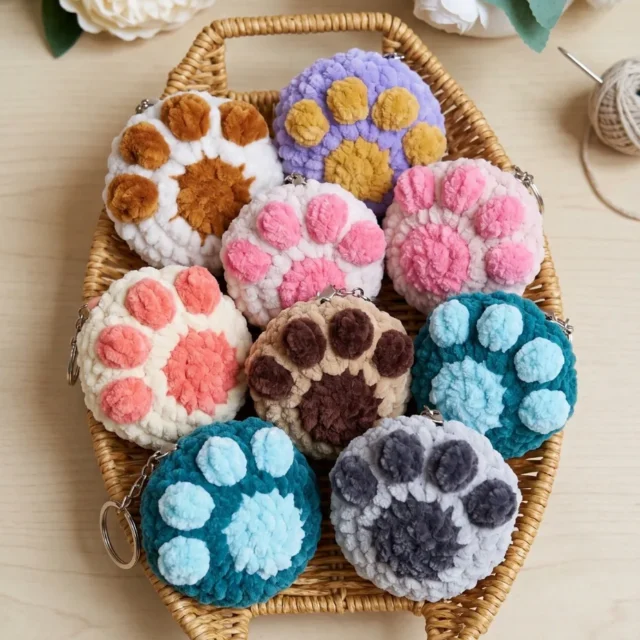
Firm single crochet in dense chenille shapes a plush kitty paw keychain with puffy toe beans.
- Skill
- Intermediate
- Time
- 2-4 hours
- Hook
- 3.5 mm
- Yarn
- Bulky
- Rounds
- 9
About this pattern
Bulky plush yarn worked tightly in single crochet turns dense here — sized down to an E-4 or F-5 hook, each stitch sits close to its neighbors, leaving little room for the polyester fiberfill inside to peek through. Under your fingers the fabric feels thick and velvety, more like a small cushion than a typical amigurumi shell, with a firm, springy give rather than any stretch.
The finished piece is a single paw-shaped pad, built as one continuous spiral from a seven-stitch magic ring up to its full width over nine rounds, with puff-stitch toe beans standing proud on its front face. Thread a keychain ring through the gap between the two center toes and it hangs ready to clip onto a bag, a set of keys, or a zipper pull.
The swatch in numbers
- Rounds
- 9
- Level
- Intermediate
- Time
- 2-4 hours
- Hook
- 3.5 mm
- Yarn
- Bulky
The yarn and the hook
Yarn
- Bulky-weight plush yarn (such as Himalaya Dolphin Baby or any similar velvet/chenille-style yarn) in two colors — one main color and one contrast color for the toe beans
Hook
- E-4 (3.5 mm) or F-5 (4 mm) hook — choose the size that gives you a firm, tight fabric
Stuffing
- Polyester fiberfill
Keychain ring
- One keychain ring with a chain
- Scissors
- Yarn needle / tapestry needle
Stitches, spelled out
ch Chain; dec Decrease (invisible decrease recommended); inc Increase (2 sc in same stitch); MR Magic RingDense; PS Puff Stitch (3 dc in one stitch); sc Single CrochetDense; sl st Slip Stitch.
Tension and hand-feel
Gauge is not critical for this project; what matters most is achieving a tight, firm fabric so the stuffing does not show through.
After Round 2, the fourteen stitches around the magic ring should sit close enough together that no fiberfill shows through when you pinch the fabric.
If you can see gaps or the circle feels floppy rather than firm, drop down from the F-5 to the E-4 hook and keep working the same stitch count.
Paw (Make 1)
Begin with contrast color yarn.
How the texture is built
- Round 1 opens with seven single crochet into a magic ring, and Round 2 puts an increase in every one of those seven stitches, doubling the count to fourteen — a fast early increase that builds a tight, small starting circle before the pad widens.
- Round 3 slows the increase rate to one every third stitch, bringing the count to twenty-one; spacing increases farther apart like this flattens the growth curve so the pad opens into a broad disc rather than a pointed cone.
- The paw is worked in continuous spiral rounds rather than joined rounds — do not join at the end of each round unless otherwise instructed, and use a stitch marker to track the beginning of each round; this pattern is also written throughout in US crochet terminology.
Putting the pieces together
If you swap the yarn
| Worsted-weight cotton | Stitches show more definition and the toe beans read flatter and crisper; drop to a smaller hook than the E-4 to keep the fabric firm, and expect a stiffer, less plush drape with fiberfill more likely to show unless stitches are packed tight. |
|---|---|
| Worsted-weight acrylic | Lighter in the hand and easier to find in solid colors, but lacks the velvety pile of chenille; keep to the E-4 or F-5 hook range but size down one step if the fabric feels loose, since acrylic doesn't full or grip like plush yarn. |
| DK-weight chenille or velvet | Produces a noticeably smaller paw with finer stitch definition; move to a smaller hook, such as a C-2 or D-3, use less fiberfill for the reduced volume, and expect a softer, thinner fabric overall. |
Colorways
- Warm ginger cat Contrast color (rounds 1-2, the fourteen-stitch center) in soft pink for the toe bean base; main color (round 3 onward) in warm ginger-orange for the rest of the paw body.
- Sleek black cat Contrast color (rounds 1-2) in dusty rose for the toe bean center; main color (round 3 onward) in solid black for the paw body and outer rounds.
Washing and blocking
Hand wash in cool water and avoid wringing or twisting the plush chenille, since agitation makes the pile shed and mat.
Reshape the paw and toe beans while still damp, then lay flat to dry so the puff stitches keep their rounded profile instead of flattening.
Store away from rough friction against keys or zippers, since the velvety pile crushes and pills with repeated rubbing; a soft pouch or its own ring loop keeps the nap intact.
When it does not look right
- The paw pad cups or curls instead of lying flat.
- The increases in the early rounds were likely uneven or too few; recount the increase in every stitch of Round 2 and the every-third-stitch pattern in Round 3, using a stitch marker to confirm where each round starts.
- The keychain ring pulls loose from the paw after light use.
- It was likely secured with only a single strand instead of being reinforced; whipstitch the ring several times through the gap between the center toes with main-color yarn as the assembly steps describe.
Questions people ask
Can I use a different yarn weight for this paw keychain?
Yes, but keep in mind that the finished size will change depending on your yarn weight. Bulky plush yarn gives you a palm-sized paw that's satisfying to hold. If you use a lighter weight, such as worsted or DK, the paw will be smaller and more delicate — you may also need to adjust your hook size accordingly. The stitch count stays the same regardless of yarn weight.
What is a puff stitch and how do I work it for the toe beans?
A puff stitch in this pattern means 3 double crochet stitches worked into the same stitch. To make it, yarn over, insert your hook into the stitch, pull up a loop, and complete a double crochet — then repeat twice more in the exact same stitch. The three dc clustered together create a raised, rounded bump that looks just like a toe bean. Work these in your contrast color and they’ll stand out beautifully against the main color paw.
How do I attach the keychain ring securely so it doesn't come loose?
Position the keychain ring between the 2nd and 3rd toe beans at the top edge of the paw. Use a short length of your main color yarn threaded onto a tapestry needle to whipstitch around the base of the ring and through the stitches of the paw several times. Knot the yarn securely on the inside and weave the tail into the stuffed interior. With plush yarn, the fluffy fibers help grip the knot so it holds extremely well.
How much yarn do I need to make one paw keychain?
Because this is a small project, you won’t need much yarn at all. A small amount of bulky plush yarn — roughly 10 to 15 meters of your main color and just a few meters of contrast color for the toe beans — is plenty for one keychain. This makes it a brilliant stash-buster project, and you can easily make several keychains from a single skein of plush yarn.
New patterns, as they are filed
One short email when a batch lands, with the feel of each.