
48 rounds · filed under dense · 37 of them
Amigurumi · added 15 Sep 2026
Mini penguin amigurumi pattern for a firm 10cm toy
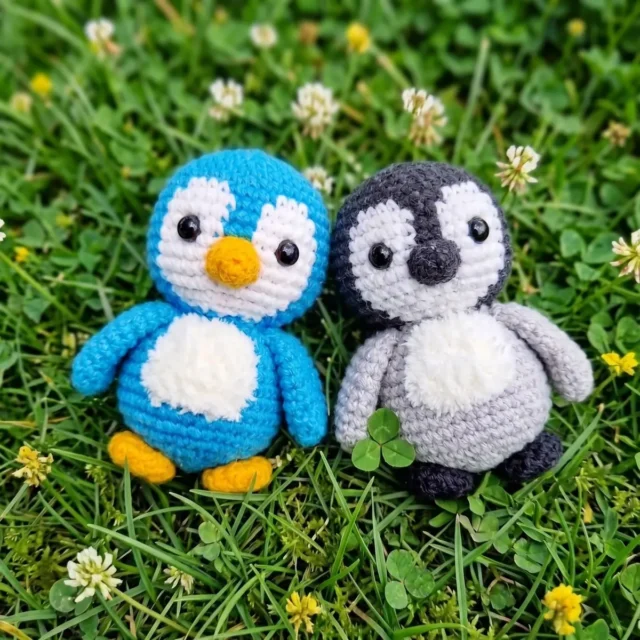
Single crochet worked dense with a small hook builds a firm, stuffing-ready fabric for this 10cm penguin amigurumi toy.
- Skill
- Intermediate
- Time
- 4-6 hours
- Hook
- 6 mm
- Yarn
- Fingering
- Rounds
- 44
About this pattern
Single crochet worked tightly with a 2 mm hook on fine yarn like YarnArt Jeans or Alize Softy makes a fabric with almost no gaps between stitches, dense enough to hold its shape without stuffing pushing through. Each increase round in the head and body spreads the stitches evenly outward, so the surface stays smooth rather than puckered, and the fabric keeps enough body to stand on its own once it is stuffed.
The head and body form one continuous rounded shape worked over 33 rounds, tapering from a small closed circle into a full curve without a seam at the neck. Smaller pieces — the beak, legs, and wings — attach afterward, each sewn on with the long tail left at closing, so plan the stuffing firmness of every part before sewing it on, since a loosely packed leg will not hold the finished penguin upright.
The swatch in numbers
- Rounds
- 44
- Parts
- 5
- Level
- Intermediate
- Time
- 4-6 hours
- Hook
- 6 mm
- Yarn
- Fingering
The yarn and the hook
Yarn
- YarnArt Jeans or Alize Softy in the following colors: black, white, light gray, and a small amount of orange (for the beak and legs)
Safety eyes
- 6 mm with secure locking backs (or half-beads adhered with strong craft glue)
Stuffing
- Polyfill or hollowfiber stuffing
Tapestry needle
- Wide-eye needle for sewing and weaving in ends
- Scissors
Tools
- 2 mm (or size appropriate for your yarn to achieve a firm, stuffing-free gauge)
Stitches, spelled out
ch chain; sl st slip stitch; sc single crochetDense; inc increase (2 sc in the same stitch); dec decrease (invisible decrease over 2 stitches); mr magic ringDense; FLO front loop onlyRidge; dc double crochetDrape; rep repeat.
Tension and hand-feel
Gauge: approximately 5 sc = 1 cm using YarnArt Jeans and a 2 mm hook.
After round 3, the 18-stitch circle should lie flat on a table without cupping inward or rippling at the edges.
If it cups, move up a hook size; if it ripples and won't sit still, drop to a smaller hook until the stitches pull tight enough to hold their shape without stuffing showing through.
Head and Body (worked in one piece)
Switch to light gray yarn here. If you prefer a solid-color penguin, continue with the main color.
Beak
Legs (make 2)
Wings (make 2)
Fluffy Chest Patch
How the texture is built
- The head and body increase every round through at least round 5 (6, 12, 18, 24, 30 stitches), spreading the stitch count evenly outward to build the curve of the skull before the rate of increase eases off for the straighter sides of the body.
- The legs start with a chain of 6 rather than a magic ring, worked around both sides of the chain to form a flat oval sole, before the decrease rounds at 4 and 5 pull the stitch count from 12 down to 8 to shape the ankle.
- The beak's final round closes with a slip stitch instead of continuing the spiral, turning the open cone into a solid point and leaving a tail long enough to sew it straight onto the head without a separate closing pass.
Putting the pieces together
If you swap the yarn
| Cotton, fingering weight | Stitch definition sharpens and the fabric loses some springiness, so drop to a 1.75 mm hook to keep the same tight gauge, and pack stuffing a little firmer since cotton shows lumps through the fabric more readily than the original yarn. |
|---|---|
| Acrylic, DK weight | The fabric thickens noticeably, so size up to a 2.5 mm hook to avoid a stiff board-like feel, and the extra loft in the yarn itself means less stuffing is needed to reach the same firmness. |
| Wool blend, fingering weight | The finished fabric gains drape and a slight halo, so stuff a touch lighter to avoid stretching the stitches out of shape, and keep in mind wool can felt slightly if machine washed. |
Colorways
- Classic black and white Black covers the head and upper body rounds down to the stripe boundary where the beak sits, white takes over for the lower body, light gray shapes both wings, and orange is reserved for the beak and both legs.
- Soft gray fade Light gray replaces black across the head rounds, white fills the body below it, black is limited to a narrow band at the wing edges only, and orange stays on the beak and legs as in the standard version.
Washing and blocking
Hand wash in cool water and avoid wringing, since the cotton-acrylic blend named in the materials list can lose its tight stitch definition if agitated too roughly.
Lay the finished penguin flat to dry rather than hanging it, so the stuffed body and legs keep their shape instead of stretching under their own weight.
Store away from direct sunlight and reshape the wings and legs by hand after any wash, pressing gently back into place while the fabric is still slightly damp.
When it does not look right
- The head-body bulges unevenly instead
- The increases in the early rounds (rounds 1-5) were bunched together rather than spaced evenly around the round; on the next attempt, spread each inc so it lands in a different position than the round before, keeping the increase pattern staggered.
- The legs won't stand flat and the oval sole curls upward.
- The starting chain of 6 was worked at an uneven tension, tightening one side more than the other; redo the foundation round with even tension across both the chain stitches and the 3-sc turn at the end of the chain.
- The beak looks floppy and dents in when pressed.
- Too little stuffing was packed into the 3-round cone before the sl st closed it; unpick the closing stitch, add a small amount more filling, and re-close so the point holds firm.
Questions people ask
What skill level is required for this mini penguin pattern?
This pattern is best suited for beginner-intermediate crocheters who are already comfortable with magic rings, increases, decreases, and basic color changes. If you have completed one or two simple amigurumi projects before, you should be able to follow this pattern without difficulty. The color-work in the head section is the most technically demanding part.
How long does it take to complete this mini penguin?
Most crocheters with intermediate experience can complete this penguin in approximately 3 to 5 hours, including assembly. The head and body section worked in one piece is the most time-consuming element. Working in focused sessions of an hour or two makes the project very manageable across an evening or weekend.
Can I sell finished toys made from this pattern?
Handmade items crocheted from this pattern may generally be sold as finished toys, provided credit is given to the original designer where required. Always verify current terms with the pattern source before listing items commercially.
New patterns, as they are filed
One short email when a batch lands, with the feel of each.