
10 rounds · filed under dense · 2 of them
Baby Clothing · added 10 Oct 2026
Mint green granny cluster baby poncho pattern
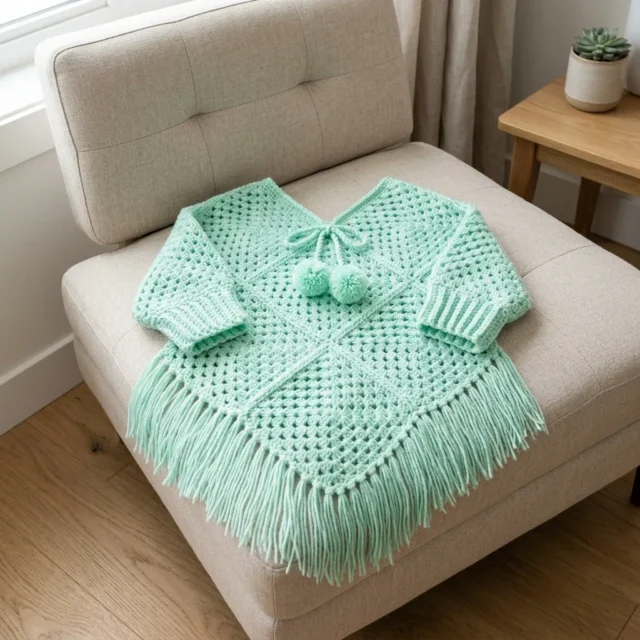
3dc clusters build a bumpy, textured granny fabric in this mint green baby poncho with fringe and pompom trim.
- Skill
- Intermediate
- Time
- 8 to 12 hours
- Hook
- 6.0 mm
- Yarn
- Worsted
- Rounds
- 3
About this pattern
Each row of this poncho panel builds from a 3-double-crochet cluster set into ch-2 spaces, so the fabric comes out thick and nubby rather than smooth. Worsted weight yarn fills the clusters until they sit close together, while the chain-2 gaps between them let light and air through in a loose grid. Run a hand across a finished panel and you feel raised ridges with soft give in the open spaces, dense enough to hold its shape over small shoulders, open enough to drape rather than stand stiff.
Two matching rectangular panels, each about 11 inches wide, become the body of the poncho once joined along a short shoulder seam and left open below for arm and head openings. The ribbed cuff worked across one short edge of each panel turns the fabric 90 degrees, adding a snugger band where the granny clusters would otherwise flare. Finished, the poncho measures about 22 inches around the chest and 11 inches from shoulder to hem, ready for the fringe and pompom trim before it goes on a baby between 12 and 18 months old.
The swatch in numbers
- Rounds
- 3
- Level
- Intermediate
- Time
- 8 to 12 hours
- Hook
- 6.0 mm
- Yarn
- Worsted
The yarn and the hook
Yarn
- Approximately 350 yards of worsted weight yarn in mint green. I recommend smooth acrylic or superwash wool blends since baby items need to be machine washable. Lion Brand Pound of Love in Pastel Green works beautifully. Red Heart Soft in Seafoam is another great budget option.
Hook
- US size J-10, which is 6.0 mm
Notions
- Yarn needle for seaming
- Scissors
- 4 stitch markers
- Cardboard rectangle about 3 inches wide for fringe
- Cardboard circles about 2.5 inches in diameter for pompoms
- Measuring tape
Stitches, spelled out
ch chain; sl st slip stitch; sc single crochetDense; dc double crochetDrape; ch-sp chain space (the gap created by chain stitches in the previous row)Lace; sk skip; BLO back loop onlyRidge; RS right side; WS wrong side; 3dc-cl 3 double crochet cluster - work 3 double crochets into the same space.
Tension and hand-feel
Measure the panel width a few rows in rather than waiting for all 14 rows, since a true repeat holds 7 clusters and 8 ch-2 spaces sitting close to the finished panel's 11-inch width.
Panel (Make 2)
Make 2The 5 skipped chains at the start of Row 1 create the turning structure and first edge space.
Do not fasten off after Row 14; continue directly to the cuff ribbing.
Checkpoint: panel should measure approximately 11 inches wide by 10.5 to 11 inches tall; confirm you have 7 clusters across any row.
Cuff setup: after completing the panel rows, fasten off and cut yarn; with the right side of the panel facing you, find one short side edge (14 row ends along this edge); join yarn at the top corner of this short edge before beginning Cuff Row 1.
Make two identical panels (Panel A and Panel B), each with a ribbed cuff strip along one short edge.
Each finished panel measures approximately 11 inches wide by 11 inches tall.
Foundation Chain: Chain 24.
How the texture is built
- Row 1 skips 5 chains before placing the first cluster, which builds the turning structure and opens the first edge space that every following row works into.
- The panel is worked flat in rows, not joined into rounds, so each of the 14 rows holds steady at 7 clusters and 8 ch-2 spaces with no increases or decreases - the piece stays a true rectangle start to finish.
- The pattern does not fasten off after Row 14; the cuff rows pick up directly off the last row and run in a different direction, single crochet instead of clusters, turning the open granny fabric into a tighter ribbed band at the edge.
Putting the pieces together
If you swap the yarn
| Cotton, worsted weight | Cotton has far less stretch than a standard worsted yarn, so the ch-2 spaces hold their shape instead of relaxing; the fabric also gets noticeably heavier on the same J-10 hook, which can drag the finished poncho longer unless you check the panel width after a few rows. |
|---|---|
| Acrylic, worsted weight | Acrylic keeps the same hook size and row count workable while giving a lighter, machine-washable fabric with a bit more spring in the ch-2 spaces, trading some of the dense hand-feel of a heavier fiber for easier everyday care on a baby garment. |
| Wool-blend, DK weight | Dropping to DK weight thins the clusters and opens the ch-2 spaces further, so the hook needs to come down a size or two from the J-10 to keep the panel near its 11-inch width, and the finished fabric drapes softer but loses some of the structured body the worsted weight gives the cuffs. |
Colorways
- Cream-Trimmed Mint Keep both full panels and the cuff rows in mint green, and reserve a soft cream or off-white only for the pompoms wound on the 2.5-inch cardboard circles, so the only color change sits at the two pompom points rather than along any seam or row.
Washing and blocking
Hand wash the finished poncho in cool water and avoid wringing the clusters, since twisting pulls the ch-2 spaces out of shape faster than the open fabric can recover on its own.
Dry the piece flat on a towel rather than hanging it, since the weight of wet worsted yarn stretches a hanging poncho long at the shoulder seam.
Reshape the panels to their 11-inch width while still damp and let the fringe hang straight as it dries, then store the poncho folded rather than on a hanger to keep the cluster rows from sagging out of their grid over time.
When it does not look right
- The panel comes out narrower or wider than 11 inches even though the row counts check out.
- Tension on the 3dc-cl clusters is running tight or loose rather than the chain count being off; work a swatch with a hook a size up or down from the J-10 and recheck width before committing to all 14 rows.
- The ribbed cuff pulls the panel edge in or leaves it wavy once anchored.
- The sl st anchoring the cuff to the row ends is going in too tight or skipping rows unevenly; work the anchor stitch at the same tension as the rest of the piece and match one anchor point per row end along the edge.
- The ch-2 spaces look uneven in width across a single row.
- A cluster is landing in the wrong chain space or a ch-2 is missing a chain; recount the row against the 7 clusters and 8 ch-2 spaces it should hold before moving on to the next row.
Questions people ask
Why does this poncho use two separate panels instead of working in the round?
Working two flat rectangular panels lets you seam a short shoulder section while leaving the rest open for the head and arms, which a single round piece cannot do as cleanly. It also keeps the ribbed cuff rows simple to add along a straight edge once each panel is finished.
How do you know a panel is ready to seam before starting the cuff?
Check it against the pattern's own checkpoint: the panel should measure about 11 inches wide by 10.5 to 11 inches tall, with 7 clusters holding steady across any row. If either measurement is off, the seam and cuff will not match between the two panels.
What does the slip stitch seam actually do to the finished edge?
Worked through both panel layers at once with wrong sides together, it pulls up into a raised ridge on the right side rather than disappearing flat, so the shoulder seam reads as a visible design line rather than a hidden join.
Can the fringe and pompoms be skipped if you want a plainer finish?
Yes, the fringe cut from the 3-inch cardboard rectangle and the pompoms wound on the 2.5-inch circles are both finishing steps added after the panels and cuffs are complete, not part of the body construction, so leaving them off still gives a complete poncho at the 22-inch chest and 11-inch length.
New patterns, as they are filed
One short email when a batch lands, with the feel of each.