
11 rounds · filed under drape · 3 of them
Baby Clothing · added 9 Oct 2026
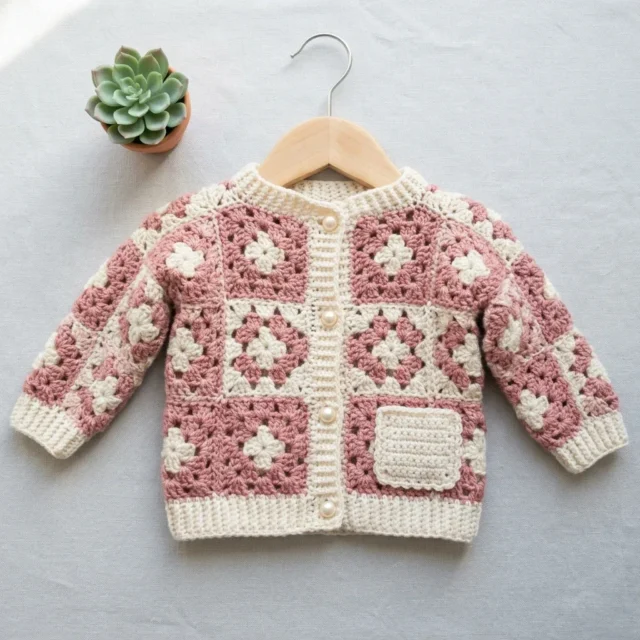
Granny square baby cardigan in dusty rose and cream
Double crochet clusters build a thick, textured granny square fabric joined into a baby cardigan with ridge seams.
- Skill
- Intermediate
- Time
- 4-6 hours
- Hook
- 5.0 mm
- Yarn
- Worsted
- Rounds
- 3
About this pattern
Under the hand this cardigan reads as a grid of small, dense tiles rather than one continuous panel. Each 3-dc cluster packs three double crochet stitches into a single space, so the fabric builds up thick and slightly stiff at first, then relaxes into a soft, slightly nubby surface once the chain-2 corners and chain-1 sides open the mesh between clusters. The result holds its shape in the hand without going board-stiff, and the open spaces let a little air through the layers.
Thirty-seven 3-inch squares assemble into the back, two fronts, and two sleeves of a cardigan sized for 12 to 18 months, finished at 22 inches around the chest and 11 inches from shoulder to hem. Work the squares first and keep them sorted by color type and position before joining, since the layout grid determines where each rose-centered and cream-centered square lands. Block every square to the same 3-inch measurement before seaming so the grid lines up square.
The swatch in numbers
- Rounds
- 3
- Level
- Intermediate
- Time
- 4-6 hours
- Hook
- 5.0 mm
- Yarn
- Worsted
The yarn and the hook
- Color A (Dusty Rose): approximately 300 yards (274 meters) of worsted weight yarn
- Color B (Cream/Off-white): approximately 250 yards (229 meters) of worsted weight yarn
- Lion Brand Pound of Love (100% acrylic, 1020 yards per skein): Soft, machine washable, widely available, and ideal for baby garments. Use Buttercream for Color B and Dusty Pink for Color A.
- Paintbox Yarns Simply DK (100% acrylic, 137 yards per 50g skein): A smooth, affordable yarn with excellent stitch definition that makes the granny square flower centers pop. This is a DK weight and will require a gauge swatch to confirm square size matches.
- Cascade 220 Superwash (100% superwash wool, 220 yards per 100g skein): A higher-end option with beautiful drape and natural softness ideal for baby skin. Machine washable. Use Doeskin Heather for Color A and Cream for Color B.
- Any worsted weight or heavy DK yarn that achieves the stated gauge may be substituted. Prioritize machine-washable fibers for baby garments. Avoid yarns with excessive halo like mohair blends because they obscure the granny square stitch definition.
- US size H-8 / 5.0 mm crochet hook
- Yarn needle for seaming and weaving in ends
- 5 pearl shank buttons, approximately 12 mm diameter
- Stitch markers
- Scissors
- Rust-proof blocking pins
- Blocking mat or towels
Stitches, spelled out
blo back loop only (insert your hook under just the back loop of the stitch instead of both loops)Ridge; BOR beginning of round; ch chain; ch-sp chain space (the gap created by chain stitches)Lace; dc double crochet (yarn over, insert hook, pull up loop, yarn over, pull through 2 loops, yarn over, pull through remaining 2 loops)Drape; pm place marker; rem remaining; rep repeat; rnd round; RS right side; sc single crochet (insert hook, pull up loop, yarn over, pull through both loops)Dense; sk skip; sl st slip stitch (insert hook, pull up loop and through loop on hook in one motion); sp space; st stitch; sts stitches; WS wrong side; JAYG join as you go.
Tension and hand-feel
After Round 1, lay the four dc clusters flat and check that the ring sits open with four even corner spaces, not pulled tight into a cone.
If the clusters bunch instead of opening flat, loosen the tension on the chain-2 corners and re-check against a neighboring sample square before committing to all 37.
Granny Square
Make 37This pattern uses a standard 3-round granny square. You'll make two types that alternate colors to create the checkerboard effect.
Total squares required: Back panel 12 squares; Left front 6 squares; Right front 6 squares; Sleeves 12 squares (6 per sleeve); Pocket 1 square (worked with Color B only for a solid cream look). Total: 37 squares.
Of the 37 squares: Type 1 (rose center, cream border) = 19 squares; Type 2 (cream center, rose border) = 18 squares.
Back panel grid (4 wide x 3 tall): Row 1 from bottom: T1, T2, T1, T2; Row 2: T2, T1, T2, T1; Row 3 (top/yoke): T1, T2, T1, T2.
Right front panel grid (2 wide x 3 tall): Row 1: T2, T1; Row 2: T1, T2; Row 3: T2, T1.
Left front panel grid (2 wide x 3 tall): Row 1: T1, T2; Row 2: T2, T1; Row 3: T1, T2.
Right sleeve grid (2 wide x 3 tall): Row 1: T1, T2; Row 2: T2, T1; Row 3: T1, T2.
Left sleeve grid (2 wide x 3 tall): Row 1: T2, T1; Row 2: T1, T2; Row 3: T2, T1.
Pocket: 1 square, Type 2 (or all Color B for solid cream).
How the texture is built
- Each square builds its corners from chain-2 spaces placed at the four points of the ring, and every round after Round 1 grows outward only by working new clusters into those same corner spaces, which is what keeps the square flat instead of cupping.
- Color changes happen at fastening-off points between rounds rather than mid-round, so each round is worked in one color from start to finish and the next color joins fresh at a corner space.
- The join-as-you-go single crochet seam works through both layers at once with wrong sides held together, which pushes a visible sc ridge to the right side instead of hiding it on the back.
Putting the pieces together
If you swap the yarn
| Cotton, worsted weight | Produces a crisper, heavier square with less give in the ch-2 corners; stick with the H-8/5.0mm hook but expect the finished cardigan to sit stiffer against the body and take longer to dry. |
|---|---|
| Acrylic, worsted weight | Keeps the same H-8/5.0mm hook and yardage close to the 300/250 yard amounts listed, with squares that drape slightly looser and resist felting if the cardigan sees frequent washing. |
| Wool-blend, DK weight | Drops the square size below 3 inches at the same stitch count, so sizing up to an H-9/5.5mm hook keeps the squares closer to the 3-inch gauge while adding a touch more loft to the dc clusters. |
Colorways
- Rose-forward Use Color A (Dusty Rose) for Round 1 centers and Color B (Cream) for Rounds 2 and 3 on most squares (Type 1), so rose centers dominate the grid with cream borders framing each one.
- Cream-forward Use Color B (Cream) for Round 1 centers and Color A (Dusty Rose) for Rounds 2 and 3 (Type 2) across more of the 37 squares, so cream centers read as the dominant tile color with rose borders and rose JAYG seams tying the grid together.
Washing and blocking
Hand wash the finished cardigan in cool water to protect the worsted-weight fibers used across both colors, since the dense dc clusters hold moisture longer than open stitch work.
Lay flat on a blocking mat or towel to dry rather than hanging, so the weight of the wet squares does not pull the joined grid out of its 22-inch chest measurement.
Store folded rather than on a hanger, with the button side flat, to keep the granny square texture from stretching along the shoulder seams.
When it does not look right
- Individual squares cup or dome instead of lying flat.
- Tension on the ch-2 corner spaces is too tight across one or more rounds; reblock the square to the 3-inch measurement using rust-proof pins and let it dry fully before joining.
- The joined seam ridge looks uneven or
- The squares were joined with right sides together instead of wrong sides together; unpick the sc seam and rejoin with wrong sides facing so the ridge sits visibly on the right side.
- Squares come out smaller or larger than
- Hook tension on the dc clusters is running tight or loose compared to the sample square; adjust hook size slightly or work a looser/tighter dc until a blocked square matches the 3-inch gauge before continuing.
Questions people ask
Why does each square change color between rounds instead of staying one color throughout?
Round 1 is fastened off before Round 2 begins, which is what allows Color A and Color B to swap cleanly at a corner space. This also produces the two-tone look where Type 1 squares show a rose center and Type 2 squares show a cream center.
How many of the 37 squares need to be Type 1 versus Type 2?
The pattern's layout grid determines the split between rose-centered and cream-centered squares across the back, fronts, and sleeves, so sort and label squares by position before joining rather than guessing a ratio.
Does the ridge from the join-as-you-go seam feel bulky against a baby's skin?
The ridge sits on the right side of the fabric by design, facing outward, so the wrong side seam allowance stays smooth against the body. The dc cluster fabric itself is thicker than a plain sc fabric, which is the main texture a caregiver will notice against skin.
What happens if a square blocks out larger or smaller than 3 inches?
Since all 37 squares need to match for the grid to align into the 22-inch chest and 11-inch length, reblock any outlier square to the 3-inch target before joining. A single mismatched square will show as a visible pucker or gap once the rows are seamed together.
New patterns, as they are filed
One short email when a batch lands, with the feel of each.