
26 rounds · filed under dense · 13 of them
Accessories · added 11 Oct 2026
Pearl-trimmed dusty rose lace collar crochet pattern
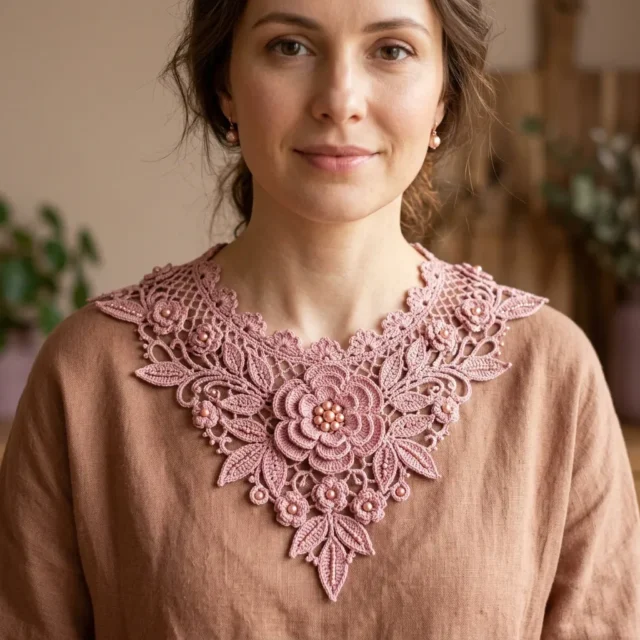
Double crochet petal clusters build a raised, dimensional lace texture in this pearl-trimmed dusty rose thread collar.
- Skill
- Intermediate
- Time
- 4-6 hours
- Hook
- 1.65 mm
- Yarn
- Lace (Size 10 Crochet Cotton)
- Rounds
- 16
About this pattern
Run a finger across one of the rose motifs and the ridges stand up rather than lying flat — each petal is a cluster of four to nine double crochet stitches packed into a single base stitch, so the loops pile outward instead of settling smooth. Worked in size 10 crochet cotton on a fine steel hook, the base rounds stay dense and firm while the petal tips stay springy and separate. The front-loop-only and back-loop-only split between rounds keeps two layers of petals growing from the same ring without one pressing the other flat.
The finished piece sits as a curved band meant to rest along a neckline, built from a central rose flanked by medium roses, four small flowers, and four leaf clusters joined through a mesh background. Once blocked flat with spray starch and pinned into shape, thread rose-gold or blush pearls through the open spaces with a beading needle, then finish the neck edge with either a hook-and-eye closure or a short length of satin ribbon tied at the back.
The swatch in numbers
- Rounds
- 16
- Parts
- 4
- Level
- Intermediate
- Time
- 4-6 hours
- Hook
- 1.65 mm
- Yarn
- Lace (Size 10 Crochet Cotton)
The yarn and the hook
Yarn
- Size 10 crochet cotton thread in dusty rose or antique mauve. You will need approximately 350 to 400 yards / 320 to 365 meters.
Hook
- US Steel Hook Size 7 (1.65 mm) for main collar work. US Steel Hook Size 6 (1.8 mm) optional for motifs if your tension runs tight.
Notions
- Approximately 30 to 36 rose-gold or blush freshwater pearls or pearl beads, 4 mm to 6 mm diameter
- Beading needle and matching thread for attaching pearls
- Stitch markers (6 to 8)
- Tapestry needle for weaving ends
- Blocking board and rustproof pins
- Spray starch or blocking solution
- One small hook-and-eye closure OR 24 inches / 61 cm of 1/4 inch / 6 mm satin ribbon in matching color
Stitches, spelled out
ch chain (wrap yarn over hook, pull through loop); sl st slip stitch (insert hook, yarn over, pull through stitch and loop on hook in one motion); sc single crochet (insert hook, yarn over, pull up loop, yarn over, pull through both loops)Dense; hdc half double crochet (yarn over, insert hook, pull up loop, yarn over, pull through all 3 loops)Dense; dc double crochet (yarn over, insert hook, pull up loop, yarn over, pull through 2 loops twice)Drape; tr treble crochet (yarn over twice, insert hook, pull up loop, yarn over, pull through 2 loops three times)Drape; dtr double treble crochet (yarn over 3 times, then work off 2 loops at a time)Drape; sp space; st/sts stitch/stitches; beg beginning; rep repeat; rem remaining; tog together; yo yarn over; RS right side; WS wrong side; MR magic ring (adjustable ring)Dense; ch-sp chain spaceLace; dc2tog double crochet 2 together (a decrease)Drape; pm place marker; Picot (3-chain picot) Chain 3, slip stitch into the first chain made to close the loop. This creates a small decorative knot on the edge.Lace; Picot (5-chain picot) Chain 5, slip stitch into the first chain made to close the loop. Used on outer collar edge for decorative scallop effect.Lace; Shell Stitch Work 5 dc all into the same stitch or space.Lace; Double Shell Work 7 dc all into the same stitch or space.Lace; Puff Stitch (Yarn over, insert hook into stitch, yarn over and pull up a loop to height of a dc) 3 times in same stitch. Yarn over and pull through all 7 loops on hook. Chain 1 to close.Squish; Foundation Single Crochet (FSC) Insert hook into bottom loop of chain just made, yarn over and pull up a loop, yarn over and pull through one loop (chain made), yarn over and pull through 2 loops (sc made). Continue in this manner.Dense; Joined Chain Mesh Chain 5, skip 2 stitches or the designated number, single crochet into next stitch or join point. Repeat. This creates the open net background.Lace.
Tension and hand-feel
After Round 2 of any rose motif, lay it flat on the table and check that it rests without cupping, since cupping signals the stitches are packed too tight for the thread.
Large Central Rose
Fasten off, leave 12-inch tail after Round 6.
Medium Rose
Make 2Fasten off, leave 12-inch tail after Round 5.
Small Flower
Make 4Fasten off, leave 10-inch tail after Round 4.
Large Leaf
Make 4How the texture is built
- Round 2 of every rose and flower doubles the Round 1 count (10 to 20, 8 to 16, 6 to 12) with a plain 2-sc increase round, laying down exactly enough base stitches for the front-loop petals in Round 3 to fan without crowding each other.
- Round 3 works into the front loops only of Round 2, then Round 4 returns to the same stitches through their untouched back loops, so two independent petal layers rise from one ring of base stitches rather than competing for the same loop.
- Every round closes with a join to the first stitch instead of spiraling, which keeps each layer a true closed circle and holds the petal count fixed — the reason the motif sits flat rather than climbing into a cone.
Putting the pieces together
If you swap the yarn
| Size 20 fine crochet cotton | Motifs shrink and the lace opens finer and crisper; drop to a steel hook a size or two smaller than the size 7 (1.65 mm) called for, and plan on more yardage than the 350 to 400 yards listed to cover the same collar. |
|---|---|
| Cotton-bamboo blend thread, same thread weight | Drape goes softer and the petals lose some of their crisp lift, settling closer to the base; starch blocking holds the shape less firmly than with straight cotton, so pin longer before unpinning. |
| Mercerized cotton in a worsted weight | Motifs scale up considerably and the whole collar turns heavier and more solid rather than lacy; needs a hook well above the steel 7 (1.65 mm) listed, and the 4 mm to 6 mm pearls read smaller against the bulkier stitches. |
Colorways
- Tonal Blush Large Central Rose, Medium Roses, Small Flowers, and Large Leaves all worked in the same dusty rose thread, with rose-gold pearls as the only point of contrast against the single-color lace.
- Antique Contrast Large Central Rose and both Medium Roses worked in antique mauve, Small Flowers and Large Leaves worked in dusty rose, with blush pearls bridging the two tones across the mesh background.
Washing and blocking
Hand wash in cool water with a mild soap, since size 10 cotton thread holds its shape well but mats if agitated or wrung.
Lay flat on a towel to dry and ease the petals open with your fingers before they set, rather than hanging the piece, which pulls the lace open at the neck edge.
Store flat in a drawer or box rather than folded over a hanger, so the pearls do not press creases into the thread and the leaf points stay unflattened.
When it does not look right
- Petals bunch into tight knots instead of fanning open.
- The petal round was likely worked into both loops instead of the front loops or back loops only specified; redo that round into the correct single loop so the two petal layers can separate.
- Pearls sit crooked and nearby stitches look pulled out of shape.
- Pearls were attached before blocking, which the pattern specifically warns against; unpick them, block the piece flat first, then reattach with the beading needle and matching thread.
Questions people ask
Can the pearls be sewn on before blocking to save a step?
No. The pattern notes that pearls attached before blocking interfere with pinning the motifs flat, so block and starch the collar first and sew pearls on only once it has dried and holds its shape.
How does the collar close at the back of the neck?
Either a small hook-and-eye closure or a 24-inch length of 1/4-inch satin ribbon tied at the back will finish the opening; both options are listed in the materials and neither changes the lace itself.
Why are there different rose sizes instead of one repeated motif?
The Large Central Rose sits as the single focal point at center front, the two Medium Roses flank it, and the four Small Flowers and four Large Leaves fill the mirrored sides out to each shoulder, keeping the collar symmetrical left to right.
New patterns, as they are filed
One short email when a batch lands, with the feel of each.