
17 rounds · filed under dense · 9 of them
Amigurumi · added 15 Sep 2026
Plush bobble-shell crab keychain crochet pattern
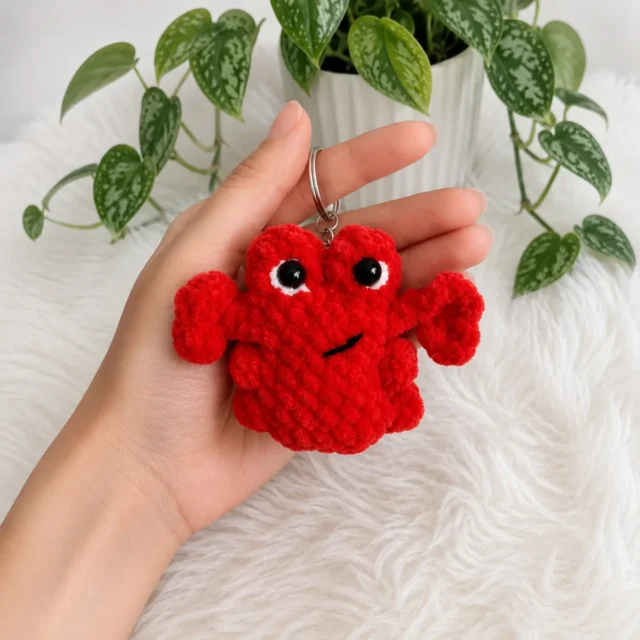
Dense single crochet and raised bobble stitches shape a nubby plush shell on this small crab keychain amigurumi.
- Skill
- Intermediate
- Time
- 3-5 hours
- Hook
- 3.0 mm
- Yarn
- Bulky
- Rounds
- 12
About this pattern
Bulky plush or velvet yarn worked mostly in single crochet builds a fabric that feels dense and slightly nubby under the fingers, thick enough to hide the polyfill inside once the tension stays tight. The bobble stitches in the shell rounds interrupt that smooth density with small raised bumps, giving the shell a texture that reads as shell-like rather than flat and plain when your hand passes over it.
The body works up as a rounded oval shell over eight rounds, wide enough to sit flat once stuffed firmly, with two small mounds built up on top to carry the safety eyes forward on raised humps rather than flush against the shell. Once assembly closes the gap between the mounds and the embroidery marks the eyes and smile, attach the keyring hardware to the top center and the finished piece is ready to clip onto a bag or set of keys.
This pattern is written in US crochet terminology and worked in a continuous spiral — no joining, no turning chain — unless otherwise stated. Gauge is not critical for this project; consistent tight tension matters more, since it keeps stuffing from showing through the stitches. Stitch counts are given at the end of each round in parentheses.
Worked in bulky plush yarn (approx. 100 g / 120 m) with a US D-3 (3.0 mm) hook, the finished crab body measures approximately 2–2.5 inches across, with the claws adding a little extra width on each side. Finished size will vary based on tension and yarn choice.
The swatch in numbers
- Rounds
- 12
- Parts
- 3
- Level
- Intermediate
- Time
- 3-5 hours
- Hook
- 3.0 mm
- Yarn
- Bulky
The yarn and the hook
- Yarn (Main Color): Plush or velvet yarn, Bulky weight (approx. 100 g / 120 m) — red or any preferred color
- Yarn (Detail): Fingering weight smooth yarn — black and white, small amounts for embroidery
Hook
- US D-3 (3.0 mm)
Safety Eyes
- 8 mm × 2
Stuffing
- Polyfill fiberfill
- Stitch Marker: × 1
- Tapestry Needle
- Scissors
Keyring Hardware
- Split ring or lobster clasp
Stitches, spelled out
ch Chain; dec Invisible Decrease; dc Double CrochetDrape; inc Increase (2 sc in same stitch); sc Single CrochetDense; sl st Slip Stitch.
Tension and hand-feel
After Rnd 2 of the body, lay the oval base flat and check that the four increase points sit at even intervals with no rippling or cupping along the edge.
If the base domes or curls upward instead of lying flat, the increases are landing unevenly — recount the stitches between each increase and adjust before continuing into the bobble round.
Gauge is not critical for this project; consistent, tight tension matters more than an exact stitch count match, since it is what keeps the polyfill stuffing from showing through the stitches.
Body
Foundation: Ch 6.
Special Stitch 4-dc Bobble: Work all four double crochets into the same stitch: [yo, insert hook, pull up a loop, yo, pull through 2 loops] four times — you now have 5 loops on the hook. Yo and pull through all 5 loops to close. The bobble pops toward the right side of the work.
First Eye Mound
Second Eye Mound
How the texture is built
- Round 1 turns the ch-6 foundation into an oval base by working 3 sc into the last chain at one end and increasing in the first stitch along the opposite side of the chain — the standard corner-shaping used to start an oval amigurumi base.
- Round 2 places its four increases in an inc-3sc-inc-1sc-inc-3sc-inc-1sc sequence, matching the four points set up in Round 1 so the shell keeps a flat, symmetrical footprint as it grows outward.
- The eye mounds are built with a pivot across two halves of the body (4 sc, pivot, 4 sc) instead of the continuous spiral used elsewhere, and the second mound starts as a separately joined round attached at the 5th stitch of Round 9 — both worked flat or joined so each mound rises as an anchored hump rather than a free spiral.
Putting the pieces together
If you swap the yarn
| Worsted weight cotton | Produces a smaller, firmer finished piece with less pile and crisper stitch definition; drape is stiffer than the plush bulky yarn, so size down to a US 7 (4.5 mm) hook and reduce stuffing slightly to avoid overfilling the smaller stitches. |
|---|---|
| Bulky weight chenille | Keeps a similarly soft, plush hand but drapes looser and slouchier than velvet yarn; stuffing can show through if tension loosens, so keep the same US D-3 hook and work a touch tighter. |
| Bulky weight standard acrylic (non-plush) | Trades the nubby pile for a smoother, lighter fabric with sharper stitch and bobble definition; the shell reads more sculpted than fuzzy, and the same D-3 hook and stitch counts still apply. |
Colorways
- Sandy Rock Crab Body Rounds 1–8 and both eye mounds worked in a warm terracotta bulky yarn; Round 3's bobble stitches worked in a slightly darker rust for subtle shell texture; eye whites embroidered in white fingering yarn, smile in black fingering yarn.
- Deep Tide Blue Body and eye mounds worked entirely in a deep teal or navy bulky yarn; eye whites in white fingering yarn and smile in black fingering yarn as given; optionally work the bobble round in a lighter gray-blue bulky yarn to lift the texture without breaking the palette.
Washing and blocking
Hand wash in cool water and avoid wringing or scrubbing — plush and velvet yarns mat and flatten when agitated.
Air dry flat away from direct heat or a dryer, since heat can crush or melt the pile on plush synthetic yarn.
Reshape the eye mounds and shell curve by hand while still slightly damp, then store away from direct sunlight to keep the plush color from fading.
When it does not look right
- The oval base cups or ripples instead of lying flat.
- The four increases from Round 2 have drifted from the corner points set in Round 1; recount stitches between each increase (3 sc, inc, 1 sc, inc pattern) and correct placement before working further rounds.
- The eye mounds sit at different heights
- The pivot rows (4 sc, pivot, 4 sc) were not worked to matching counts on both halves; check that each half reads 4 sc before placing the safety eye between Rounds 9 and 10.
Questions people ask
Can the safety eyes be swapped for embroidered eyes?
Yes, black yarn worked in satin stitch or French knots can stand in for the 8mm safety eyes, though the raised mound shaping will look less crisp without a fixed anchor point at its center. Keep the white satin-stitch highlight from the assembly steps either way to keep the eyes readable.
Why does the pattern call for a stitch marker if the body is worked in spiral rounds?
Continuous spiral rounds have no join or turning chain to mark where a round starts, so the stitch marker is the only way to track the 8 body rounds accurately. Move it up one stitch at the start of each new round.
What does the 4-dc bobble stitch actually do to the fabric?
It gathers four double crochet stitches into one raised cluster, popping a small bump above the surrounding single crochet fabric in Round 3. Spaced two per round on this shell, the bobbles read as shell ridges once the piece is stuffed.
Can a different bulky yarn replace the plush or velvet yarn without changing the finished size?
Any bulky weight yarn close to 100 g / 120 m keeps the stitch counts and finished size in the same range. Fiber content changes the surface feel and drape though, from the soft nubby pile of plush yarn to the smoother, firmer face of standard acrylic or cotton.
New patterns, as they are filed
One short email when a batch lands, with the feel of each.