
25 rounds · filed under dense · 17 of them
Hats and Beanies · added 2 Oct 2026
Strawberry sundae bobble beanie crochet pattern
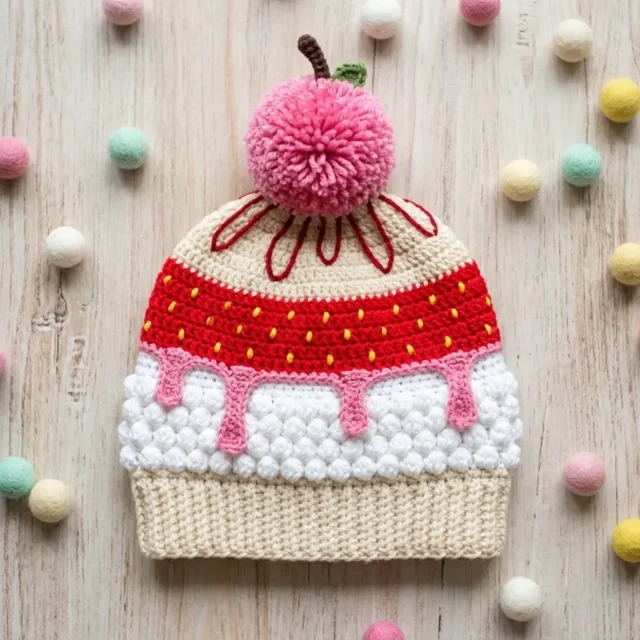
Bobble stitch builds a raised, whipped-cream texture under your fingers on a ribbed-brim beanie with a strawberry band.
- Skill
- Intermediate
- Time
- 4-6 hours
- Hook
- 6.0 mm
- Yarn
- Worsted
- Rounds
- 21
About this pattern
Run a hand over the middle of this beanie and you feel raised knots pushing up against your palm, rows of them staggered like stitching on a quilt. That's the bobble stitch at work: each one pulls several loops through a single stitch and closes them off together, so the fabric puffs outward instead of lying flat. Between the bobble rounds, plain single crochet rounds flatten back out, so your hand reads a rhythm of smooth, bump, smooth as it travels up the hat.
The hat builds as a tube from a ribbed brim up through a cream body, a white bobble band, a red strawberry round, and a cream crown that draws in to close at the top. The ribbed brim starts flat and seams into a circle, giving the base more stretch and recovery than the rounds above it, so it's the part that actually grips the head. Pull it onto a head to check the fit before you commit to the crown decreases, since the dome above it is shaped rounds with no second chances.
The swatch in numbers
- Rounds
- 21
- Parts
- 5
- Level
- Intermediate
- Time
- 4-6 hours
- Hook
- 6.0 mm
- Yarn
- Worsted
The yarn and the hook
Yarn (all worsted weight)
- Color A, Cream/off-white: approximately 150 yards (137 m)
- Color B, Red: approximately 80 yards (73 m)
- Color C, White: approximately 70 yards (64 m)
- Color D, Pink: approximately 40 yards (37 m)
- Color E, Dark Red/Burgundy: approximately 15 yards (14 m)
- Color F, Yellow: approximately 8 yards (7 m)
- Color G, Brown: approximately 5 yards (5 m)
- Color H, Green: approximately 5 yards (5 m)
- Color I, Pink for pom-pom: approximately 30 yards (27 m), bulky weight or doubled worsted
Hooks
- US Size J-10 (6.0 mm) for main hat body
- US Size G-6 (4.0 mm) for stem and leaf
Notions
- Yarn needle (tapestry needle)
- Scissors
- Stitch markers (at least 4)
- Pom-pom maker or two cardboard rings, approximately 3 to 3.5 inches (7.5 to 9 cm) diameter
- Ruler or measuring tape
Yarn suggestions
- Lion Brand Vanna’s Choice works beautifully for this project. The stitch definition is excellent, which makes those bobbles really pop. Red Heart Super Saver is a budget-friendly alternative with plenty of color options. If you prefer DK weight yarn, use a US Size H-8 (5.0 mm) hook and swatch carefully.
Stitches, spelled out
ch chain; sl st slip stitch; sc single crochet (insert hook, yarn over, pull up loop, yarn over, pull through both loops)Dense; hdc half double crochetDense; dc double crochetDrape; st(s) stitch(es); RS right side; WS wrong side; pm place marker; rep repeat; rem remaining; sc2tog single crochet two together (a decrease that joins two stitches into one)Dense; MR magic ringDense; blo back loop onlyRidge; flo front loop onlyRidge; sk skip; Bobble Stitch (bo-st) This creates the puffy whipped cream texture. In one stitch, work 5 incomplete double crochets. Here’s exactly how: yarn over, insert hook, pull up a loop, yarn over and pull through 2 loops. You now have 2 loops on your hook. Repeat this 4 more times in the same stitch. You’ll have 6 loops on your hook. Yarn over and pull through all 6 loops at once. One bobble complete. The bobble naturally pushes to the wrong side of your work, so you’ll flip the hat inside out while working this section.Squish; Standing Single Crochet Make a slip knot with new yarn, insert hook into the designated stitch, yarn over and pull up a loop, yarn over and pull through both loops. This gives you a clean color change without a joining chain.Dense; Surface Slip Stitch Hold yarn behind the fabric. Insert hook from front to back, draw up a loop, insert hook at the next point along your line, draw up another loop and pull through the first. Continue to create a chain on the fabric surface. This creates the sauce drizzle and frosting drip outlines.; Drip Loop Detail While working a surface slip stitch drip line, chain 5 to 7 and slip stitch back into the same point. This creates the rounded bottom of a dripping effect..
Tension and hand-feel
After the first two rounds of Section 2, lay the tube flat and measure 4 inches across the single crochet rows: you should count 14 stitches and 16 rows in that span.
If your stitch count runs higher than 14 per 4 inches, the fabric is coming in tight and dense, so go up a hook size; if it runs lower, the fabric is loose and drapey, so drop down a size before you reach the bobble section.
Section 1: Brim (Color A, Cream)
The brim is worked as a flat ribbed rectangle, then seamed into a tube. This creates that stretchy, professional-looking ribbed edge.
Foundation chain: Ch 9.
This creates the pink separator between the white cream and red strawberry sections. The drip details get added during finishing.
Section 2: Lower Hat Body, Cream Transition (Color A)
Section 3: Whipped Cream Bobble Section (Color C, White)
Important: Flip your hat inside out before starting this section. The bobbles push away from you as you work, so with the wrong side facing out, they’ll end up on the outside of the finished hat.
Join Color C with a standing sc.
Section 5: Red Strawberry Section (Color B, Red)
Join Color B with a standing sc.
Checkpoint: Total hat height should be approximately 5.5 to 6 inches (14 to 15 cm) from the brim pickup edge.
Section 6: Upper Cream Dome and Crown Shaping (Color A, Cream)
Join Color A with a standing sc.
Now begin crown shaping:
Checkpoint: Total hat height from brim pickup edge should be approximately 9 to 9.5 inches (23 to 24 cm).
How the texture is built
- The brim is worked flat as a short ribbed rectangle and then seamed into a tube, which is why it reads differently under the hand than the rest of the hat: that seam line is what lets the row-by-row ribbing stretch around a head instead of fighting the join.
- Section 3 alternates bobble and single crochet placement between Round 3 and Round 5, so the bumps land in a staggered, brick-like pattern rather than stacking directly on top of each other round after round.
- Every round in Sections 2, 3, and 5 closes with a slip stitch to the first stitch, which keeps the round count exact at 80 stitches throughout the body so the bobble pattern and the strawberry band line up cleanly before crown shaping starts.
Putting the pieces together
If you swap the yarn
| Acrylic worsted weight | Closest match to the gauge given; holds the bobble stitch shape crisply and keeps the J-10 (6.0 mm) hook as specified. |
|---|---|
| Wool-blend worsted weight | Adds loft and a softer, slightly fuzzy bobble texture; may need a half-size smaller hook since wool blocks and relaxes more than acrylic. |
Colorways
- Classic sundae Color A cream on the brim, lower body, and upper dome; Color C white through the bobble section; Color B red for the strawberry round; Color D pink as the thin separator; Color E burgundy for the surface slip stitch drizzle.
- Monochrome texture Use Color A cream for the brim, lower body, bobble section, and strawberry round alike, saving Color B red only for the surface slip stitch drizzle lines, so the bobble texture reads as the main feature instead of the color blocking.
Washing and blocking
Hand wash in cool water if using a wool-blend substitute, or machine wash gentle in cool water for the acrylic version named in the materials list.
Lay flat to dry rather than hanging, since a wet bobble section is heavier than the plain rounds and can pull the crown out of shape if left suspended.
Store the finished hat unfolded or loosely stuffed with tissue paper so the bobbles keep their raised profile instead of flattening under the weight of other folded items.
When it does not look right
- The bobbles end up on the inside of the hat instead of poking outward
- Section 3 must be worked with the hat flipped inside out, since bobbles push away from the working side; turn it right-side out again once the section is complete.
- The ribbed brim won't stretch to fit over the head
- The foundation chain and row count for the brim set its final seamed circumference, so check your row tension against the Section 1 instructions before seaming; a tight gauge here makes the whole brim stiff rather than stretchy.
- The strawberry band or bobble rounds don't line up with the body below
- A missed stitch in Round 1 or 2 of Section 2 throws off the 80-stitch count that every later round depends on; recount before starting Section 3 rather than after it.
Questions people ask
What happens if the bobble rounds come out looser than the plain rounds?
Bobble stitches naturally pull in more than single crochet, so some tightening between Round 3 and Round 4 is normal. Check it against the bobble gauge of 12 bobble stitches and 8 rounds per 4 inches rather than comparing it directly to the plain sc rounds.
Can this hat be resized for a smaller head?
Yes, the pattern notes a child size adjustment by shortening the brim strip to roughly 19 to 20 inches for a 19 to 23 inch head circumference range. The bobble and crown sections stay structurally the same, so only the brim length and overall round counts shift.
Why does the brim get worked flat instead of in the round like the rest of the hat?
Working the ribbed brim as a flat strip and seaming it afterward produces a different stitch orientation than the joined rounds above it, which is what gives it the stretchy, ribbed quality underfoot of a head rather than a plain round edge. The rest of the hat is worked in joined rounds because that's what lets the bobble and strawberry bands wrap evenly around the tube.
New patterns, as they are filed
One short email when a batch lands, with the feel of each.