
25 rounds · filed under dense · 20 of them
Hats and Beanies · added 6 Oct 2026
Teddy bear baby beanie with a ribbed, stay-put brim
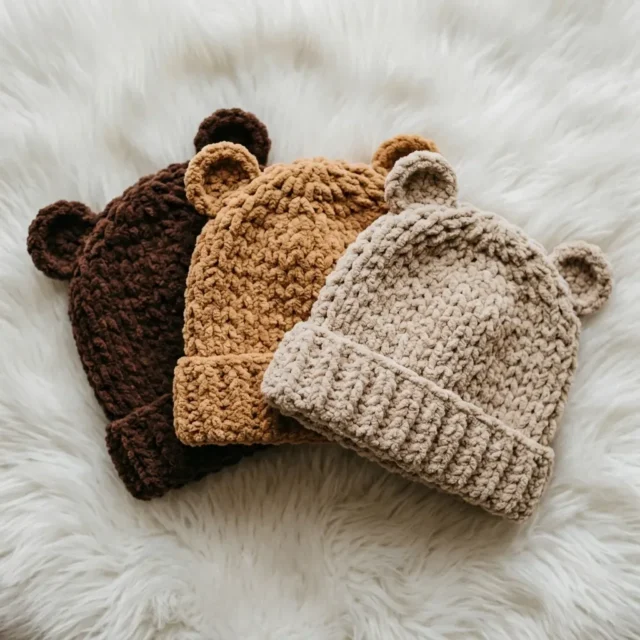
Back-loop single crochet ribs a stretchy brim; a plush chenille cap with sewn-on bear ears forms the finished hat.
- Skill
- Intermediate
- Time
- 2-5 hours
- Hook
- 6.5 mm
- Yarn
- Bulky (5)
- Rounds
- 22
About this pattern
Run a finger across the brim and you feel ridges, not a smooth surface. Single crochet worked into the back loop only, row after row, leaves the front loop standing proud as a little ledge, and forty-some rows of those ledges stack into something that reads and stretches like knit ribbing. Above the brim the chenille or velvet yarn takes over and the fabric changes character entirely, turning dense, plush, and quiet to the touch, with the pebbled surface that bulky chenille is known for.
The finished shape is a simple dome on a deep cuff, with two small circles sewn on as ears. Fold the ribbed brim up over the ears before it goes on a head; that fold is what turns a long rectangle of ribbing into a snug double-thick band. Pinch the base of each ear before sewing it down so it cups forward instead of lying flat against the crown.
Finished Size: Head circumference approximately 14 inches (35.5 cm), fitting newborn to 3 months. Hat height with the brim folded up measures approximately 6.5 inches (16.5 cm), or approximately 5 inches (12.5 cm) with the brim unfolded. The folded brim depth is approximately 1.5 inches (3.8 cm), and each ear stands approximately 1 inch (2.5 cm) tall.
Skill Level: Easy to intermediate. You should be comfortable with working in continuous rounds, seaming pieces together, and sewing on small embellishments. If you have made at least one hat before, you can handle this crochet pattern.
The swatch in numbers
- Rounds
- 22
- Parts
- 5
- Level
- Intermediate
- Time
- 2-5 hours
- Hook
- 6.5 mm
- Yarn
- Bulky (5)
The yarn and the hook
Yarn
- Approximately 80 to 100 yards of bulky weight yarn (weight 5) in chenille or velvet texture. This gives you that pebbled, plush surface you see in the photos. One skein will make multiple hats.
Recommended yarns
- Bernat Blanket Yarn in Vintage White, Almond, or Chocolate
- Paintbox Yarns Simply Chunky in Champagne White, Soft Fudge, or Caramel Fudge
- Lion Brand Pound of Love held double for similar bulk
Hook
- US size K / 6.5 mm crochet hook
Notions
- One stitch marker
- Yarn needle for seaming and weaving ends
- Scissors
Stitches, spelled out
ch chain. Wrap yarn over hook and pull through the loop on your hook. This creates one chain stitch.; sc single crochet. Insert hook into the stitch, yarn over and pull up a loop (two loops on hook), yarn over and pull through both loops.Dense; sc2tog single crochet two together. This is a decrease that turns two stitches into one. Insert hook into next stitch, yarn over and pull up a loop (two loops on hook). Without finishing, insert hook into the following stitch, yarn over and pull up a loop (three loops on hook). Yarn over and pull through all three loops. You just decreased by one stitch.Dense; sl st slip stitch. Insert hook into stitch, yarn over and pull through both the stitch and the loop on your hook in one motion.; st/sts stitch/stitches; BLO back loop only. Instead of inserting your hook under both loops of a stitch, insert it under only the back loop (the one farthest from you). This creates a ribbed texture.Ridge; rnd round; pm place marker; MR magic ring (also called magic circle). An adjustable starting loop that closes tightly with no hole in the center.Dense; RS/WS right side/wrong side.
Tension and hand-feel
Gauge: 13 single crochet stitches by 15 rows equals 4 inches (10 cm), worked in continuous rounds, unblocked. Gauge matters here: a loose gauge makes the hat too big for a newborn head, a tight gauge makes it too small. Swatch first and adjust your hook size up or down until you hit this gauge.
After Round 1 of the Hat Body, check that your 44 single crochet stitches sit snug but not tight around the brim's top edge, the way a cuff should hug rather than gape.
If the stitches feel loose or the fabric gaps at the join, drop to a smaller hook; if the round won't stretch over the brim at all, size up, since the pattern gives no gauge swatch to fall back on and fit here is judged by feel.
Section 1: Ribbed Brim
The brim is worked flat as a rectangle, then seamed into a ring.
Ribbed Single Crochet: The stretchy brim gets its texture from working single crochet in the back loop only across every row. This creates ridges that look like knit ribbing and stretch beautifully around a baby's head.
Foundation chain: Ch 9.
Checkpoint: Your ribbed brim strip should measure approximately 14 inches long and 2.5 inches wide.
Seaming the brim: Fold the strip so the two short ends meet. Line up the stitches carefully. Using your working yarn and yarn needle, whipstitch or slip stitch the two short ends together through both loops. Fasten off and weave in that end. You now have a ribbed ring.
Section 2: Hat Body
Now you will pick up stitches along the top edge of your brim ring and work the hat body upward in continuous rounds.
Continuous Rounds: The hat body is worked in a spiral without joining at the end of each round. You just keep going, moving your stitch marker up to track where each round begins. This eliminates the visible seam line that joining creates.
Hold the brim with the seam at the back. Join your yarn with a slip stitch to the first row-end stitch along one long edge.
Section 3: Crown Shaping
Time to close the top of the hat with evenly spaced decreases.
Checkpoint: The crown should close neatly with no gap. The finished hat body measures approximately 5 inches tall above the unfolded brim.
Section 4: Bear Ears (Make 2)
Each ear is a small flat circle that gets flattened and sewn on.
Make a magic ring.
Section 5: Attaching the Ears
Position ears on the hat with the brim folded up. Place each ear approximately 1.5 inches from the center top, sitting at the upper curve of the crown just below where the decreases begin. The ears should be about 3 inches apart from inner edge to inner edge.
Pin both ears in place and check from all angles before sewing. They should look balanced from the front, back, and sides.
Using the long tail and yarn needle, whipstitch each ear to the hat around the entire base. Pull firmly so the ears stand up and do not flop. Knot securely inside and weave in all ends.
How the texture is built
- The brim is worked flat as a long strip and seamed into a ring rather than crocheted in rounds from the start, because back-loop ribbing needs a turning edge on every row to create its texture; working it in continuous rounds would hide the ridge on one side.
- Round 1 of the Hat Body is a setup round that includes one sc2tog, a small decrease placed purely to land on an even stitch count of 44 before the plain rounds begin, not a shaping move.
- Rounds 2 through 12 of the Hat Body hold the stitch count flat with no increases or decreases at all, so the entire 3.5-inch rise above the brim is a straight cylinder; all the shaping that domes the crown happens afterward in Section 3.
- 3 to 6 months (16-inch head circumference): Work the brim to 16 inches (approximately 52 rows). Pick up 48 stitches in Round 1. Work 14 body rounds before crown shaping. Begin decreases with (sc in next 10 sts, sc2tog) 4 times.
- preemie (12-inch head circumference): Work the brim to 12 inches (approximately 38 rows). Pick up 36 stitches in Round 1. Work 9 body rounds before crown shaping.
Putting the pieces together
If you swap the yarn
| Acrylic chenille, bulky weight 5 | Closest match to the materials list; keep the same US K / 6.5 mm hook and expect the same pebbled, plush hand with no stuffing needed in the ears. |
|---|---|
| Cotton-blend, worsted weight 4, held double | Drops the plush texture for a flatter, more matte surface with less drape; size down to a US I or J hook and recheck the Round 1 pickup count against the brim edge. |
| Wool-blend, bulky weight 5 | Keeps the same hook size and stitch counts but trades the chenille's smooth pebble for visible stitch definition, and the ears will hold their shape with a touch more loft, so stuff them lightly if you want extra dimension. |
Colorways
- Tonal fade Use Chocolate for the brim, Caramel Fudge for the hat body and crown, and Soft Fudge for the ears, moving light to dark from crown to cuff.
Washing and blocking
Hand wash in cool water and press out moisture with a clean towel rather than wringing, since chenille and velvet yarns shed less fiber when handled gently.
Lay flat to dry, shaping the brim's fold and pinching each ear back into its cupped curve before it sets.
Skip the iron and skip high-heat tumble drying; both flatten the chenille pile and leave the pebbled texture permanently crushed.
When it does not look right
- The brim doesn't stay folded up into a cuff
- Back-loop ribbing is stretchy in both directions, so an unfolded brim will relax flat again; press the fold with your fingers after washing and let it dry in that folded position.
- The stitch count drifts during the Hat Body rounds
- Chenille's fuzzy surface hides individual stitches, which makes it easy to miss or double one; count stitches at the end of each round against the 44-stitch target until the rhythm feels automatic.
- The ears sit flat instead of cupping forward
- A flat circle straight off the hook has no curve built in; pinch the bottom edge of each ear together before sewing so the fold itself creates the cupped shape.
Questions people ask
Why is the brim worked as a flat strip instead of in the round?
Back-loop-only single crochet needs a row turn to build its ridged texture, so the brim is made flat and then seamed into a ring. Working it in continuous rounds would leave the ridges on only one face of the fabric.
How do you avoid a seam line on the hat body?
The Hat Body is worked in continuous rounds with a stitch marker moved up at the start of each round, rather than joining and chaining up. That removes the stair-step seam a joined round would leave down the back of the cap.
What makes picking up stitches around the brim tricky?
The brim's row-end stitches are smaller and more textured than a plain edge, so it's easy to skip one or grab only a single loop. Insert the hook under both loops of each row-end stitch and confirm the loop is secure before pulling up the next one.
Can you skip stuffing the ears?
Yes, the ears are solid single crochet circles with no stuffing called for in the pattern. Their shape comes entirely from pinching the base before sewing, not from fill.
New patterns, as they are filed
One short email when a batch lands, with the feel of each.