

14 rounds · filed under drape · 13 of them
Garments · added 6 Oct 2026
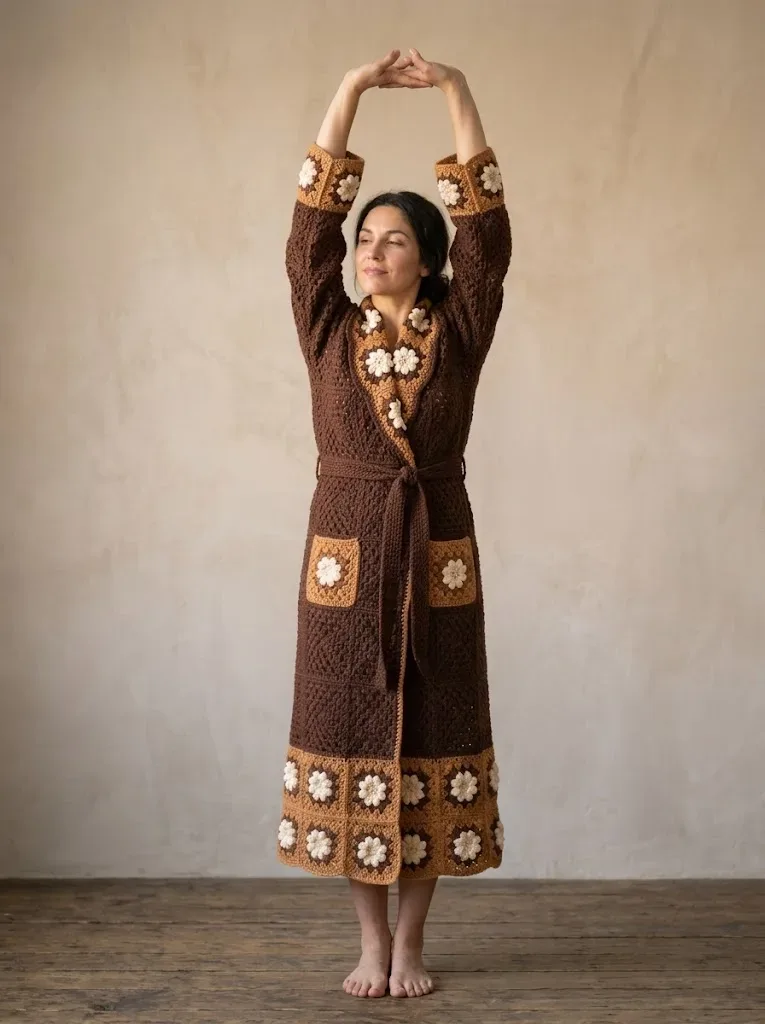
Chocolate caramel granny square robe crochet pattern
Double crochet granny squares build a thick, textured robe that drapes at the shoulder and stays warm.
- Skill
- Intermediate
- Time
- 15-20 hours
- Hook
- 5.0 mm
- Yarn
- Worsted
- Rounds
- 14
About this pattern
Each square builds up from a double crochet cluster worked three stitches deep into chain-2 corners and chain-1 spaces, so the surface comes out ridged rather than smooth, with small open gaps between clusters that let the fabric breathe. Thirty-two squares joined edge to edge for the back panel means that texture repeats across the whole piece instead of settling into one flat expanse. Under the hand it reads as thick and slightly stiff square by square, loosening into something closer to drape once enough squares are seamed together.
The robe takes shape from three separate panels - one back and two fronts - each built from its own grid of squares before joining at the shoulder with a flat slip stitch seam that leaves almost no ridge on either side. A ten-inch gap at the center top keeps the neckline open rather than closed, so the finished robe wraps and layers rather than pulls over the head. Treat it as an open layer for cool rooms, something to throw over a sweater rather than wear snug against skin.
The swatch in numbers
- Rounds
- 14
- Parts
- 5
- Level
- Intermediate
- Time
- 15-20 hours
- Hook
- 5.0 mm
- Yarn
- Worsted
The yarn and the hook
- for Your Crochet Robe
Yarn
- Color A (Chocolate Brown): 1,800 yards of worsted weight yarn
- Color B (Caramel/Tan): 600 yards of worsted weight yarn
- Color C (Cream/Off-White): 200 yards of worsted weight yarn
Hook
- Size H/8 (5.0mm) crochet hook, or size needed to obtain gauge
Notions
- Tapestry needle for weaving ends and seaming
- Stitch markers
- Scissors
- Measuring tape
- Gauge
Granny square gauge
- One completed 3-round granny square measures approximately 4 inches by 4 inches.
Solid panel gauge
- 14 double crochet stitches and 8 rows equals 4 inches.
Stitches, spelled out
ch chain; st stitch; sl st slip stitch; sc single crochetDense; dc double crochetDrape.
Tension and hand-feel
After the third round, lay a single chocolate square flat and measure corner to corner; it should hold at approximately 4 inches by 4 inches without stretching or curling in at the edges.
If it falls short, move up a hook size, and if it spreads past 4 inches, drop down one, since every panel in the robe depends on that square staying consistent.
Notions
Tapestry needle for weaving ends and seaming Stitch markers Scissors Measuring tape Gauge
Granny square gauge: One completed 3-round granny square measures approximately 4 inches by 4 inches.
Solid panel gauge: 14 double crochet stitches and 8 rows equals 4 inches.
Take time to check your gauge before starting. A robe that’s too tight won’t wrap properly, and one that’s too loose will feel sloppy. Trust me on this one.
Abbreviations and Stitch Definitions
Ch = Chain. Wrap yarn over hook and pull through the loop on your hook. This creates one chain stitch.
Sl st = Slip stitch. Insert hook into stitch, yarn over, pull through both the stitch and the loop on your hook in one motion.
Sc = Single crochet. Insert hook into stitch, yarn over and pull up a loop (2 loops on hook), yarn over and pull through both loops.
Dc = Double crochet. Yarn over, insert hook into stitch, yarn over and pull up a loop (3 loops on hook), yarn over and pull through 2 loops (2 loops remain), yarn over and pull through remaining 2 loops.
Dc2tog = Double crochet two together. This is a decrease stitch. Yarn over, insert hook into next stitch, yarn over and pull up a loop, yarn over and pull through 2 loops, yarn over, insert hook into next stitch, yarn over and pull up a loop, yarn over and pull through 2 loops, yarn over and pull through all 3 loops on hook.
Granny cluster = 3 dc worked into the same stitch or space.
Step by Step Crochet Pattern Flower Center Granny Squares (Make 32)
These beautiful squares feature a raised flower center that gives the robe its distinctive vintage charm.
Solid Granny Squares in Chocolate (Make 48)
These simpler squares form the body of the robe.
Part 2
Robe Body Construction
Back Panel
Arrange 4 chocolate squares across and 8 squares down (32 squares total for the back). Join squares using the flat slip stitch method: hold two squares with right sides together, insert hook through both corner spaces, slip stitch, then slip stitch through each corresponding stitch along the edge. This creates an almost invisible seam.
Front Panels (Make 2):
Each front panel uses 2 squares across and 8 squares down (16 squares each). For the bottom border, use flower granny squares. Arrange 2 flower squares across the bottom, then 2 chocolate squares above, continuing for 6 more rows of chocolate squares.
Join front panels to back panel at the shoulder seams, leaving approximately 10 inches open at the center top for the neck opening.
Sleeves (Make 2)
Each sleeve is worked from the shoulder down.
Shawl Collar The collar is what makes this robe feel truly luxurious.
Part 4
Pockets (Make 2)
Each pocket uses one flower granny square as the base.
Border Round: Join Color A to any corner of a flower square. Ch 3, work 2 dc in same space, ch 2, 3 dc in same space. Continue around in granny square pattern for 2 more rounds. Fasten off. (24 granny clusters on final round)
Position pockets at hip level on the front panels and whip stitch in place along three sides, leaving the top open.
Belt
Part 5
Hem Border
Join flower granny squares along the bottom hem of the robe. You’ll need approximately 11 squares across the back and 5-6 squares across each front panel. Arrange them in a single row and sew to the bottom edge of the robe body using a whip stitch.
Finishing Your Crochet Robe
Block all pieces before final assembly if possible. For acrylic yarn, steam blocking works wonderfully. Lay the robe flat, hover your iron about an inch above the fabric (never touch the yarn directly), and let the steam relax the stitches.
Weave in any remaining ends. I like to weave ends through at least 2 inches of stitches, then double back for security.
Try on your robe and adjust the belt loops if needed. You can crochet two small loops (ch 15, sl st to form a ring) and sew them to the side seams at waist height.
Tips for Success
Don’t rush the squares. Make all your granny squares first, then lay them out before joining. This lets you catch any sizing inconsistencies early.
Use stitch markers generously. Mark your corners, mark your increases, mark anything that helps you keep track.
Try it on as you go. Once you’ve joined the back and front panels, do a quick fitting before adding sleeves. Better to adjust now than rip out later.
The flower centers might pucker at first. This is normal. They flatten beautifully after blocking.
This chocolate caramel cozy crochet robe makes an incredible gift, though I’ll warn you now. Once you make one for yourself, you might not want to give it away. The combination of granny square tradition and modern silhouette creates something truly special that you’ll reach for again and again.
I really hope you love making this crochet robe pattern as much as I loved designing it. If you want to find it easily later, go ahead and save this post to your Pinterest boards. And please, if you make your own chocolate caramel robe, drop a comment below or tag me on social media. I would absolutely love to see your color combinations and finished projects!
How the texture is built
- Each round of the granny square adds its 3-dc clusters at the four chain-2 corners and fills the sides with chain-1 spaces, which is why the square grows square rather than rectangular from round 1 through round 4.
- The back panel is assembled from 32 individual squares joined edge to edge with the flat slip stitch method instead of worked as one continuous piece, which keeps the seam low-profile rather than adding a ridge across the back.
If you swap the yarn
| Cotton, worsted weight | Squares come out firmer and heavier, the grid of chain-1 and chain-2 spaces stays more open since cotton does not bloom the way acrylic does, and the hook may need to drop a size to keep the 4-inch gauge. |
|---|---|
| Washable wool, worsted weight | Adds more stretch and a softer hand to each square, lets the finished robe drape closer to the body at the shoulder seam, and keeps gauge close with the same H/8 (5.0mm) hook. |
| Acrylic-wool blend, bulky weight | Fewer, larger squares cover the same panel size, the fabric turns noticeably thicker and warmer, and a hook one or two sizes up keeps the clusters from packing too tight. |
Colorways
- Deep Chocolate Core Color A (chocolate) fills the first two rounds at the center of each square, Color B (caramel) takes round three, and Color C (cream) finishes the outer round four edge, with plain chocolate squares used for the body panels and the ombré effect reserved for the flower hem squares.
- Caramel Centered Color B (caramel) fills the first two rounds at the center, Color A (chocolate) takes round three, and Color C (cream) closes out round four, flipping the balance so caramel reads as the dominant tone across the front panel hem.
Washing and blocking
Machine wash cold on gentle for an acrylic blend, or hand wash in cool water for washable wool; avoid wringing the panels since twisting distorts the shape of the granny squares.
Lay the robe flat on a towel to dry rather than hanging it, since the weight of over 1,800 yards of worsted yarn pulls the shoulder seams out of shape on a hanger.
Block each square back to its 4-inch measurement while still damp, and fold the finished robe for storage rather than hanging it, which keeps the flat slip stitch seams from stretching over time.
When it does not look right
- the squares pull into a slight cup instead of lying flat
- Tension pulled too tight at the chain-2 corners draws the center upward; loosen the corner chain-2 stitches and block the square flat while damp.
- the flat slip stitch seam leaves a visible ridge instead of sitting invisible
- Squares were joined without right sides held together, or a stitch was skipped along the edge; re-seam matching every stitch corner to corner with right sides facing.
- the front panel hem band doesn't match the body in size
- The flower granny squares were worked to a different gauge than the chocolate squares; check the flower square against the same 4-inch gauge before joining, adjusting hook size until it matches.
Close-ups

Questions people ask
How many granny squares does the whole robe need?
The back panel alone uses 32 chocolate squares, arranged 4 across and 8 down, and each front panel uses 16 squares plus flower squares at the hem. Between the body panels alone, the count runs well past 60 squares before sleeves are added.
Can the neck opening be made wider or narrower?
The pattern leaves approximately 10 inches open at the center top when joining the shoulder seams. That gap can be adjusted by joining more or fewer squares at the shoulder before leaving the remainder open.
Do the flower squares use the same gauge as the chocolate squares?
Yes, every square in the robe is built to the same 4-inch by 4-inch gauge after three rounds. That consistency is what lets the flower hem squares join cleanly with the chocolate body squares.
What yarn amount should be on hand before starting?
Materials call for 1,800 yards of chocolate, 600 yards of caramel, and 200 yards of cream, all in worsted weight. That covers the back panel, both front panels, and the sleeves.
New patterns, as they are filed
One short email when a batch lands, with the feel of each.