
23 rounds · filed under dense · 15 of them
Garments · added 17 Oct 2026
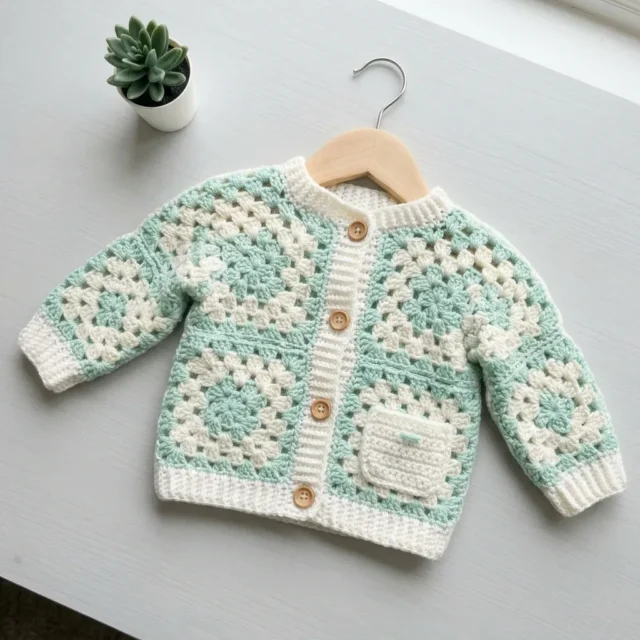
Granny square baby cardigan in mint and cream
Double crochet clusters build a thick, grid-textured fabric for a 37-square baby cardigan with ribbed cuffs and hem.
- Skill
- Intermediate
- Time
- 4-6 hours
- Hook
- 4.0 mm
- Yarn
- DK
- Rounds
- 20
About this pattern
Under the hand this cardigan reads as a grid of firm little pillows. Each granny square is built from clusters of three double crochet worked into the same chain space, so the stitches fan out and stack into a raised, slightly domed texture with open corner gaps between them. The fabric has give across the diagonal of each square but holds its shape at the seams, so the body feels sturdy rather than floppy, with enough structure to keep its shape on a small, active body.
Thirty-seven squares join into front panels, a back, and two sleeve panels, then get framed with single crochet ribbing worked through the back loop at the hem and cuffs. That ribbing pulls in tighter than the open square body, so the edges sit snug against wrist and waist while the motif panels stay relaxed and breathable. Block the joined piece flat before adding bands, since the corner ch-2 spaces and seams are where the whole shape gets set.
Finished measurements (blocked, buttoned): chest 20 inches / 51 cm; length from shoulder to hem 11 inches / 28 cm; sleeve length from underarm to cuff 7 inches / 18 cm; each granny square 3 x 3 inches / 7.5 x 7.5 cm (blocked). Designed for the 12 to 18 month size range.
The swatch in numbers
- Rounds
- 20
- Parts
- 9
- Level
- Intermediate
- Time
- 4-6 hours
- Hook
- 4.0 mm
- Yarn
- DK
The yarn and the hook
- Lion Brand Pound of Love works beautifully for this project. It is machine washable, budget-friendly, and has excellent stitch definition.
- Paintbox Yarns Simply DK offers a superb color range if you want to match specific mint and cream shades.
- Cascade 220 Superwash Sport is my pick for an heirloom-quality piece. The merino wool feels luxurious but is still machine washable on a gentle cycle.
- Whatever yarn you choose, make sure it is machine washable. Baby items need to survive frequent washing without falling apart.
Yarn
- Color A (Mint Green): DK weight yarn, approximately 200 yards / 183 meters
- Color B (Cream/Off-White): DK weight yarn, approximately 350 yards / 320 meters
Total yarn needed
- approximately 550 yards / 503 meters combined
Hook
- US size G-6 / 4.0 mm crochet hook
Additional Materials
- Yarn needle for weaving ends and seaming
- 5 wooden buttons, 5/8 inch / 15 mm diameter
- Sewing needle and thread to match Color B
- Stitch markers
- Blocking mats and pins
- Rust-proof T-pins
Stitches, spelled out
beg beginning; BLO back loop only (working into just the loop farthest from you)Ridge; ch chain (the foundation stitch that creates a cord-like series of loops); ch-sp chain space (the gap created by chain stitches where you insert your hook)Lace; dc double crochet (yarn over, insert hook, pull up loop, yarn over, pull through 2 loops twice)Drape; rep repeat; rnd round; RS right side (the side that faces outward when worn); sc single crochet (insert hook, pull up loop, yarn over, pull through both loops)Dense; sl st slip stitch (insert hook, yarn over, pull through stitch and loop on hook in one motion); sp space; st(s) stitch(es); tbl through back loop only; WS wrong side (the inside of the garment); yo yarn over (wrap yarn around hook from back to front).
Tension and hand-feel
This is critical, so please do not skip it. After blocking: 1 granny square = 3 inches x 3 inches / 7.5 cm x 7.5 cm. In single crochet (sc) ribbing stitch pattern through back loop only: 20 stitches x 24 rows = 4 inches x 4 inches / 10 cm x 10 cm. Even a small deviation per square multiplies across the joined panels, so make and block a sample square before starting; adjust hook size up if your square measures under 3 inches, or down if over 3 inches.
After Round 1 of a single granny square, measure the square from corner ch-2 space to opposite corner ch-2 space, since that first round sets the scale for all 37 motifs.
Section 1: Granny Square (Make 37 Total)
Using Color A, make a magic ring or ch 4 and join with sl st to form a ring.
Step by step, the granny cluster: yarn over, insert hook into the chain space, yarn over and pull up a loop (3 loops on hook), yarn over and draw through 2 loops (2 loops on hook); yarn over, insert hook into the same chain space again, yarn over and pull up a loop (4 loops on hook), yarn over and draw through 2 loops (3 loops on hook); yarn over, insert hook into the same chain space a third time, yarn over and pull up a loop (5 loops on hook), yarn over and draw through 2 loops (4 loops on hook), then yarn over and draw through all 4 remaining loops on hook. Throughout this pattern, 'cluster' means this 3-dc cluster unless otherwise stated.
When joining yarn for a new round or color, join with a standing stitch rather than slip-stitching into a chain; this reduces bulk at join points. Chain 3 at the beginning of each round counts as one dc throughout the granny square pattern. Weave in all ends from each square before joining panels, since it is much easier than weaving ends after assembly. Total square count: 12 for the back + 6 for the left front + 6 for the right front + 6 for the left sleeve + 6 for the right sleeve + 1 for the pocket = 37 granny squares total. The back panel is 4 squares wide by 3 squares tall; each front panel is 2 squares wide by 3 squares tall; each sleeve is 2 squares wide by 3 squares tall.
CHECKPOINT: Each blocked square should measure exactly 3 inches x 3 inches. All 37 squares should be uniform before proceeding.
Section 6: Hem Ribbing
With right side facing and Color B, begin at the lower right front corner edge. Work 1 sc into each dc top, 1 sc into each ch-1 sp, and 1 sc into each corner ch-2 sp along the bottom edge. With 8 squares across the bottom edge, work 10 sc across each square bottom edge. Total pickup = 80 sc.
Single crochet through back loop only (sc tbl), step by step: insert hook into the back loop only of the stitch (the loop farthest from you); yarn over and pull up a loop; yarn over and draw through both loops on hook. This creates the horizontal ridge texture used for all ribbing borders in this pattern.
Section 7: Cuff Ribbing (Work on Both Sleeves)
With right side facing and Color B, join yarn at the sleeve seam at the lower edge.
CHECKPOINT: Each cuff should measure approximately 3 inches in circumference and approximately 1 inch in depth.
Section 8: Button Bands and Neckband
With right side facing and Color B, join yarn at the lower right corner of the right front panel.
Right front band: Work 42 sc evenly up the right front edge from hem to neckline. (42 sc)
Neckline: Work approximately 36 sc across the back neckline and front neckline shaping. (36 sc)
Left front band: Work 42 sc downward along the left front edge. (42 sc)
Total after setup row: 120 sc around the entire front and neckline opening. Do not join. Work in rows.
Section 3: Sleeve Panels (Make 2)
For each sleeve, join 2 squares across by 3 squares tall, creating a flat rectangle 6 inches wide x 9 inches tall. This will be seamed into a tube after the underarm seam is worked.
Section 4: Shoulder and Side Seams
Flat slip stitch join, step by step: this joining method creates a visible ridge on the right side that complements the granny square aesthetic. Hold two squares with wrong sides together. Insert hook through the back loop of the stitch on the front square and through the back loop of the corresponding stitch on the back square simultaneously. Yarn over with joining yarn and pull through both loops and the loop on hook. Continue across all edge stitches.
Lay the back panel flat with right side up. Place the right front panel alongside the back panel, right sides together, aligning at the top right corner. Using Color B and the flat slip stitch join method, seam the outer 4 squares’ worth of top edge on each side (approximately 3.5 to 4 inches per shoulder). Leave approximately 4 to 5 inches of the back top center and the inner edge of each front top open for the neckline.
Repeat for the left front panel.
Side seams: With wrong sides together, align the side edges of the back panel with the side edges of the front panels. Work the flat sl st join from the hem edge upward, stopping approximately 3.5 inches from the top edge to leave the armhole opening.
CHECKPOINT: The armhole opening should measure approximately 3 to 3.5 inches on each side. The overall body circumference at the chest, buttoned, should be approximately 20 inches.
Section 5: Attaching Sleeves
Fold each sleeve panel in half along the long edge and seam the side edges together using the flat sl st join to form a tube. The tube should be 3 inches wide x 9 inches tall (circumference 6 inches at this stage).
With wrong sides facing, pin the top edge of the sleeve tube into the armhole opening of the body, easing evenly. Seam the sleeve into the armhole using the flat sl st join, working around the armhole opening. Repeat for the second sleeve.
Section 9: Pocket
Take the one remaining granny square (already blocked to 3 x 3 inches).
Along the top edge of the pocket square, work a finishing row: Join Color B with sl st at top left corner. Ch 1, work approximately 10 sc across the top edge. Fasten off. (10 sc)
Pin the pocket to the lower right area of the left front panel (as worn), positioning it so the bottom aligns with the top edge of the hem ribbing. Using a yarn needle and Color B, whip stitch the pocket to the cardigan body along the bottom and two side edges, leaving the top edge open.
Section 10: Button Attachment
Mark button positions on the left front band corresponding to each buttonhole on the right front band. Thread a sewing needle with thread matching Color B. Sew each wooden button securely through both button band layers. Create a thread shank that allows the button to pass easily through the crocheted buttonhole. Knot securely on the wrong side.
How the texture is built
- Each granny square increases only at its four corner ch-2 spaces, where 3 dc, ch 2, 3 dc repeats every round, which is what pushes the motif outward evenly on all sides rather than distorting into a rectangle.
- The hem and cuff ribbing are worked as flat rows (sc tbl, turn) picked up after the motif panels and sleeve tube are already joined, so the ribbing can be seamed at a single point rather than built in the round from the start.
- The join with sl st to the top of the first dc or beg ch-3 at the end of each round sits at a corner, which keeps the color change points (Color A fastened off, Color B joined fresh) landing in the same corner each round instead of drifting around the square.
Putting the pieces together
If you swap the yarn
| Merino wool, DK weight | Softens the hand of the finished squares and adds a little more spring to the ribbing, but check it is machine washable before using it on baby items; hook size stays at G-6 / 4.0 mm. |
|---|---|
| Cotton-acrylic blend, DK weight | Produces a crisper, less stretchy square with sharper corner ch-2 spaces, good for warm-weather wear; may need to drop to an F-5 / 3.75 mm hook if the blend runs slightly thicker than standard DK. |
| Acrylic, sport weight | Makes a lighter, more pliable square with softer corner definition and less structure in the ribbing; move up to a G-6 or H-8 hook to keep the stitch count from drafting too dense. |
Colorways
- Mint center, cream frame Color A (mint green) fills Round 1 at the center of every granny square; Color B (cream) takes over for the outer rounds of each square plus the hem ribbing, cuff ribbing, and button bands/neckband.
- Reversed emphasis Swap the yarn amounts so Color B works the Round 1 centers and Color A carries the outer rounds of each square, then keep Color B on the hem and cuff ribbing so the ribbed edges still read as the lighter shade against mint-framed squares.
Washing and blocking
Hand wash or use a gentle machine cycle to match the washable fibers named in the materials list, since baby garments go through frequent laundering.
Lay the cardigan flat to dry rather than hanging it, so the weight of the wet granny squares does not stretch the shoulder seams or pull the ribbing out of shape.
Store folded rather than on a hanger, and reshape the ribbed cuffs and hem by smoothing them flat by hand after each wash to keep the sc tbl texture from loosening over time.
When it does not look right
- Granny squares come out different sizes
- Tension usually loosens or tightens over a long make; recheck gauge against the Round 1 corner-to-corner measurement every few squares and adjust hook size half a step if a square drifts off that mark.
- The hem or cuff ribbing puckers instead of lying flat
- This happens when the 80-sc or 20-sc pickup count is off along the motif edge; recount stitches picked up from the dc tops, ch-1 spaces, and corner ch-2 spaces before starting Row 1 or Round 1 of the ribbing.
- Squares pull diagonally out of true after joining
- Uneven tension on the corner ch-2 spaces during assembly skews the grid; wet block the joined panels pinned to true corners before working the ribbing, since the ribbing locks in whatever shape the blocking sets.
Questions people ask
Can the squares be joined as they go instead of all at the end?
The pattern as written treats the 37 squares as a separate section before assembly, so joining as-you-go would change the order of operations around the Section 1 fasten-offs. It is more reliable to finish all 37 squares first, then follow the Shoulder and Side Seams and Attaching Sleeves sections as given.
Why does the ribbing use sc tbl instead of plain single crochet?
Working into the back loop only leaves a visible horizontal ridge on every row, which is what gives the hem and cuff their stretchy, corrugated look. Plain sc tbl rows across the 80-sc hem or 20-sc cuff produce that ribbed pull-in without any extra shaping stitches.
How much yarn is needed in each color?
The materials list calls for about 200 yards of Color A (mint green) and about 350 yards of Color B (cream), for roughly 550 yards combined. Cream carries more of the yardage because it covers the outer rounds of every square plus all the ribbing and bands.
What hook size keeps the granny squares and ribbing consistent?
A US G-6 / 4.0 mm hook is used throughout, for both the dc clusters in the squares and the sc tbl rounds in the ribbing. Keeping one hook size across both stitch types is what lets the ribbed edges sit snugly against the firmer motif body without a visible gauge jump.
New patterns, as they are filed
One short email when a batch lands, with the feel of each.