
14 rounds · filed under drape · 10 of them
Hats · added 27 Sep 2026
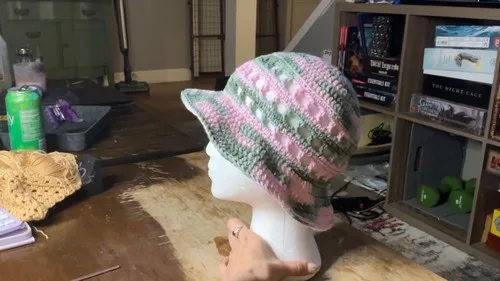
Double crochet bucket hat with a built-up crown
Double crochet builds a firm, ridged fabric that holds its shape - the base for a structured bucket hat crown.
- Skill
- Intermediate
- Time
- 4-6 hours
- Hook
- 4.0 mm
- Yarn
- Worsted
- Rounds
- 14
About this pattern
Under your hand this works up firm and a little ridged, not floppy. Double crochet is a taller stitch than single crochet, so each round adds visible height and the fabric gets body fast - it stands up rather than draping. Worked in cotton or a lightweight yarn, the finished piece keeps a crisp edge along every round, which is exactly what a brim needs if it's going to hold a shape instead of folding over.
The piece starts as a flat disc built from the center out, widening one increase-spacing further with every round so it stays flat instead of cupping or rippling. Once the disc reaches the width you want for the crown, that flat circle becomes the top of the hat and the work turns toward the sides - the 5.0mm hook listed for edging comes in here, opening the stitches slightly for a softer finish at the brim.
Between the flat crown and the increasing brim, the body of the hat opens up into a mesh section - chain-2 spaces between double crochets create a breathable, lightweight band before the fabric closes back into solid double crochet for the brim.
The swatch in numbers
- Rounds
- 14
- Parts
- 5
- Level
- Intermediate
- Time
- 4-6 hours
- Hook
- 4.0 mm
- Yarn
- Worsted
The yarn and the hook
- 4.0mm crochet hook (5.0mm optional for edging)
- Cotton or lightweight yarn
- Tapestry needle
- Scissors
Stitches, spelled out
dc double crochetDrape; sc single crochetDense; bllo back loop only; flo front loop onlyRidge.
Tension and hand-feel
After round 2, lay the 24-stitch circle flat on a table and check that it sits without curling up at the edges or rippling into waves.
Crown of the Hat
Body of the Hat
Brim of the Hat
For Rounds 3–5 (or 6 for wider brim)
Each new round increases the number of DC between increases by 1:
Finishing Touches
Optional Slip Stitch Edging Switch to a hook 1mm larger (e.g., 5.0mm). Slip stitch around the brim (avoid slip stitching into the very first stitch to prevent unraveling).
Weaving in Ends Use a tapestry needle to weave in all loose yarn tails securely.
How the texture is built
- Round 1 sets 12 double crochets into the magic loop, giving a foundation ring that closes with a pull instead of a knot, and round 2 doubles that count evenly to 24 by working 2 DC in every stitch.
- round 3 onward the increase is spaced one plain stitch further apart each time - 8 DC then an increase, then 9, then 10 - which matches the stitch count you'd need to keep a flat circle growing without buckling or gathering.
- Every round closes with a slip stitch into the first DC rather than into the turning chain, which keeps the join low and tight instead of leaving a raised chain-stitch bump at the seam line.
If you swap the yarn
| Mercerized cotton, worsted weight | Gives the crispest, most structured fabric of the three - stitches stay defined and the disc holds flat with less blocking, matching the 4.0mm hook as written. |
|---|---|
| Cotton-linen blend, DK weight | Produces a lighter, slightly looser fabric with more drape at the brim; size up to a 4.5mm hook to keep the stitch count from tightening. |
| Cotton, bulky weight | Speeds up the rounds and thickens the fabric considerably, so plan on a larger hook than 4.0mm and expect the finished hat to run wider for the same stitch counts. |
Colorways
- Contrast edge Keep the entire crown in a single main color, then change color only for the edging worked with the 5.0mm hook, so the brim stands out against the body of the hat.
Washing and blocking
Hand wash the finished hat in cool water; cotton and lightweight plant-fiber yarns lose their crispness fast in hot water and machine agitation.
Dry it flat on a towel, reshaping the crown into a circle and pressing the brim into its curve while damp so the fabric sets in that shape as it dries.
Store the hat flat or lightly stuffed with tissue rather than folded, since cotton fabric holds a crease if it sits creased while damp.
When it does not look right
- The crown cups upward like a bowl instead of lying flat.
- The increases are landing too close together for the row - move to a larger hook or double check that each round adds exactly one more plain DC before the increase, per the 8, 9, 10 sequence.
- The disc ripples or ruffles at the outer edge.
- Too many increases are going in for the round - recount the stitches before the join and drop to a smaller hook if the fabric still won't sit flat after adjusting.
- A visible bump or step shows at the start of each round.
- That's the slip-stitch join sitting slightly proud - keep the join stitch snug and consistent in tension, and it will settle into a thin seam line rather than a ridge.
Close-ups


Questions people ask
How do you know when to stop increasing the crown?
Stop once the flat circle reaches the width you want the top of the hat to be - the notes give 7 rows as a typical stopping point for a 22-inch circumference. Lay the disc flat and check it against the head measurement you're working to before moving on.
Why does the pattern call for two different hook sizes?
The 4.0mm hook keeps the crown rounds firm and structured, which is what holds the flat shape of the top. The optional 5.0mm hook loosens the stitches slightly for the edging, giving the brim a softer, more open finish than the body of the hat.
Can you keep increasing past round 5 or 6?
Yes - keep spacing the increases one stitch further apart each round (11 DC then an increase, then 12, and so on) for as long as you want the crown to keep growing. Wider brims just mean more rounds of this same spacing pattern.
Does the fabric stay flexible enough to fold the brim?
Double crochet in cotton holds a shape rather than draping loosely, so the brim will fold and hold a crease if you press it, but it won't flop the way a single crochet or lacy stitch fabric would. Blocking the edge while damp makes that fold more definite.
New patterns, as they are filed
One short email when a batch lands, with the feel of each.