
25 rounds · filed under dense · 21 of them
Baby Clothing · added 14 Oct 2026
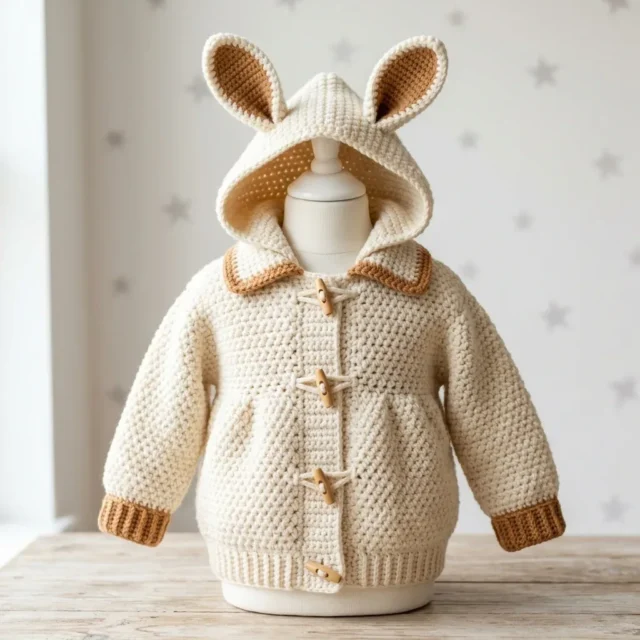
Moss stitch crochet bunny hoodie in cream and caramel
Moss stitch builds a dense, woven fabric for this cream and caramel bunny hoodie with standing ears and button loops.
- Skill
- Intermediate
- Time
- 4-6 hours
- Hook
- 6 mm
- Yarn
- Bulky
- Rounds
- 20
About this pattern
Under the hand, the body of this hoodie feels thick and slightly bumpy, almost like a basketweave rather than a plain single crochet surface. That texture comes from the moss stitch: each row's single crochets drop into the ch-1 spaces of the row before, offsetting the stitches so none stack directly on top of another. Worked in bulky weight yarn, the result is dense and squishy, closer to a knit than a typical crochet fabric, with enough body to hold its own shape without stiffening into a board.
The shape is a simple pullover hoodie built from a back panel, two fronts, two sleeves, and a hood, with contrast ribbing closing the cuffs, bottom band, and hood edge against drafts. Bunny ears sew onto the hood with a contrast lining that holds them upright rather than flopped over. Button loops and wooden toggles replace a zipper, so dress a squirming baby by slipping the hood over first, then closing the front band at whatever pace the moment allows.
The swatch in numbers
- Rounds
- 20
- Parts
- 13
- Level
- Intermediate
- Time
- 4-6 hours
- Hook
- 6 mm
- Yarn
- Bulky
The yarn and the hook
Yarn
- Yarn A (cream): Bulky weight, category 5, approximately 460 yards for size 12-18 months
- Yarn B (caramel/warm tan): Bulky weight, category 5, approximately 80 yards for size 12-18 months
- For other sizes, you’ll need: 380 (420) [460] {510} (560) yards of cream and 60 (70) [80] {90} (100) yards of caramel.
Recommended Yarn Options
- Lion Brand Pound of Love held doubled (this machine-washable acrylic is perfect for baby items)
- Paintbox Yarns Simply Super Chunky in ivory and caramel
- Cascade Yarns 128 Superwash for a luxurious merino option
Hooks
- US size J-10 / 6 mm for the body and sleeves
- US size I-9 / 5.5 mm for ribbed trim and edging
Notions
- Yarn needle
- 6 stitch markers
- Scissors
- 5 wooden toggle buttons approximately 1.25 inches long (for size 12-18 months)
- Sewing needle and thread
- Blocking mats and pins
Stitches, spelled out
ch chain: Yarn over, pull through the loop on your hook; sc single crochet: Insert hook into stitch, yarn over, pull up a loop (2 loops on hook), yarn over, pull through both loopsDense; sl st slip stitch: Insert hook, yarn over, pull through stitch and loop on hook in one motion; sk skip: Pass over the indicated stitch without working into it; ch-sp chain space: The gap created by a chain in the previous rowLace; sc2tog single crochet 2 together: A decrease that turns 2 stitches into 1. Insert hook in first stitch, pull up a loop, insert hook in next stitch, pull up a loop (3 loops on hook), yarn over, pull through all 3 loopsDense; BLO back loop only: Work into just the back loop of the stitchRidge; FLO front loop only: Work into just the front loop of the stitchRidge; RS right side: The public-facing side of your work; WS wrong side: The inside of your work; MC main color (cream); CC contrast color (caramel).
Tension and hand-feel
After the first few rows of the back panel, count across to confirm 25 sc, and check that the moss stitch lies flat without curling at the edges.
Main Pattern
Important: When counting stitches, count only the sc stitches. The ch-1 spaces are structural spacers and don’t add to your stitch count.
Main Pattern
Main Pattern
Sleeves (Make 2)
With larger hook and MC, chain 27 for size 12-18 months.
Main Pattern
Outer Ear (Make 2 in MC)
With larger hook and MC, chain 9.
Hood Face Edging
With smaller hook and CC, RS facing, join yarn at the lower right front edge of hood.
Front Band and Button Loops
With smaller hook and CC, RS facing, join at bottom right front edge.
Armhole Shaping
Decrease Row 1 (RS): Ch 1, sk first sc, sc in first ch-1 sp, continue in pattern to last 2 sc, sc2tog. Turn. (23 sc)
Decrease Row 2 (WS): Ch 1, sk first sc, sc in first ch-1 sp, continue in pattern to last 2 sc, sc2tog. Turn. (21 sc)
Work even in Moss Stitch Pattern without shaping until armhole measures 4.5 inches from start of armhole shaping, ending with a WS row.
Shoulder and Neck Divide
Next Row (RS): Work 6 sc in pattern (left shoulder). Fasten off.
Skip center 9 sc (these form the back neck).
Rejoin MC to remaining 6 sc. Work 1 row even. Fasten off (right shoulder).
Left Front Armhole Shaping
The armhole is at the left edge of your work (beginning of RS rows).
Decrease Row 1 (RS): Ch 1, sk first sc, sc in first ch-1 sp, continue in pattern to end. Turn. (11 sc)
Decrease Row 2 (WS): Work in pattern to last 2 sc, sc2tog. Turn. (10 sc)
Work even until armhole measures 2.5 inches, ending with a RS row.
Left Front Neck Shaping
Decrease Row 1 (WS): Ch 1, sk first sc, sc in first ch-1 sp, continue in pattern to end. Turn. (9 sc)
Decrease Row 2 (RS): Work in pattern to last 2 sc, sc2tog. Turn. (8 sc)
Decrease Row 3 (WS): Ch 1, sk first sc, sc in first ch-1 sp, continue in pattern to end. Turn. (7 sc)
Work even until armhole measures same as back armhole depth. You should have 6 sc remaining for shoulder. Fasten off.
Hood Seam
Fold the rectangle in half with RS together so the two short ends meet. The fold line becomes the top center of the head. Slip stitch through both layers across all sc stitches to join the top seam. Fasten off.
How the texture is built
- Sleeve increases land only at the very first and very last stitches of each 4th row, which keeps the moss stitch's offset sc/ch-1 columns intact while the piece widens from its chain-7 base up to 21 sc.
- The ribbed trim at the cuffs, bottom band, and hood edge is worked as its own flat strip with the smaller I-9/5.5mm hook, picked up along the foundation chain edge of the main pieces, so the pull-on stretch sits in a separate tighter fabric rather than stressing the looser moss stitch body.
- Back, fronts, and sleeves each start from their own foundation chain and alternate Row 2 and Row 3 of the moss pattern rather than working in the round, which is what lets the offset sc columns reverse correctly on both the RS and WS without a seam disrupting the pattern.
Putting the pieces together
If you swap the yarn
| Superwash merino wool, bulky weight | Adds softer drape and more warmth against the skin; the moss stitch opens slightly looser, so swatch with the J-10/6mm hook to confirm the sleeve still reaches 21 sc at the expected width. |
|---|---|
| Acrylic-wool blend, bulky weight held doubled | Keeps the same squashy density as the original yarn but is easier to machine wash and dry; the ribbed trim may need to stay strictly on the I-9/5.5mm hook if the blend runs thinner than the main hook's gauge. |
| Cotton-acrylic blend, worsted weight held doubled | Drapes heavier and less springy than acrylic, so the piece sits with less loft; the ear lining needs a firmer contrast layer to keep the ears standing, and the hook may need to move up from I-9 to J-10 throughout to avoid tightening the moss stitch. |
Colorways
- Classic Cream and Caramel Cream (Yarn A) works the back, fronts, sleeves, and outer ears as the main moss stitch body; caramel (Yarn B) works the ribbed trim at the cuffs, bottom band, and hood edge, plus the inner ear lining and the front band button loops.
Washing and blocking
Machine wash cold on a gentle cycle if using the acrylic or superwash merino yarns named in the materials list; the moss stitch holds its texture without felting.
Lay flat to dry rather than tumble, especially around the hood and ear edges where the contrast lining gives shape, since tumble heat can relax the toggle closures.
Smooth the ribbed cuffs and bottom band back into shape while still damp, then fold the hoodie flat for storage rather than hanging it, so the bulky moss stitch body doesn't stretch out on a hanger.
When it does not look right
- The ribbed cuff stays loose instead of pulling in snug.
- This happens when the BLO/FLO rib rows get worked with the larger J-10 hook instead of the specified I-9/5.5mm; rework the rib rows with the smaller hook to bring the stretch back.
- The sleeve stalls below 21 sc even though rows keep getting added.
- The increase row only adds 2 sc every 4th row, with 3 even rows between; recount from the last increase row to make sure the 4-row cycle hasn't been interrupted or doubled up.
- The moss stitch looks bumpy with single crochets stacking instead of offsetting.
- This comes from skipping into the ch-1 space instead of working into it on the alternating row; recheck Row 2 and Row 3 so sc lands in the ch-1 sp on one row and skips the sc beneath it on the next.
Questions people ask
Why does the sleeve use a different stitch cycle than the back panel?
The sleeve needs to widen, so it repeats the moss stitch while adding paired increases every 4th row until it reaches 21 sc, whereas the back is worked even until it measures 7.5 inches. This keeps the widening sleeve from distorting the offset single crochet pattern.
Can the ears be made to stand up without the contrast lining?
The outer ear alone is floppier without support. The contrast inner lining is what gives the ear enough body to stay upright, so leaving it out results in ears that lean over instead of standing.
What's the difference between the two hook sizes used?
The J-10/6mm hook works the main moss stitch body and sleeves at a looser, squishier gauge, while the I-9/5.5mm hook works the ribbed trim at the cuffs, bottom band, and hood edge tighter. That size difference is what makes the trim grip and stretch instead of flopping like the body.
How long should each sleeve measure before fastening off?
Each sleeve is worked until it measures 8.5 inches from the foundation chain, after finishing the increase cycle up to 21 sc. Measure straight down the center of the piece rather than along the ribbed trim, since rib compresses when relaxed.
New patterns, as they are filed
One short email when a batch lands, with the feel of each.