
6 rounds · filed under ridge · 2 of them
Sweaters · added 22 Oct 2026
A textured crochet pullover for men with a button placket
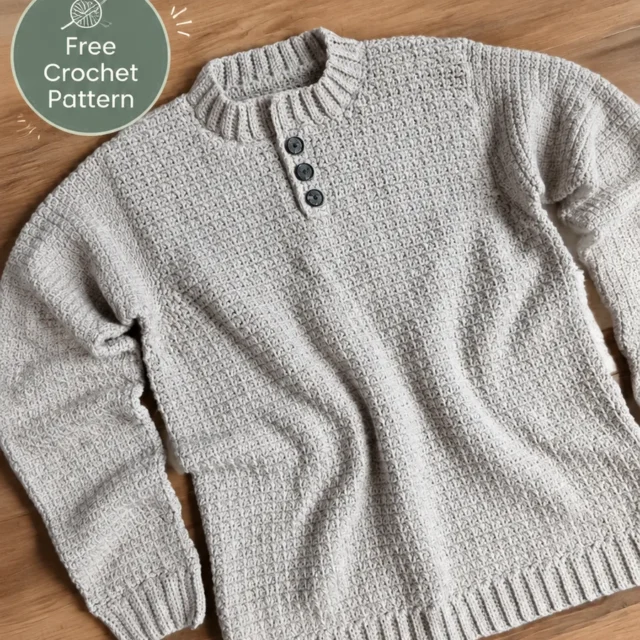
Back loop single crochet ridges this cozy men's pullover sweater, worked flat in panels with long sleeves and a button placket.
- Skill
- Easy to Intermediate
- Time
- 10-15 hours
- Hook
- 5 mm
- Yarn
- Worsted (Category 4)
- Rounds
- 4
About this pattern
Back loop single crochet (sc blo) is the stitch doing all the work here: each row leaves the front loop sitting on top as a raised horizontal bar, so the fabric reads as a line of fine ridges running across the Back Panel and Sleeves. Working through one loop instead of two also loosens the stitch slightly, giving this single crochet fabric more horizontal give than a standard sc swatch, while still holding its shape under the weight of 1,800 yards of worsted yarn.
The sweater comes together as separate pieces — Back Panel, Front Panel, Sleeves, and a Neckline and Button Placket — seamed into a pullover with a slightly relaxed fit and long sleeves. Working piece by piece means each panel can be blocked flat before joining, which keeps the ridged sc blo fabric from twisting at the seams. Once assembled, the quarter button placket gives easy on-off at the neck, and the finished sweater layers well over a t-shirt or under a jacket for cooler weather.
The swatch in numbers
- Rounds
- 4
- Parts
- 5
- Level
- Easy to Intermediate
- Time
- 10-15 hours
- Hook
- 5 mm
- Yarn
- Worsted (Category 4)
The yarn and the hook
- Worsted weight yarn, approximately 1,800 yards (1,646 meters)
- 5 mm US H-8 crochet hook
- Three medium buttons
- Yarn needle
- Stitch markers
- Scissors
- Tape measure
Stitches, spelled out
ch chain; sc single crochetDense; sl st slip stitch; st stitch; rep repeat; blo back loop onlyRidge; sc2tog single crochet two stitches togetherDense.
Tension and hand-feel
Because sc blo has more horizontal stretch than regular single crochet, measure the fabric lying flat and only lightly pressed, the same way it will sit once worn, rather than pulled taut.
Back Panel
Ch 86.
Sleeves
Ch 42.
Special Stitch
Textured Single Crochet: Work single crochet stitches through the back loop only. This creates horizontal texture and a flexible fabric.
Front Panel
Ch 86.
Rows 1 through 42: Work the same as back panel. (85 sts) Next row: Work across first 35 sts, ch 1, turn.
Work 10 rows across these 35 sts to create left neckline area.
Fasten off.
Join yarn to opposite side and repeat for right neckline section.
Leave center opening approximately 15 sts wide.
Neckline and Button Placket
Join yarn at neckline edge.
Work single crochet evenly around neckline.
Work three rows of single crochet.
Create three button loops by chaining 3 and skipping 3 stitches evenly across the opening.
Sew three buttons opposite the loops.
Weave in all loose ends.
How the texture is built
- Increases on the Sleeves fall symmetrically, one stitch added at each end every 8th row for six repeats, carrying the piece from 41 to 53 stitches without shifting the center line, so the underarm seam stays straight once the sleeve is set in.
- Both the Back Panel and Sleeves are worked flat in turned rows rather than in the round, which matches the separate-piece construction: each flat panel can be laid out and measured on its own before it is seamed to its neighbors.
- Working sc blo leaves the front loop open along every row of the Back Panel and Sleeves, and that open loop is what gets whipstitched or sc-seamed when panels join, so the ridge pattern runs unbroken right up to the seam line.
Putting the pieces together
If you swap the yarn
| Wool blend, worsted weight | Adds warmth and a softer drape to the sc blo ridges, keeps the same 5 mm US H-8 hook, but swatch first since wool blends relax and lengthen slightly after blocking, which can push the Back Panel past the 27 inch target. |
|---|---|
| Cotton blend, worsted weight | Produces a firmer, heavier fabric with less horizontal stretch across the sc blo rows, so sizing up to a 5.5 mm hook helps keep ease comfortable across the chest and shoulders. |
| Acrylic blend, DK weight | A lighter fabric with more drape and less bulk per stitch, worked on a smaller hook than the 5 mm H-8 called for, which means more rows are needed to reach the same 19 inch sleeve and 27 inch body lengths. |
Colorways
- Tonal Oatmeal Oatmeal yarn carries the Back Panel, Front Panel, and Sleeves in one unbroken color so the sc blo ridges stay the visual focus, while navy is reserved for the Neckline and Button Placket and the three buttons.
- Heather Contrast A soft gray covers the Back Panel and Front Panel, the Sleeves repeat the same gray for continuity, and cream is worked into the Neckline and Button Placket so the ribbed trim and buttons stand apart from the body.
Washing and blocking
Wash the finished pullover by hand or on a gentle cycle, following the washing instructions on the yarn label, since blended yarns respond differently to heat and agitation.
Dry the sweater flat rather than hanging it, easing it back into its blocked chest and sleeve measurements while damp so the sc blo ridges settle rather than droop.
Store the sweater folded on a shelf instead of on a hanger; worsted-weight fabric built from 1,800 yards of yarn is heavy enough that hanging will pull the shoulders and placket out of shape over time.
When it does not look right
- the Sleeves taper unevenly from cuff to shoulder
- One of the six paired increases likely landed off-row on one side; mark the increase rows with a stitch marker on both edges so each 8th-row increase lands at the same row on both sides.
- the Back Panel curls along the long edges
- This is typical of sc blo fabric where the front loop stays open along every row; block the panel flat and pin it out, misting lightly rather than soaking, before seaming.
- the Front and Back Panels end up different lengths
- Each panel is worked to a 27 inch measurement judged by eye rather than by a fixed row count, which is easy to misjudge; measure both panels flat on a hard surface side by side before joining them.
Questions people ask
How much yarn do I actually need for this sweater?
The pattern calls for about 1,800 yards (1,646 meters) of worsted weight yarn for the size medium shown. Keep some extra on hand if the Sleeves or Back Panel are worked past the 19 inch and 27 inch marks given.
Can this pattern be sized up or down from medium?
Yes, the piece is written for a medium chest, so measure the wearer's chest circumference and adjust the starting chain and stitch counts for the Back Panel, Front Panel, and Sleeves proportionally. Keep the sc blo gauge consistent across all pieces so the panels still match up at the seams.
Why is back loop single crochet used instead of regular single crochet?
Working through only the back loop creates the horizontal ridge texture and a more flexible, stretchy fabric than standard sc. That extra give matters for a pullover that needs to move with the wearer's shoulders and arms.
Do the buttonholes need to be worked in separately?
The materials list calls for three medium buttons for the quarter placket, so buttonholes do need to be worked or whip-stitched into the Neckline and Button Placket piece as it comes together. Check the opening size against the actual buttons before sewing the placket to the neckline.
New patterns, as they are filed
One short email when a batch lands, with the feel of each.